- REVIEWS
Displays Electronics 
Speakers Sources Other Gear Software - HOW TO
How To Buy How To Use Tech 101
Garage Home Theater: Part I

You've heard of do-it-yourselfers. In fact, you've probably seen them featured on the pages of Audio Video Interiors. But Richard Charschan has something on them—he's a pro. The president of AcousticSmart—a family-owned company that specializes in the design and fabrication of acoustically treated custom home theater interiors and home theater seating—Charschan has gone without a dedicated space of his own for quite some time now. "It's like the shoemaker who has holes in his own shoes," he says. "I wanted something that would serve as a corporate showroom, as well as be a great addition for me and my family." This multi-part column will take you, the reader, from beginning to end pictorially, helping you understand visually how a pro installs his own home theater.
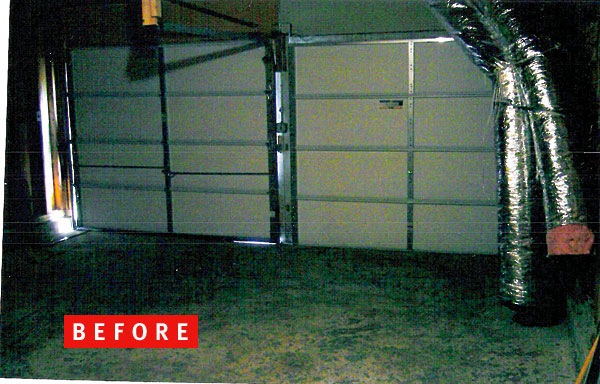
According to Charschan, a quality theater needs complete sound isolation. His house has only two levels and no basement. He immediately ruled out the main floor, which has no suitable spaces. The construction team found the answer where Charschan parks his car: the two-car garage. "It sounds simple enough," says Charschan. "I measure the garage and give the dimension to my designer. We then create a design rendering [as pictured in the images below] and then the fun starts!"
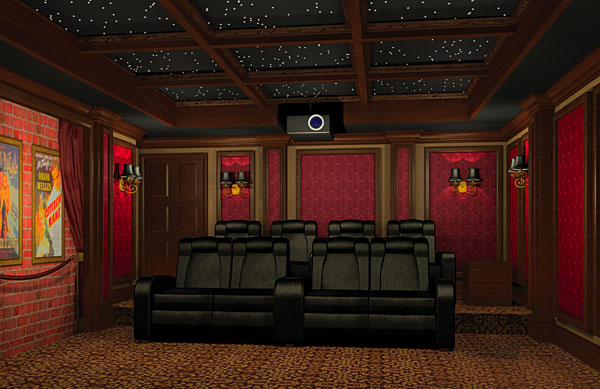
Even though home theaters are his business, Charschan faces the same challenges as his clients. As they progress, new twists and turns start to surface that require immediate attention. What follows is a photo diary of those challenges and documentation of the progress, covering the complete frame-out of the room. Use this column as a guide to help you plan a theater of your own.

Challenges & Solutions
Challenge 1: Since we never put our cars in the garage, we used it for storage. Without a basement, we were very short on storage space. If we were to clean out the garage, where would we put all of our stuff?
Solution: Build a standalone storage shed and place it next to the house. As you can see, it blends right in with the style of the home.

Challenge 2: Our garage had two steel columns that support the second floor. Nobody wants an obstructed view. The columns had to go.
Solution: Reinforce the second floor with steel beams.

Challenge 3: The floor was cracked and uneven.
Solution: Two members of the AcousticSmart team poured a new concrete floor.

Challenge 4: We needed additional power for all of the new equipment and lighting—20 amps for the rack and 15 amps for the lighting. The main circuit box was located in the middle of the wall where the screen should be.
Solution: Move the main electric box to the left-hand corner of the wall.

Challenge 5: We had to reroute the plumbing to a location where we could access it. Before, the waste and drain pipes ran through the wall directly behind the back row of seating.
Solution: Move the pipes to the corner of the room and build a trap door for easy access.

Challenge 6: Since the new theater was once a garage, there was no HVAC system.
Solution: Atlantic Mechanical installed an HVAC system in the theater area. They also added additional cooling power to the central air and established a new zone.

Challenge 7: Deliver sound, light, and power to the theater.
Solution: Prewire the entire room based on the design specs. Pull wires through the new walls and ceilings.

Challenge 8: The theater must be isolated from the rest of the house. We needed to keep outside noise out and prevent the theater sounds from leaking out.
Solutions: When framing the room, use floating studs to cut down on vibration (see photo A). Install sound-barrier material and insulation behind, as well as between the floating studs (photo B). Build up additional noise barrier on top of the floating studs, consisting of layers of sound-barrier mate- rial, sheetrock, and plywood. During the wall-finishing stage, add acoustic panels (photos C & D). Install damping strips at 24-inch intervals between the layers of sheetrock to reduce vibration (photo E).

Photo A
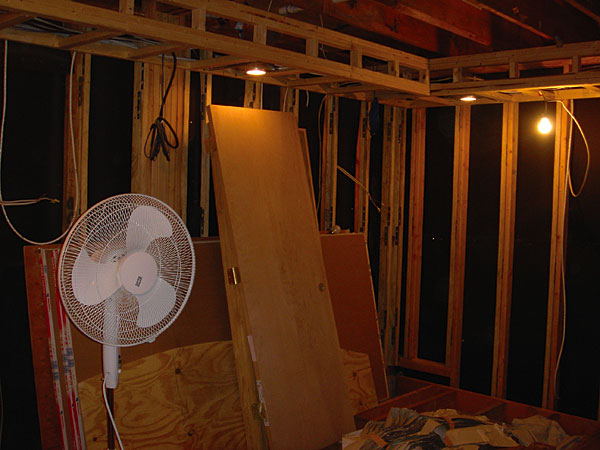
Photo B

Photo C

Photo D

Photo E
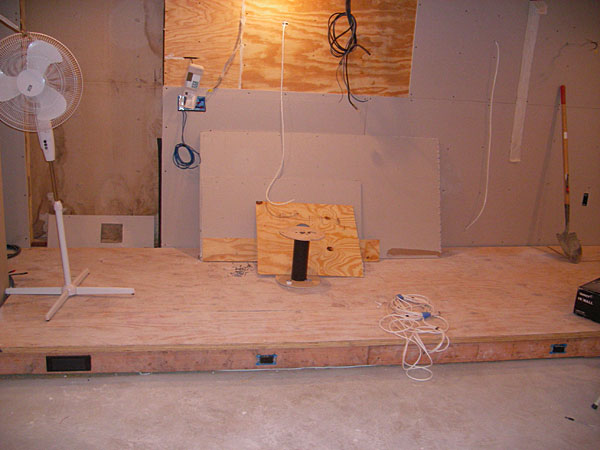
Challenge 9: How far should the seating be from the screen? And, based on distance, how wide should the screen be? Select a platform design.
Solution: Select a screen width of 117 inches and mark it off on the wall. (Note the power box's new position.)

Challenge 10: How many seats do we want? Do we want the back row to recline? How high should the back row be? Determine sight lines.
Solution: In order to gain more distance from the screen and thus allow for a larger width, the back row will not recline. Instead, construct a riser for the back row.
Challenge 11: The laundry-room entrance was fine when the garage was a garage, but we can no longer use it for our theater.
Solution: Seal off the laundry-room doorway and create a new entrance off the main foyer.

Challenge 12: Being a musician, it sure would be nice to build in a recording studio as part of this theater.
Solution: Revise the plans and block off space for a recording studio along the theater's side wall.


| Displays Electronics Speakers | Sources Other Gear Software | Top Picks of the Year Top Picks | Custom Install How To Buy How To Use |
Tech 101
|
Latest News Features Blogs | Resources Subscriptions |
WHERE TECHNOLOGY BECOMES ENTERTAINMENT
 © 2026 Sound&Vision
AVTech Media Americas Inc., USA
All rights reserved

