- REVIEWS
Displays Electronics 
Speakers Sources Other Gear Software - HOW TO
How To Buy How To Use Tech 101
DIY Reader Home Theater: A Penny Saved

When we moved into our first home a few years ago, I couldn't wait to get started finishing the basement. I told my wife I would wait a while before starting, but I was so excited that I could only hold out for a few weeks. The space is approximately 1,800 square feet, so I had plenty of room to let my imagination run. There were several things we wanted to put down there, like a workout room and a billiard room, but the one thing that really excited me was a dedicated home theater. I have been an avid reader of Audio Video Interiors for the past several years, so I had plenty of ideas about the experience I wanted to create.
Theater Design and Construction
When I set out to design the perfect home theater experience, I had a few primary goals in mind. The main overarching goal was to create a professional feel without spending a lot of money. This really adds to the challenge, because there are so many options that can add up quickly. I've read a lot of articles where people have spent $30,000 to $40,000 or more on just a basic theater setup, which was more than I wanted to spend. By doing all of the work myself and developing some creative solutions, I knew I could create a comparable setup for a fraction of this cost. Besides, having never done anything close to this, I knew that some of my planning and decision making would come gradually—and no contractor was going to wait around several weeks every time I wanted to mull over different design options. I had two primary concerns with the basic layout. First, when the theater wasn't closed off for serious movie watching, I wanted it to open up as much as possible to the adjacent billiard room and family game room. Second, I wanted the home theater to provide a central connection point for a wholehouse distributed A/V system, which I planned to design and install at the same time.
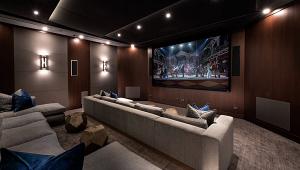
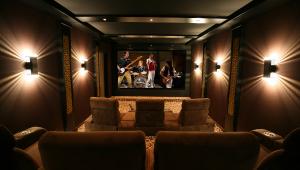
More than half of our basement is underground, creating a prominent corner without windows. This was the perfect place for the home theater. I decided to create an extra wide set of pocket doors, approximately 88 inches wide, along the back wall of the theater so it could open up to the family game room. I joined together two French doors to make each side of the pocket doors. To prevent light from coming through these doors during the day, I installed a custom set of curtains on an adjacent set of pocket-door tracks. We can open and close these independently of the doors to allow for maximum flexibility. This large opening in the back of the theater has definitely helped the theater transition from a cozy, dark hideaway to a free-flowing place where people can gather during social occasions. And the wow factor I get from friends and family when I close it all up for a movie has made it well worth the effort.
In order to tie the home theater equipment in with the wholehouse system and have easy access to all of the wiring, I built the front of the theater out from the front wall by about 4 feet, concealing an electronics room behind the screen. This front facade contains the cabinets, the screen, the speakers, and all of my theater equipment. Unless you look carefully, it appears that it is all flush against the wall. The equipment rack is on the far left side. On the right side is a hidden door leading back to a 2-foot-wide electronics room that runs behind the entire width of the theater. This is also a really useful place to store all of our DVD and CD cases. At the end of the hall, behind the equipment rack, are the panels where all of the Cat-5e cables, 16/4 speaker wire, and RG-6 wires run to the rest of the house. This provides an ideal situation to configure and connect the theater components, the wholehouse A/V system, and the computer network.

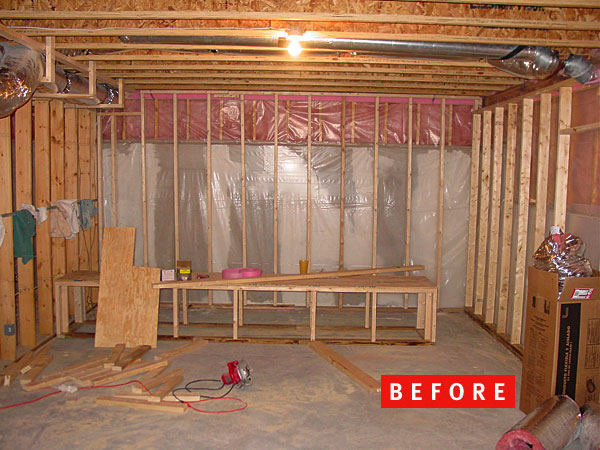
When it came time to select materials to cover all of the surfaces, soundproofing was a big concern. I like to listen to movies and music loudly, and not everyone in the house wanted to share in my theater experience (according to my wife). I researched countless technologies and techniques and came up with several that met my budget and style preferences. I put R-19 insulation in the ceiling and then covered this with lightweight particleboard. Then I installed two layers of drywall for added sound protection. The rest of the walls all contain some combination of insulation, sheeting to keep out moisture along the foundation, particleboard, and cushioning in the places where the walls meet the concrete floor and/or ceiling. Along with extra thick carpet padding and fabric wall treatments, this has done a pretty good job of containing the sound. I could have had a professional team come out and create a completely isolated room within a room, but I was pretty sure the minor improvement in sound absorption wasn't worth the several-thousand dollars it would have cost.
With all of the soundproofing and subsequent fabric and wood treatments, the walls turned out very nicely. To give the room a custom-theater feel and to control the sound, I wanted to add some form of wall treatment. Many of the ready-made products available are limited in color and style and can get quite expensive. While it would have fit into my budget, I decided to design a system myself to achieve a more elegant look for a very reasonable price. I decided on stained-wood, bead-board wainscoting and fabric-covered panels to help with sound absorption and to give the walls a more elegant look. All of the wainscoting and trim pieces are standard items at your local home-improvement store, and some stain and polyurethane provide a nice custom feel. I realized that standard ceiling tiles have a very similar composition and density to dedicated wall panels and are about as inexpensive as you can get. After I attached them to the walls above the wainscoting with a little construction adhesive, I covered them with fabric and framed out the panels with more stained trim work. I must admit that my wife and I made several trips to local fabric stores before we found a pattern that suited us—but, in the end, it was definitely worth it. We decided on an elegant gold paisley pattern that looks absolutely stunning with all of the dark cherry-stained wood. For less than $1,000, the walls look at least as good as many of the custom theaters I've seen in magazines.
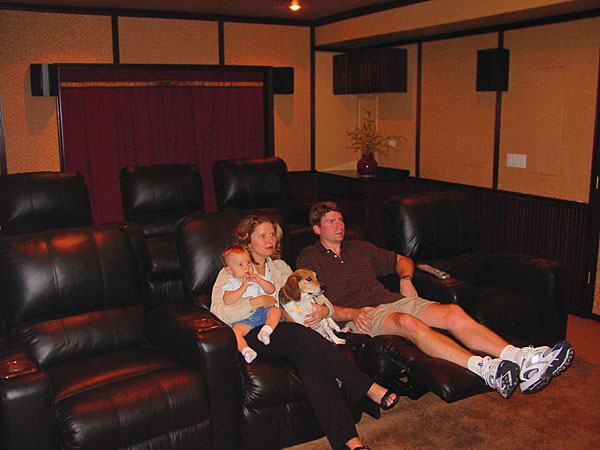
The final dimensions of our home theater are 15 feet wide by 20 feet long. The projector is located in the center of the ceiling, approximately 12 feet from the screen. The front row has four seats, and the back row has three seats on an 8-inch riser.
Home Theater Equipment Choices
In terms of equipment, the projector was definitely the most research-intensive piece I had to buy. A combination of price, knowing very little about projectors, and the quickly changing technology made for a lot of Internet research. I looked at dozens of projectors on the Internet and finally decided on the Panasonic PT-AE700U. Based on all of the reviews I found, this was the best projector available within my price range. And, based on its performance over the past year, I couldn't be happier with my choice.
The sound system is a pretty standard 7.1 system, with two Polk BP200i tower speakers for the front channels, hidden just to the sides of the screen behind speaker fabric. The center channel is located below the screen, and the subwoofer is below that. I had a hard time deciding on where to place the side surround speakers. One of the perks of doing all of the work myself was the luxury of taking as much time as I wanted to integrate the speakers into the wall treatments. After a fair amount of testing, I decided to put the side surround speakers just behind the first row of seating. This placement isn't ideal for back-row viewers, because the speakers are slightly in front of them, but I determined that any negative impact would be minor.
All of the components are in a Middle Atlantic rack located to the far left of the screen. The CD player, the DVD player, and the DirecTV receivers are all hooked into the rest of the house. The ChannelPlus MDS-6A distributes audio to the rest of the house from a tuner, the CD player, and the DVD player located in the rack. These also act as the main players for the theater. The DirecTV receivers are hooked into a channel modulator and distribution amplifier, so any TV in the house can use any of these sources. To efficiently run all of the components in the theater and the rest of the house, I use multiple One For All URC 9910 IR/RF remotes, which work anywhere in the house.
Most of the custom home theaters I've read about utilize a complex control system with some kind of LCD keypad (AMX, Crestron). One of these would have been nice, but they are extremely expensive and require a call to the installer every time you want to make a change. And, to be honest, the usability isn't where I wanted it to be. I prefer to hold the remote and operate it with one hand without having to scroll through screens. I also wanted to be able to program the remote; there's nothing more frustrating than spending a lot of time programming a remote only to lose all of the codes because, for instance, the batteries run out. After a lot of research, I stumbled on a way to program off-the-shelf remotes using a language called JP-1. This let me customize all of the codes on my PC and then save them over to my remote. The URC 9910 remote uses both IR and RF signals, so I don't have to point the remote at the equipment. Another benefit of using this remote with the wholehouse system is that I have several of them in different rooms of the house. For example, I can watch a movie anywhere in the house and use the RF signal to control the DVD player in the basement. At $35 each for the remotes, my wallet is definitely better off.
Overall, we couldn't be happier with the way the theater came out. It has exceeded all of our expectations. We almost never go to the movies now. Instead, we look through our at-home movie list, close all the doors, and settle in for a few hours of movie bliss.
Equipment List:
Framing, Drywall, and Insulation $2,000
Electrical and Lighting $1,000
Trim, Cabinets, Acoustic Walls, Carpet $4,500
Theater Chairs (7) $5,500
Middle Atlantic Rack and Shelves $500
Panasonic PT-AE700U Projector $2,200
96-Inch Screen $200
Monster Power HTS 3500 MKII $250
ChannelPlus MDS-6A Music Distribution $700
Yamaha RX-570 (Additional Tuner) $200
Yamaha RX-1500 Receiver $600
Sony DVP-CX985V DVD Player $400
Sony CDP-CX300 CD Player $300
JVC VCR/DVD Combo $80
RCA DirecTV DVR $100
RCA DirecTV Receiver Free
One For All URC 9910 Remote Control $35
ChannelPlus DA-550BID Cable Distribution $100
ChannelPlus 5645 Stereo Cable Modulator $400
Steren 3-by-4 Multiswitch $15
Polk Audio S4 Side Surround Speaker $200
Polk Audio CSi40 Center-Channel Speaker $200
Polk Audio FXi30 Rear Surround Speaker $200
Polk Audio BP200i Loudspeaker $1,000
Polk Audio PSW12 Subwoofer $220
HP 3000 Computer $600
Total: $21,500


| Displays Electronics Speakers | Sources Other Gear Software | Top Picks of the Year Top Picks | Custom Install How To Buy How To Use |
Tech 101
|
Latest News Features Blogs | Resources Subscriptions |
WHERE TECHNOLOGY BECOMES ENTERTAINMENT
 © 2026 Sound&Vision
AVTech Media Americas Inc., USA
All rights reserved

