- REVIEWS
Displays Electronics 
Speakers Sources Other Gear Software - HOW TO
How To Buy How To Use Tech 101
Integra DTR-9.9 A/V Receiver Setup & Tests
If you're familiar with A/V receiver setup from past experience (or perhaps even if you're not), the onscreen menus are easy to follow. You can do a conventional manual setup in less than half an hour with minimum (or no) reference to the manual.
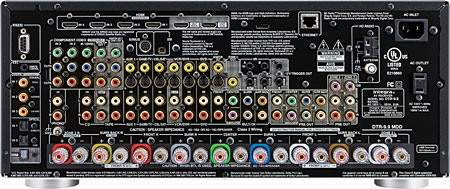
The menus will get your HDMI and component inputs properly configured, the speaker layout dialed in and calibrated, and the listening-mode defaults set up. There's even an impedance setting for your speakers in the menu (6/4 ohm); most receivers that provide this do so with a hard switch on the back panel. Unless you know that your speakers are specified at 4 ohms, or the receiver runs unusually warm, you should be able to safely leave this setting at its factory-default 6-ohm setting. That's the setting I used for the listening tests and measurements.
As mentioned in the Audyssey discussion in the "Features" section, an automated setup is just as simple as a manual one, though perhaps a bit less intuitive. Keep the manual handy, and keep in mind that it doesn't get to the step-by-step automated setup description until page 61! The onscreen Audyssey setup menu is also fairly straightforward in guiding you through the steps, though it does not appear until you plug in the microphone. After the auto setup, you can switch off the Audyssey equalization without disturbing the other parts of the Audyssey-derived calibration—channel levels, distances, and crossover frequencies.
While the Audyssey system selects what it thinks is the best crossover points for each speaker, you might not agree, and you can change it, but only after the calibration has been completed. In particular, you might not always want to treat the front speakers as large or full range, though Audyssey almost always seems determined to do this if the speakers have any semblance of bass. I'd like to see Audyssey provide a mode in which you first could choose the crossover frequencies yourself. The system would then perform its DSP adjustments around those selections, rather than the reverse.
My video tests showed the Integra's HQV Reon VX video processor to be a superb performer for the most part, which was really no surprise based on my prior experience with that technology. All of the digital processing tests were done with a 1080i HDMI input to the Integra and a 1080p HDMI output to the display. The analog tests were done with a component input and a 1080p HDMI output. The component input for the analog tests was 480i for 3:2 SD, 2:2 SD, Motion Adaptive, and Scaling. It was 1080i for 3:2 HD, 2:2 HD, Video Clipping (actually, a lack of video clipping; a passing grade indicates that the processor could pass both above white and below black), Luma Resolution, and Chroma Resolution. The results are shown in the table below.
![]()
One test I conducted that does not show up in the table was to connect the best 480i-native composite source I had on hand (a Pioneer Elite CLD-99 laserdisc player) to the receiver and upconvert it to a 1080p HDMI output. The receiver's individual input video controls let me closely match the direct player-to-projector composite feed to the route through the Integra—at least with respect to standard video parameters like brightness, contrast, and color. But both looked quite poor overall (clearly the fault of the source), and it was a toss-up which one was more tolerable. Don't assume that cross-conversion of an older composite or S-video source to HDMI will necessarily improve it.
To check out the Integra's video calibration controls, I worked with a JVC DLA-RS1 projector that was in a relatively mediocre state of calibration. With 500 hours on the JVC's lamp, the Before result shown below indicates the result I obtained with the projector's controls alone.
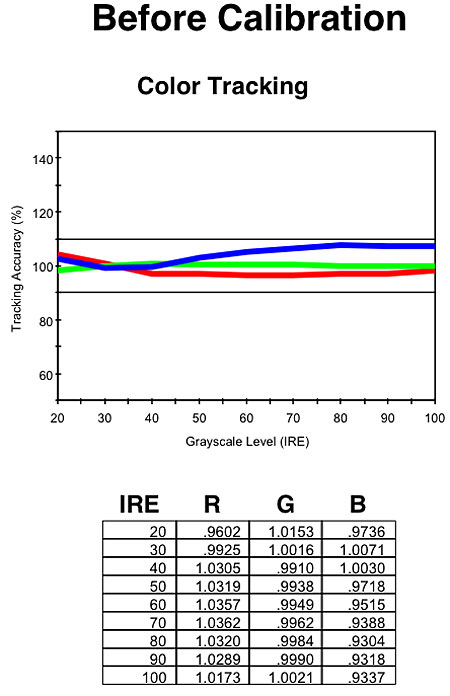
My first attempt wasn't entirely satisfactory, but the second try, shown in the After chart below, produced significant improvements, including a much closer match across the brightness range to the standard D65 white point as indicated by the closer overlap of the red, green, and blue curves.

The After results include the combined effect of the projector calibration alone and additional tweaks made with the Integra's adjustments. I recommend this approach with any external video processing—get the result as close as possible using the display's controls, then fine tune it with the outboard processor.
In the end, the color was much improved, though the JVC's oversaturated color gamut remained. And the JVC's gamma was still too low (mid tones too bright). This could not be corrected by the Integra's Gamma control, which had no visible or measured effect at any setting. At deadline, Integra told us that a firmware update has fixed the Gamma adjustment.


| Displays Electronics Speakers | Sources Other Gear Software | Top Picks of the Year Top Picks | Custom Install How To Buy How To Use |
Tech 101
|
Latest News Features Blogs | Resources Subscriptions |
WHERE TECHNOLOGY BECOMES ENTERTAINMENT
 © 2026 Sound&Vision
AVTech Media Americas Inc., USA
All rights reserved

