- REVIEWS
Displays Electronics 
Speakers Sources Other Gear Software - HOW TO
How To Buy How To Use Tech 101
Installing In-Wall/Ceiling Speakers: Part 1

Whether you’re looking to add (or expand) music around your home, or add some Atmos overhead speakers, understanding wiring and installing new speakers is a great skill for any AV enthusiast to have.
Planning is a massive part of a retrofit, so in this blog we’ll focus on making sure you can actually install speakers where you want. You’ll need your cordless drill, some drill bits, a tape measure, Creep-Zit flexible rods, and a flashlight. Ready? Let’s get to work!
Step 1: Determine Your Route
When we talk about adding new wiring into the home, the first step is determining the possibility of getting wire from point A to point B. Point A is the “home run,” and that will be your home theater receiver if you’re adding additional surround/Atmos speakers, or an amplifier for house-wide speakers. Point B is the speakers themselves.
Installing in-ceiling speakers nearly always requires access above the ceiling, which means having an attic. Retrofitting in-ceiling speakers on the lower floor of a multi-story home is very difficult, if not impossible. And while retrofitting wiring in the ceiling without an attic is possible, it typically requires cutting access holes in the walls and ceiling, requiring repair and painting, something beyond the scope of this piece. In-wall speakers can be accessed from above or below, and sometimes wiring down through a crawlspace, basement, or under carpeting is easier than going from the ceiling down the wall.
Pro Tip: If the new speakers will be for a house-wide audio system and you’re using a wireless audio system like Sonos, Play-Fi, or Bluesound, consider relocating the amplifier to a location that’s easier to run wire to. For example, a closet or pantry can make the perfect location to tuck away a wireless amp module or two and often offers easier access to the ceiling/attic.
Step 2: Check Your Route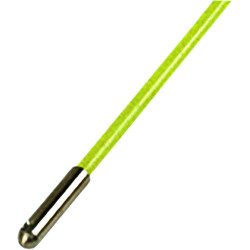 Option A: Going Up – This is where the Labor Saving Devices’ Creep-Zit rods (shown at right) are worth their weight in gold. Pull off a wall plate near the home run and slide the rod inside and up the wall just beside the wall box. If the rod extends up the wall all the way to the ceiling, you’re golden!
However, if you hit an obstruction — likely a purlin (see opening illustration) — you’ll have a tougher time getting up to the attic. Purlins are more likely to be used on exterior walls or walls taller than 10 feet, though local building codes and the builder can dictate construction technique. If you find an obstruction in one stud bay, try again at a different spot; you just might get lucky. If not, don’t panic. You’ll want to check from the top down to ensure that’s the only obstruction before you continue.
First, measure how much of the rod goes inside the wall. Next, take a measurement from a reference point you’ll be able to locate while up in the attic; something like a light can or HVAC register. Measure how far it is left or right on the wall from where you want to run the wire. Now head up into the attic with your tape measure, flashlight, cordless drill fitted with a bit large enough for speaker wire, and the Creep-Zit rod.
Locate your reference point and measure over accordingly on the top plate. You’ll likely see wiring running down through holes already drilled, which go to the wall plate you were working with down below. This is a good sign you’re in the right place! Go over a few inches and drill down through the center of the top plate. Slide the rod through the hole and see how far it goes; if it goes down the distance to the obstruction you hit from below, that’s good. If you hit an obstruction higher up, running wire in this wall will still be possible but will require a fair bit of repair.
Option B: Going Down – Using a 3/16-inch bell hanger bit, drill a hole at a slight angle through the baseboard down into your crawlspace/basement. Don’t worry; you can conceal this small hole later with a dab of caulk. Now go back into the crawlspace or basement and locate the drill bit. If you have clear access to the bottom plate for drilling up — meaning no joists or mechanicals like HVAC are in the way — you’ve found a perfect place for your home run. Repeat the process to make sure you can wire up the wall where your new speakers are going.
Next time we’ll tackle running the speaker wire and installing the speakers!


| Displays Electronics Speakers | Sources Other Gear Software | Top Picks of the Year Top Picks | Custom Install How To Buy How To Use |
Tech 101
|
Latest News Features Blogs | Resources Subscriptions |
WHERE TECHNOLOGY BECOMES ENTERTAINMENT
 © 2026 Sound&Vision
AVTech Media Americas Inc., USA
All rights reserved

