- REVIEWS
Displays Electronics 
Speakers Sources Other Gear Software - HOW TO
How To Buy How To Use Tech 101
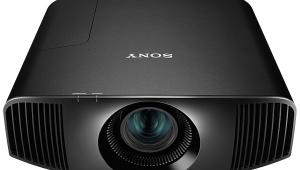
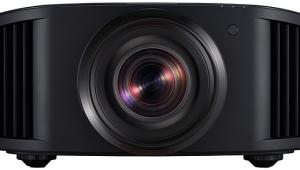
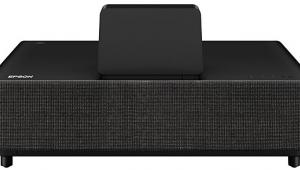
Sony VPL-VW50 "Pearl" Projector SXRD Projector

Well, the VPL-VW50 goes even farther. It's a sleek, gorgeous looking projector that retails for $5K. You read that right. Sony' SXRD front pro line started at $30K, dropped to $10K in the second generation Ruby (which remains available) and is now just $5K. Not only is that cheap for 1080p front projection in general, it's outrageous for a projector as slick and robustly featured as this one. It's so outrageous, in fact, that I feel like I should be wearing a suit covered with question marks and shouting these specs at you!
The obvious question is, just how much of a chip off of the blocks of the Qualia 004 and the VPL-VW100 can the VPL-VW50 be for just a fraction of the cost?
Form: How The Pearl Got Its Name?
Sony's official name for this new projector may be the VPL-VW50, but it's already known the world over simply as the "Pearl," Sony's inside name for the project. And the Pearl it will be for the rest of this review.
In spite of its price, the Pearl is nearly as gorgeous as any projector I've seen. The only projector I've seen that I unequivocally think is prettier is the $30K Qualia 004, the SXRD Mothership. The Pearl is curvy in all the right places, and while whitish wouldn't be my first choice in color for a home theater projector, the finish here is a rich, pearly white with some sparkle thrown in. In short, there is pride of ownership in this projector's fit n' finish for sure.
Function
The Pearl has two HDMI inputs, one component input, and an RGB on 15-pin DSub. It also features vertical lens shift, which is motorized along with the zoom and focus. Regarding the latter two, these represent the only ergonomic shortcomings I've discovered with the Pearl. The electronic zoom and focus start and stop far too sluggishly, making the finest adjustments onerous to perform (especially on focus, which is absolutely crucial to getting the sharpest picture).
As was the case with the Ruby vs. the Qualia 004, the Pearl adds some refinements and features that even its more expensive predecessors lacked. Although the Ruby sported a "dynamic" iris, the Pearl's Advanced Iris 2 is Sony's latest thinking on that technology. The Advanced Iris settings open and close the iris dynamically based on the brightness level in the image, resulting in better blacks. They also electronically boost whites so that scenes with a mix of light and dark don't simply go all black when the iris closes down. In addition to being based on new algorithms, Advanced Iris 2 offers a number of features and settings that were not included in the Ruby's dynamic iris system.
Selecting Cinema Black Pro from the main Picture menu takes you to the Advanced Iris settings. The Advanced Iris can be set to Off, or to Manual, which calls up another sub-menu that allows the iris to be set at any fixed position over its range of operation. I didn't use either of these modes, choosing instead to use the more aggressive Auto 1 setting. The other choice is Auto 2, which according to the user manual offers reduced contrast compared to Auto 1. This didn't seem any more appealing when I tried it in practice than when I read it on the page. I'm guessing that Auto 1 and Auto 2 exert control over the range of the iris' operation, while the Sensitivity adjustment apparently varies the speed with which the dynamic changes engage.
The Sensitivity setting is chosen by scrolling to the right after you've selected either Auto 1 or Auto 2. The three settings are Recommend, Fast and Slow. I couldn't imagine a benefit to the iris making slower adjustments so long as no obvious "pumping" artifacts occur. As I understand it, pumping means that the opening and closing of the iris on quick transitions between light and dark scenes will be visibly distracting, and probably never right at any particular moment. I didn't see any evidence of this, and after experimenting with both Recommend and Fast on program material, and finding nothing to choose between the two, I stuck with Recommend. I figure Sony knows what it's doing.
In addition to the Advanced Iris settings, the Pearl also allows the lamp to be set for High or Low output. I chose the Low output on my 80"wide, 16:9 Stewart StudioTek 130 screen and got fine light output with the Advanced Iris set at Auto 1.
This projector is the quietest I've ever had in my theater. I left it on overnight more than once because I simply couldn't hear the thing as I walked out of the room and went to bed, especially at the Low lamp setting I used for this review!
Also new in the Pearl is the ability to accept 1080p/24, which is then displayed at a refresh (or "frame") rate of 96hz, a direct multiple of film's native rate of 24fps. Movies on Blu-ray Disc and HD DVD are encoded as 1080p/24, and Blu-ray players that output 1080p/24 are just now coming to market from Pioneer and Sony. Displaying 1080p/24 at 96Hz not only eliminates flicker, it removes the temporal artifacts involved in displaying film material at either 30 or 60fps, as most US displays require.
The Pearl's projection lamp is also a departure from the previous SXRD projectors. The Xenon lamp used in the Qualia 004 had a $3K replacement cost, and even the less expensive job used in the Ruby, also Xenon and spec'd for 2200 hours to half-brightness, cost about a thousand bucks. The Pearl uses the more common UHP mercury lamp, which will run you about $379 to replace.


| Displays Electronics Speakers | Sources Other Gear Software | Top Picks of the Year Top Picks | Custom Install How To Buy How To Use |
Tech 101
|
Latest News Features Blogs | Resources Subscriptions |
WHERE TECHNOLOGY BECOMES ENTERTAINMENT
 © 2026 Sound&Vision
AVTech Media Americas Inc., USA
All rights reserved

