- REVIEWS
Displays Electronics 
Speakers Sources Other Gear Software - HOW TO
How To Buy How To Use Tech 101
Sharp XV-Z10000U DLP Projector Calibration and Performance
The Sharp XV-Z10000U's black-level retention was excellent. Its overscan was noticeably greater than NEC HT1000's, the latter's numbers shown here in parentheses: 3% (1%) left, 4% (1%) right, 3% (2%) top, 5% (2%) bottom. The Sharp's peak (on/off) contrast measurements are given in Table 1. (On = maximum output of a 100 IRE full white field, Off = the black output from an open input, both measured in the center of the screen with a Minolta LS-100 light meter.) With a 16-square checkerboard pattern, the Sharp's contrast measured 153.
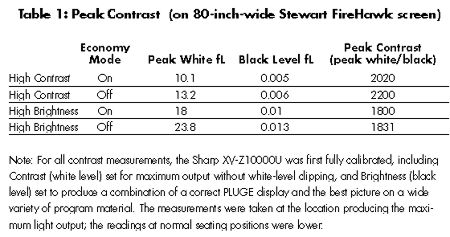
It has been my experience that a high peak contrast and a low black level produce the best DLP images on real program material. This narrowed down my choices to the Sharp's High Contrast setting. The High Brightness setting also looked reasonably good, however; I would at least try it if I had a significantly larger screen, where its higher light output might well be needed. It would also improve viewing for situations in which some ambient light is unavoidable. But changing between the two modes for different conditions will not be convenient in a ceiling-mount installation, in which the mechanical switch will be located above the lens.
If you use a ceiling mount for the Sharp with a FireHawk screen, you can get the best of both worlds—sufficient brightness and low fan noise—in the Economy mode. But in my typical review setup, with the projector on a table and my viewing chair slightly to the side, the Economy mode looked too dim. By switching Economy off, I regained enough brightness for a believably vivid image, but with enough added fan noise to make me think about a hush-box.
Sharp provides a computer-aided adjustment program with the projector: the SharpVision Manager (our sample came with version 2.0). Most of the Manager's adjustments are the same as those available on the projector itself, but the program provides extended control of gamma, using a graphical display of the gamma curve. The curve can be changed by altering its numerical value, or by clicking on it and dragging it into the desired shape.
The average user may find it fun to play with this computer control, but it's more likely to be used by a custom installer. In particular, adjusting gamma is not for the neophyte, though if you don't like the result it can be easily reset to the factory settings with no harm done. For me, the Standard gamma setting was perfectly satisfactory. In fact, above 30 IRE, it produced nearly the same gamma curve as a high-quality, properly adjusted CRT rear-projection set (the AAA-rated Hitachi 51SWX20B). Below 30 IRE, of course, the two gamma curves diverged because of the CRT's inherently better blacks.
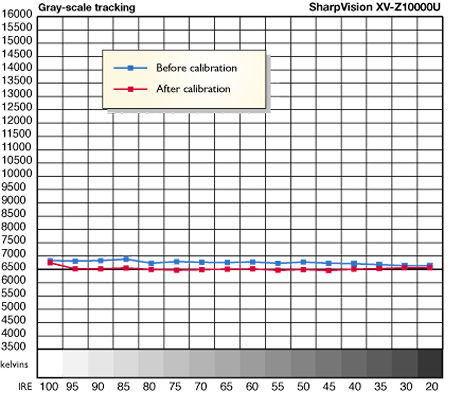
The Sharp XV-Z10000U arrived with its color temperature set to 8500 kelvins. The "Before" curve in the graph shows the measurements obtained in the 6500K setting. Further fine-tuning, using the red, green, and blue Gain and Offset controls provided in the Gamma menu, produced the result shown by the "After" curve. The standard 6500K result is respectable, with numbers very close to 6500K, but it actually had a small lack of red and a bit too much green. The fine-tuning not only brought the numbers closer to 6500K, but closer to the desired D6500 standard as well. (You can have a perfect 6500K across the brightness range but still have inaccurate color; 6500K actually plots as a curve on the CIE color chart, and D6500 is a specific point on that curve.) All measurements were made with our Photo Research PR-650 spectroradiometer.
In addition, the controls in the Sharp's Color Management System (CMS) menu allow the user or calibration technician to further fine-tune the projector's color. In addition to separate saturation adjustments for each color, these controls can actually reposition the effective color points—that is, change where they fall on the CIE color chart. These points are based on a well-defined standard and should not be altered according to taste—but we haven't yet seen a DLP projector whose primary colors are perfect out of the box. Using the Hue control in the CMS menu, I was able to fine-tune the points, within limits. The measured change was seemingly small, but the visible change was significant, and for the better. The red improved the most, moving from too-deep to a nearly perfect red. Green improved slightly, but it still tended just slightly toward yellow, and blue could be changed the least; at best, it edged subtly toward purplish-blue.
Like most user manuals furnished with video displays, Sharp's is notably unhelpful in describing just how a typical user might want to make use of the CMS and Gamma controls. You can fine-tune the color saturation of each primary color by adjusting the Lightness controls in the CMS menu while looking through separate red, green, and blue color filters at a color-bar pattern such as the one on the Video Essentials test DVD. The Lightness controls in the CMS menu do not affect the gray scale, but the Gain and Offset controls in the Gamma menu do.
But beyond the saturation adjustments, you really need specialized test gear to make full use of the Gamma and CMS controls. Like all controls that provide such flexibility, they give the experienced and properly equipped installer a terrific set of tools with which to optimize the picture, and the tweak-happy but reference-deprived user the opportunity to completely mess it up. Fortunately, the Sharp XV-Z10000U's reset controls let you return to the factory default settings with no damage done.—TJN
|
| |||||||||


| Displays Electronics Speakers | Sources Other Gear Software | Top Picks of the Year Top Picks | Custom Install How To Buy How To Use |
Tech 101
|
Latest News Features Blogs | Resources Subscriptions |
WHERE TECHNOLOGY BECOMES ENTERTAINMENT
 © 2026 Sound&Vision
AVTech Media Americas Inc., USA
All rights reserved

