- REVIEWS
Displays Electronics 
Speakers Sources Other Gear Software - HOW TO
How To Buy How To Use Tech 101
Samsung SP-H700AE DLP Projector Calibration
It's best to start the calibration process as close as possible to the front end of the display circuitry to minimize the amount of processing affecting the image. Ideally, you should calibrate the digital inputs first, followed by the analog inputs. Once that's done, any deviations in the input signals can be compensated for with the user-accessible picture controls (including, in this case, RGB offset and gain).
Following this notion, we started with the DVI input, using the Theater (low-lamp) mode and projecting onto the Stewart Studiotek 130 screen. The lamp had 41 hours of use, which we deemed sufficient for allowing it to settle into stable operation.
We began by setting the Brightness and Contrast controls using the Reverse Gray Ramp with Steps test pattern from Digital Video Essentials Pro, which we played at 1280x720p from a Windows Media Center PC with an NVIDIA 6800 graphics card that includes a Windows Media Video and MPEG decoder without the dreaded chroma bug. Because the SP-H700AE has a CRT-like gamma curve (which yields a dynamic range that extends below black), we set the Brightness one increment above the black clip point. Next, we set the Contrast to avoid white clipping and to make the ramp as smooth as possible, minimizing any apparent steps that are due to the limitations of 8-bit processing, which is found in virtually all single-chip DLP projectors.
Unlike other projectors, the SP-H700AE automatically calculates its grayscale based on the specified x,y coordinates and luminance of the red, green, and blue color points. This is a far better and easier methodology than manually—and laboriously—setting the RGB offsets and gains in other projectors. All we needed to do was display the internal red, green, blue, and white full-field test patterns, measure their x,y coordinates and luminance with a Photo Research PR-650 colorimeter, and enter the values we obtained into the appropriate parameters in the service menu. It took all of about 15 minutes!
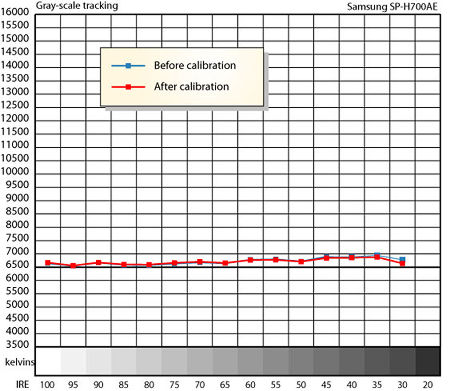
After calibration, we measured the color temperature using the standard set of IRE windows; the results are shown in the accompanying graph. As you can see, the projector was pretty close to 6500K to begin with, and both the pre- and post-calibration numbers are a bit higher than the ideal. Still, this didn't seem to adversely affect the color of normal program material, which looked spectacular.
Also in the service menu is a CW Delay setting, which controls the phase of the color wheel with respect to the image on the DMD chip; in other words, it is used to make sure the correct color filter is in front of the chip at the right time. This is critical in order to obtain the correct grayscale, but it should not normally need adjustment. (This parameter was not set properly in early production units, but after Kane created test patterns to reveal the problem, the factory settings have apparently been fine.)
Using the Photo Research, we measured a peak-white (full-field) value of 15.3 foot-lamberts (fL), but the 6500K (100%) white field measured only 10.7fL. The 100% white full-field from the Digital Video Essentials DVD (using a DVI connection) was nearly identical at 10.8fL. The Minolta LS-100 light meter produced similar results: peak white = 14.72fL, 100% white = 10.48fL. (Remember, the Samsung can display above-white if the Contrast is set properly, which provides headroom that broadcasters and DVD producers can use, though they rarely do except in sports programming.) Video black measured 0.009fL, which yields a peak contrast ratio of 1636 and a 100% contrast ratio of 1164.
We also performed the same measurements using a Leader LT446 HD signal generator with a component connection to the projector. In this case, we got a peak-white (full-field) reading of 9.5fL and a video black level of 0.010fL for a peak contrast of 953. Things got even worse on the Screen Research ClearPix2 (which has less gain than the Studiotek): peak white = 6.4fL, video black = 0.007fL, peak contrast = 907. Clearly, this projector needs a screen that is matched to its light-output, and it should be set up at a sufficient throw distance to produce a large enough image to drop the black level.
Switching to the Bright lamp mode on the Studiotek, we measured a peak-white full field at 13.42fL and a video black level of 0.013fL for a peak contrast of 1032. Keep in mind, however, that this lamp mode increases fan noise. Kane notes that, as the lamp ages, its light output decreases, though the grayscale remains constant. The Bright lamp mode is 30% brighter than the Theater mode, so all you need to do is switch to Bright mode when the lamp's output diminishes by 30% (which should be after about 200 hours of use).
Compare these numbers with our measurements of the Sony VPL-HS51 Cineza in its Low lamp mode with the iris set to Auto on the Studiotek 130 screen: peak white = 12.4fL, video black = 0.004fL, peak contrast = 3100. With its auto iris turned off, the Sony's peak contrast plunged to 583 with video black at 0.021fL.
Using the Leader signal generator, we observed that the horizontal resolution was about 720 lines per picture height for both 720p and 1080i input signals and more than 400 lines for a 480p input. A white crosshatch pattern revealed a bit of color aberration—green above the lines and red below—which was worse at the top of the screen than at the bottom. We attributed this to the fact that the projector was near the top of its lens-shift range; the aberration was reduced when we shifted the lens toward its central position. Also, the problem was not apparent from a normal seating distance.
|
| |||||||||


| Displays Electronics Speakers | Sources Other Gear Software | Top Picks of the Year Top Picks | Custom Install How To Buy How To Use |
Tech 101
|
Latest News Features Blogs | Resources Subscriptions |
WHERE TECHNOLOGY BECOMES ENTERTAINMENT
 © 2026 Sound&Vision
AVTech Media Americas Inc., USA
All rights reserved

