- REVIEWS
Displays Electronics 
Speakers Sources Other Gear Software - HOW TO
How To Buy How To Use Tech 101
Onkyo TX-SR606 A/V Receiver Setup & Tests
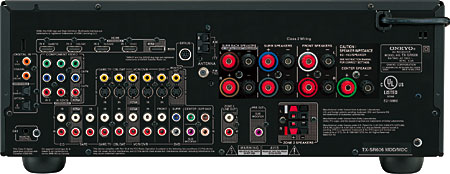
Setting up the 606 proved to be fairly simple thanks to its well-organized rear panel and its dainty weight of only 25 pounds, which made lifting it into my equipment rack an easy task. The speaker terminals are somewhat cramped, which is why I use banana plugs for my speaker connections. The HDMI inputs are well-spaced, and the analog and digital connections offer an abundance of options to suit most home-theater systems.
The well laid-out remote is about what you would expect from an AVR in this price class. It can't learn IR codes, though it does have a database of codes for other products. The tactile feel is solid and very responsive to commands.
Identical to Onkyo's other AVRs, the onscreen display (OSD) user interface is text-based and organized in an intuitive fashion. Assigning my source components to their proper inputs took only minutes, after which I was ready to run the Audyssey calibration.
The manual promises easy setup, and it isn't lying. Plugging the supplied microphone into the jack on the front displays the setup menu with clear instructions. Using a camera tripod, I followed the onscreen menus, and the audio calibration was complete within 15 minutes.
 The results of the auto setup were astonishingly good, despite the lack of a speaker-size parameter. It nailed the distances to all eight speakers in the room, although the crossover settings were a mixed bag. The front speakers were set correctly to THX's recommended crossover of 80Hz, but the surround speakers were a bit high at 120Hz, and my two rear speakers were crossed over at 100Hz. Channel levels were very accurate—within 1 dB of each other—but the subwoofer was about 5dB too hot when measured with a RadioShack SPL meter. If needed, individual adjustments are available in the OSD to correct any errors.
To test the effects of the Audyssey EQ in real time, a signal other than HDMI is required to hear the audio while the OSD is displayed. Utilizing a Toslink connection from my Panasonic DMP-BD30 playing the Eagles' Hell Freezes Over DVD, I compared the sound with Audyssey on and off. I preferred it on, which gave the audio a fuller sound with greater depth in the soundstage. If you are so inclined, the Onkyo provides a 5-band graphic equalizer for manual adjustments.
Using a 480i component output from the BD30, I tested the deinterlacing performance of the Faroudja chipset utilizing the HQV Benchmark DVD. The two jaggies tests were borderline, but the waving flag looked very good. The film-detail "race-car" sequence and mixed 3:2 content with scrolling video subtitles both failed—the bleachers were full of moiré and the moving subtitles looked jumbled.
Also of note, when the receiver upconverts 4:3 content to 1080i, the image is shrunk down and framed with a 1-inch border. When the receiver is set to "through," the displayed image looks like it should without the black border.
I recommend that you compare the AVR's processing capability with the same capability in the equipment you own. In my particular case, I set the receiver to "through" and utilized the processing in my other components for superior performance.
Finally, I compared the AVR's Dolby TrueHD decoding versus decoding in the player and sending the signal as PCM over HDMI. For my test material, I chose V for Vendetta for its stellar Dolby TrueHD mix and because I own a copy on both HD DVD and Blu-ray. This let me quickly switch back and forth between decoding the TrueHD track in a newly arrived Panasonic DMP-BD50 (review forthcoming) and decoding the bitstream from a Toshiba HD-A35 HD DVD player in the Onkyo.
Both sounded fantastic, but the subtle edge went to the AVR's decoding. The soundstage had slightly more depth and clarity. This was in no way a scientific approach—double-blind tests would be the proper way to conduct such a comparison—so take my findings as anecdotal.


| Displays Electronics Speakers | Sources Other Gear Software | Top Picks of the Year Top Picks | Custom Install How To Buy How To Use |
Tech 101
|
Latest News Features Blogs | Resources Subscriptions |
WHERE TECHNOLOGY BECOMES ENTERTAINMENT
 © 2026 Sound&Vision
AVTech Media Americas Inc., USA
All rights reserved

