- REVIEWS
Displays Electronics 
Speakers Sources Other Gear Software - HOW TO
How To Buy How To Use Tech 101
Pioneer Elite VSX-84TXSi Audio Video Receiver Page 2
The Elite '84 includes a fully integrated XM radio input. After purchasing a separate Connect and Pay, er, Play antenna and activating your XM account, you can select your programming from the on-screen XM guide or directly access channel numbers by pressing the direct access button (D.ACCESS on the big remote, n/a on the small one) and punching in the number.
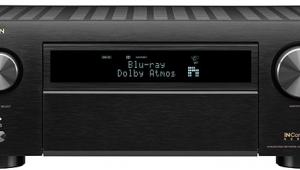
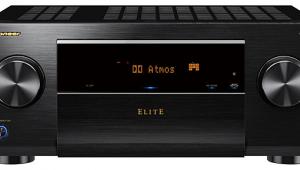
These days, it's not much use chewing up space in a review to discuss surround modes unless the receiver or pre/pro suffers a deficit or has something new to offer. With its THX Select 2 certification, all forms of DTS and Dolby Digital discrete channel processing, not to mention the various Dolby ProLogic IIx and DTS Neo:6 surround modes, the Pioneer Elite VSX-84TXSi receiver is every bit as capable as the competition.
But while the receiver's front panel will show you what mode you've selected, there is no accompanying on-screen display. You could squint to see the front panel from 15-feet away, but in my rack, with the steel mesh door shut, that display is not legible. Or you can press the "Status" button on the big remote to see which surround sound mode you're in. When you do, up pops a screen of operational stats set against a black background.
The Status button also shows you other information, such as whether the audio source is digital or analog, if the back channels are enabled, and whether or not the retriever is on. What's a retriever? Good boy.
The Status button is certainly better than nothing, but a simple two-second overlay of the selected mode onto the program you are viewing would have been nicer. The same can be said for changes of the volume, or selection of a new source. The front panel always shows you your setting, but up there on the screen where all eyes are fixed, there is no instant gratification.
Remote Controls for the Soul
In due course, the "big" and "small" remotes will become your friends. The "big" remote has an LCD panel (not backlit) that identifies which source is currently being controlled. It's programmable, by either entry of a source's manufacturer code, or through a learning process where you place your source's remote and Pioneer remote head-to-head. A group of eight buttons just below the LCD panel lets you select those sources. In fact, six of the buttons can control two components each when pressed in combination with the shift key located in the bottom left corner of the remote, just like the Underwood typewriter I'm using right now. Those source selection buttons are labeled DVD/CD, Sat/TV, Video1/2, TV, DVR1/2, iPod/CDR, Tuner/XM and Receiver/Zone.
The smaller of the remotes forgoes the LCD display and the shift key, but gives you 15 direct source keys, including ones for the phono stage and USB connection (for music from your PC), which are not found on the larger remote.
If there's a downside to the remotes, it is that neither is backlit nor glow-in-the-dark. While many of the black keys (though not all) have white legends printed on them, words that would appear with a backlit or glow design, there are other words printed above the buttons on the remote's case itself that would not. Those words printed on the body of the remote are color coded for use with a DVD player and certain built-in functions.
Launch the Pods
The Pioneer includes a special connector that plugs right into your iPod. Once plugged in, you can only control your iPod from the Pioneer's remotes. Through this interface, not only do the song titles and iPod controls appear on the front the panel, they are output to your video display as well. I checked my two connections, component and HDMI, and the iPod's familiar text-based display was visible on both.
Pioneer doesn't include a secure stand-up base, like their IDK-80, for your iPod, just a cable. I was always afraid my iPod would slide off my equipment cabinet and crash to the floor. That shortcoming, however, is more than made up for by the near perfect integration. Both of the remotes have an "iPod" source selection button, but the smaller remote also includes familiar yellow graphics for quick access to iPod functions.
The Top Menu button brings you instantly to the main menu of the iPod (I wish the actual iPod had a "top" button), whereas the Return button acts more like the Menu button on the iPod, which lets you work your way backwards, one level at a time. The symbols for Shuffle and Repeat are also on the small remote so getting in and out of those modes is a piece of cake. There is even a Photo button, which interrupted my music. I assume if I had some pictures on my iPod, that's when I'd be seeing them on TV.
You'll have access to Playlists, Artists, Albums, Songs, Genres and Composers from the main menu. Since you won't have access to any of the iPod's setting menus, remember that your iPod's last EQ setting will be in effect when connected to the Pioneer. Remember to go flat before hooking it up.
Rolly Polly Fish Heads
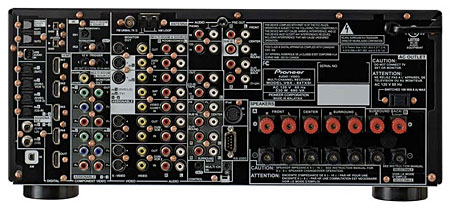
In the consumer market, there are two predominately compatible digital video connections. The older DVI connection is physically secure, if somewhat unwieldy, but it's what I have for an input on my plasma and an output on my high-def set-top box. The newer HDMI format uses a much smaller but much less physically secure connection that is willing to detach at the slightest provocation. The Pioneer—and, to be fair, most new receivers—uses the smaller HDMI connection for all digital video switching. The reason is simple. Besides the smaller real estate requirements, HDMI can also carry digital audio. Also, due to its size, HDMI is preferable when you have to route it through walls.
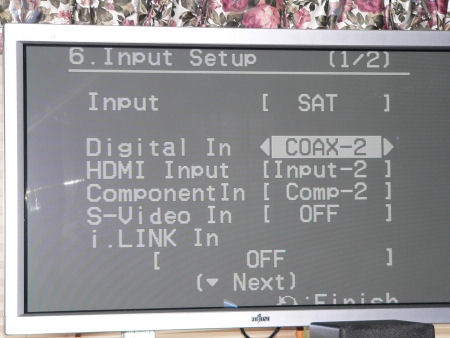
I have a collection of cables I've used before, with DVI connections on one end (for my set-top box) and HDMI connectors on the other (for the receiver). I intended to use them with the Pioneer, but ran into a glitch. With DVI, you have to run a separate digital audio connection to the receiver. But when I did, and told the Pioneer I was doing so (an option which it offered and accepted - see photo), it produced no sound. Because HDMI allows for the inclusion of digital audio on the same cable, the Pioneer was apparently expecting to find it there. No amount of experimentation would allow me to use a DVI digital source with a separate digital cable for sound. I finally switched to component cabling from my set top box video, meaning it was still high-def, but high-def with an analog bent. Hopefully, this is bug that can be fixed with software.


| Displays Electronics Speakers | Sources Other Gear Software | Top Picks of the Year Top Picks | Custom Install How To Buy How To Use |
Tech 101
|
Latest News Features Blogs | Resources Subscriptions |
WHERE TECHNOLOGY BECOMES ENTERTAINMENT
 © 2026 Sound&Vision
AVTech Media Americas Inc., USA
All rights reserved

