- REVIEWS
Displays Electronics 
Speakers Sources Other Gear Software - HOW TO
How To Buy How To Use Tech 101
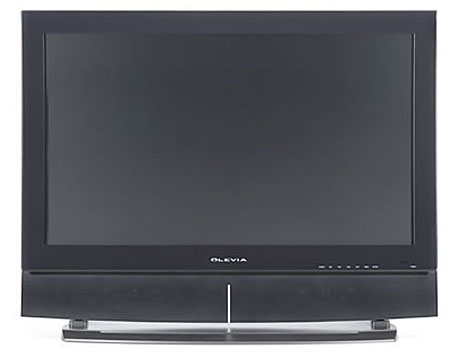
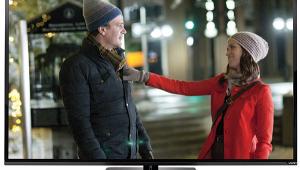
Olevia 747i LCD 1080p Television
When Michael Fremer reviewed the Syntax-Brillian 6580iFB03 65" LCoS rear projection television back in August, he described a picture "so good I looked forward to seeing it every time I turned on the set." Syntax-Brillian's bread and butter, however, is not in rear projection; but rather in Olevia's flat panel LCD designs.
The 1080p Olevia 747i ($3,999, 47" diagonal) is the top of the company's wide range of LCD displays (there's also a smaller, 42" 7 Series model, the 742i). Can it live up to the standards set by its bigger, more expensive RPTV siblings?
The World is Flat
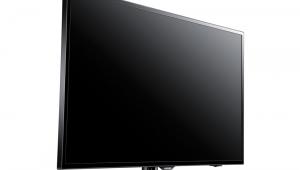
With a net weight of 128 lbs. without its (included) stand, the Olevia 747i is astonishingly heavy for an LCD flat panel. LCDs tend to be lighter than plasmas of equivalent size (Pioneer's Elite PRO-FHD1 50" 1080p plasma weighs in at a svelte 88 lbs, though it does lack a built-in tuner and speakers), but that isn't the case here. If you plan on hanging the Olevia on the wall, you'd better choose a very strong mounting bracket and a very sturdy wall.
While the bottom-mounted speakers keep the width of the set narrow, they do give it a slightly chunky appearance. Not to worry: the speakers can be removed and mounted on the sides using an optional conversion kit, or even left off entirely. You could even use the onboard digital amps (rated at 26 Wpc, though no response or distortion is specified) to drive external speakers if you choose (the speaker leads are readily accessible). I don't know of any competitor that offers this much flexibility.
When it comes to features more significant than size, weight, or form factor, Olevia didn't pinch pennies with the 747i. The fun starts with their decision to use the Silicon Optix Realta HQV video processor. Based on Teranex technology, the Realta's pixel-based scaling and deinterlacing (including the all-important 1080i-to-1080p conversion) largely eliminates video processing as a limiting factor in picture quality—at least at the current state-of-the-art.
According to Olevia, each set leaves the factory with its 6500K setting correctly calibrated to 6500K, with measurements made across the full brightness range, not just at a single point. I saw the calibration "tent" on my factory visit. A dark environment is used for calibration so that non-contact measuring devices can be used. The Olevia tech with whom I spoke said that they do not use contact devices—those suction cups fitted with sensors that are the staple measuring device of most calibration techs. He argued that the pressure from the cups—which are often held securely in position by hand—subtly distorts the front surface of the screen and affects the readings. I'm sure this will be a controversial claim, but it does indicate Olevia's dedication to detail.
 In addition to two antenna inputs and the usual video and S-Video connections, there are three component (Y-Pb-Pr) inputs (one of them on a VGA/computer style connector), and two HDMI connections. There is also an RS-232 jack. The firmware is upgradeable via a USB port. The set does not have a CableCARD slot. (The current CableCARD format has been falling out of favor because it does not offer two-way interoperability for such features as program guides and pay-per-view).
Most of these connections are located at the rear of the set but readily accessible from the side when the set is mounted on its stand. The two RF (antenna) inputs, digital audio outputs (both coaxial and TosLink optical) for use with the set's onboard ATSC tuners, L/R analog audio outs, a subwoofer output, and a headphone output are located further around back, facing down. (Placing the headphone jack around back, facing down, is an odd choice for a feature that needs to be readily available after installation.) As with all flat panel displays, none of these jacks are easily accessible in a wall mount. In that situation all connections should be made before positioning the set on its wall bracket.
While Olevia specifies only a single digital audio output, I found two (TosLink optical and coaxial) and changed the listing in the specs at the end of this review accordingly.
The 747i also includes two onboard, over-the-air, Clear QAM ATSC/NTSC tuners. You can display two HD stations simultaneously.
The only manual that came with my sample of the 747i was on a CD-ROM. While this might be useful in some circumstances, I find a printed manual far more useful. (You could, of course, print out all 79 pages of the CD-ROM manual, using your own paper and ink!)
The Usual, and Not So Usual, Suspects
I'll conserve bits here by not going into the usual list of features found in most sets—things like channel setup, Parental Control, aspect ratios, channel guides, PIP/Split Screen, etc. While there are no arcane features such as a slot for viewing the contents of a digital photo card or a printer for printing them, the set offers all the special features and any sane TV viewer might need.
The Olevia also provides an unusual way of presenting and controlling these features. The set's on-screen display starts with a figure of a rotating wheel in the upper left hand corner of the screen. It looks like one of the spinning drums in a slot machine. There are four surfaces on this indicator, for four different submenus: Picture, Audio, Screen, and Setup. The Up and Down buttons on the remote's navigation section rotate the wheel to the submenu you desire, while the Left and Right select the option you want within that submenu. Once there, the Enter button calls up the adjustment control for that option.
This arrangement is clever, but for me too clever by half. It does have the benefit of keeping the screen clear of clutter while you're navigating through the options. But it didn't feel intuitive. And with some of the options I was never quite sure if I had turned them on or off. As far as I could tell, a red border around an item indicated it was on, and a green border indicated off--not at all intuitive to my way of thinking.
For most parameters you may enter different settings for each input, but some settings operate globally or near-globally. For example, the color temperature setup you choose for HDMI will apply to both HDMI inputs.
One serious ergonomic shortcoming is that while your changes to the video settings are accompanied by an on-screen "slider" indicator with a marker above it showing the last saved setting; there are no number designations for the settings. If you dial in a reasonably satisfactory setup but want to experiment further, the lack of such numbers make it difficult to return to your original settings. And as soon as you exit the menu for a particular setting—brightness, for example—the marker moves to the new position.
Apart from the usual picture adjustments, the Picture menu includes a Lighting control that adjusts the image for a dark, medium, or bright room (I used Dark Room for virtually all of my watching). The color temperature control provides both factory and User settings for 6500K and 9300K. The User adjustments provide both high (Gain) and low (Offset) adjustments for red, green, and blue. (The lack of number designations for the settings described in the above paragraph also applies to the user menu's color temperature adjustments, which is certain to drive calibrators up the wall.)
An oddly named "Idea" submenu includes controls called Black Level Extender, White Peak Limiter, and Contrast Enhance. The On/Off status of these three controls, which had relatively subtle effects, were hard to determine from the on-screen indicators. I solved that problem by leaving the Idea menu Off. It didn't help that the function of these controls (and a few others, as well) weren't well described in the manual. The description of the White Peak Limiter, in particular, read like an outtake from Borat: "To limit the signal amplitude varying degree resulted in brightness over saturation."
The remote control's buttons are backlit, though with the common limitation that the labels for the actual functions of many of the controls are on the body of the remote and therefore not illuminated. Some controls are well located and comfortably sized, but others are too small and too close together for error-free operation. On the upside, many of the set's more frequently used functions may be accessed directly from the remote rather than going into the sometimes frustrating, main on-screen menu system. The remote may also be programmed to operate up to seven additional components by inputting the appropriate codes.


| Displays Electronics Speakers | Sources Other Gear Software | Top Picks of the Year Top Picks | Custom Install How To Buy How To Use |
Tech 101
|
Latest News Features Blogs | Resources Subscriptions |
WHERE TECHNOLOGY BECOMES ENTERTAINMENT
 © 2026 Sound&Vision
AVTech Media Americas Inc., USA
All rights reserved

