- REVIEWS
Displays Electronics 
Speakers Sources Other Gear Software - HOW TO
How To Buy How To Use Tech 101
The JVC RX-D702B Audio/Video Control Receiver
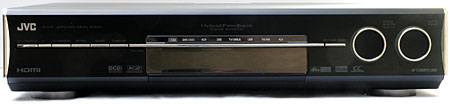
What are the "unique" convenience features? How about an optional set up procedure that turns your speakers into microphones and uses a handclap to set speaker distances and output levels? Or a USB-based 2.4 GHz transmitter that streams wireless music from iTunes (oops, I mean your computer's music library), or Internet-streamed XM or Sirius to your home theater? You can even use the "center alignment" setting to raise the perceived location of the center channel speaker if it's been placed below the screen and the dialog appears disconnected from the actors.
Among the RX-D702B's unique performance features are JVC's highly regarded K2 digital audio processing, and an algorithm called CC (Compression Compensative.) The proprietary K2 digital audio conversion scheme is used here to convert analog source inputs into the digital domain, and is based on the processing used for JVC's audiophile quality XRCD CD releases (which includes highly coveted titles from RCA's famed "Living Stereo" and Decca's [UK] "FFSS" classical music catalogs.) K2 is also used to convert digital-to-analog before the signal is passed on to the loudspeakers.
CC is a proprietary algorithm that, according to the instruction manual, "eliminates jitter and ripple, achieving a drastic reduction in digital distortion by processing the digital data in 24 bit quantization. . ." by "upsampling" the data at a rate directly synchronous to the original signal. For instance, 44.1k is converted to 176k (a direct multiple), and 48k is converted to 192k, etc. Once digitized, incoming analog can also be so processed. There's also a CC2 setting that upsamples compressed Dolby and DTS digital audio.
There's a five-band digital equalizer (63Hz, 250Hz, 1kHz, 4kHz, 16kHz) for the front channels that memorizes settings for each input source, and of course there's a programmable AM/FM tuner. JVC also offers seven proprietary DSP algorithms, plus "3D headphone," "all channel stereo" and "mono film" settings. In addition, the RX-D702 includes Faroudja's DCDi (Directional Correlation Deinterlacing) chip, which deinterlaces analog NTSC video sources without "jaggy" artifacts.
Were I to include all of the RX-D702's features, this review could end up running as long as the instructional manual, so I'll stop, except to add that the receiver's $880 MSRP is another of its impressive characteristics.
Set Up And Use
Let's get this product's biggest negative out of the way first: the instruction manual. It's dense, disorganized, dysfunctional and downright impenetrable. And that's not even considering the "Japan-speak" English translation! But I say that about most AVR instruction manuals. Perhaps it's just me, but I don't think so!
I feel sorry for a neophyte home theater enthusiast trying to wade into the thickets to dig out the essentials to get this full-featured AVR properly configured and operating. The layout of Page 3, which identifies the remote control's buttons and functionality, is enough to cause a panic attack. The wiring diagrams resemble the NYC subway system.
Before you can use page 23's "clapper" Smart Surround Setup instructions to set speaker distances, you must set speaker sizes. But to do that you are told to see page 28, which has a section entitled "Setting the Items" (say, what?) under the main header that instructs the user to select "large or small." Unfortunately, by skipping the pages between 23 and 28 you miss all of the on-screen menu instructions! So you've been plopped down in front of a list of " speaker setting" instructions, not knowing where and how to set them!
Once I'd set speaker sizes, the Smart Surround Setup feature worked reasonable accurately—certainly good enough for a neophyte able to figure out the procedure—but I chose to set distances manually using a high-tech device called a "Stanley tape measure," and an SPL meter.
Although I got through it and set up the receiver, putting myself in a "newbie's" shoes almost had me weeping. I also know enough to not take the instructions literally when it says, regarding subwoofer placement, that, "You can place a subwoofer wherever you like since bass-sound is non-directional."
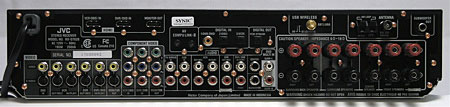
There are two component video inputs, a 5.1-channel analog input for multichannel audio, and numerous analog audio and video inputs and outputs. There are two HDMI inputs and one output. Composite, S-Video, and component video inputs are converted to HDMI, and composite and S-Video are also converted to component. Unfortunately I do not have an HDMI-equipped DVD player or display, so that part of the review will have to be provided by TJN. The HDMI 1.1 inputs are specified to pass video as well as Dolby Digital 5.1, DTS and DVD-Audio. The HDMI 1.0 output passes video only. (A "Take Two," to be posted soon, will cover the JVC receiver's video switching capabilities, including HDMI.)
Considering the compactness of this receiver, JVC's engineers did an outstanding job laying out the uncluttered back panel. But one reason for this is that (excepting the two HDMI inputs) there are only three rear-mounted digital audio inputs- one coax, two Toslink. Although a third Toslink input is mounted on the front panel, for many 21st century home theaters this is insufficient. So, consider your input needs carefully before buying this visually mesmerizing, feature-rich, high-tech component. While the remote includes eight input buttons, only three ("DBS," "VCR," and "DVR/DVD") are configurable for use with digital audio inputs.
Since the instructions failed to mention the "A" word (Apple) anywhere on the dense page of instructions explaining how to install the "drivers" needed to run the USB transmitter, I was curious to see if the wireless feature would work with my Apple PowerBook G4. After connecting the supplied 2.4GHz antenna to the back of the receiver and the USB transmitter to the PowerBook, I followed the directions required to get the transmitter and receiver to "speak" to one another. In the computer's "System Preferences," I chose sound output option that routes to the USB port. After selecting the receiver's USB input, music from my iTunes library began playing through the speakers. What would be so difficult about mentioning Apple compatibility in the instruction manual?


| Displays Electronics Speakers | Sources Other Gear Software | Top Picks of the Year Top Picks | Custom Install How To Buy How To Use |
Tech 101
|
Latest News Features Blogs | Resources Subscriptions |
WHERE TECHNOLOGY BECOMES ENTERTAINMENT
 © 2026 Sound&Vision
AVTech Media Americas Inc., USA
All rights reserved

