- REVIEWS
Displays Electronics 
Speakers Sources Other Gear Software - HOW TO
How To Buy How To Use Tech 101
Denon AVP-A1HDCI Surround Preamp/Processor and POA-A1HDCI 10-channel Power Amplifier Setup
At first glance, the rear panel of the AVP-A1HDCI is daunting. Even though it's at least twice the height of the average pre/pro, the panel's real estate is completely full with a highly concentrated suite of connectors.
On the extreme left and right side are six XLR connectors. Whenever I have the opportunity, I choose the XLR connections because they reject noise much more effectively than unbalanced connections. The RCA outputs are in one long row along the very bottom of the AVP. This allows for short cable runs to the corresponding RCA jacks on the POA, which are located at the very top of the amp. Interestingly, the AVP has a total of 12 outputs, yet the POA has only 10 channels. The AVP provides three outputs for powered subwoofers with either XLR and RCA inputs.
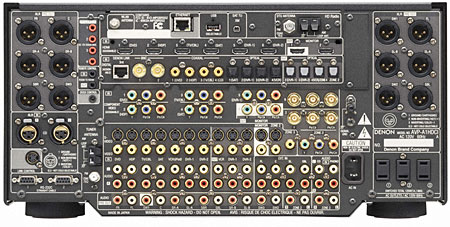
The six HDMI inputs are in a row near the top of the AVP, just under the Ethernet, USB, and satellite-tuner ports. I used all six inputs—four is no longer enough for me, especially when I am reviewing other gear.
The AVP provides two parallel HDMI outputs, which can both be active at the same time. In that case, if the two displays are of different resolutions, both HDMI outputs send the lower resolution to both. You can also select either one to be active. Each HDMI output can be assigned its own output resolution or set to Auto, which will match the native resolution of the display.
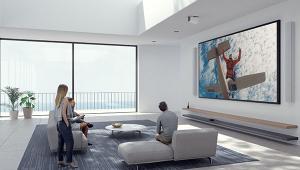
This feature is most useful if you have a flat-panel TV and a projector in the same room and use them for different situations. I connected a small computer monitor to the second HDMI output. This let me see the onscreen GUI to make adjustments in the AVP's menu or select TV programs to record on my DirecTV DVR without firing up my projector.
There are three subwoofer (LFE) outputs, one of which can be used as a motion-simulation transducer output. I only needed one for my powered PSB SubSeries 5 subwoofer.
Due to the size of the POA, the speaker binding posts are well spaced, a luxury you don't have on connector-dense receivers.
An important feature on the AVP is the ability to integrate the pre/pro with a home network, either wired or wireless. It's supposed to automatically connect using DHCP, but I was not able to get it to connect to my network. It recognized the network and even had the proper name on screen, but I never got it to make the connection. With more time, I might have been able to figure it out, but I was on deadline with this review. It may have been a Mac/Windows compatibility issue, though Denon didn't think so.

For integration with a Mac or PC that uses iTunes for managing media, you need to download DLNA (Digital Living Network Alliance) software called TwonkyMedia Manager from twonkymedia.com. This lets you access music directly from your computer via the AVP's onscreen interface. If you are not using iTunes, you have to use a PC running Vista or Windows XP with Windows Media Player 11 to access your computer or an NAS server. I like using the Audyssey MultEQ XT system for automatic speaker calibration and room EQ. I find the results to be pleasant and generally accurate. The first part of the process adjusts channel levels and delay settings for each speaker. It also creates an EQ curve that is calibrated for the entire room, not just one seat.
There are three Audyssey modes. The basic mode, which is called Audyssey, optimizes the frequency response for all speakers. Audyssey Byp. L/R optimizes the frequency response of all speakers except the main left and right. Audyssey Flat mode adjusts all speakers to produce a flat EQ curve. You can also select Manual mode, which provides access to the AVP's 9-band graphic EQ.
- Log in or register to post comments


| Displays Electronics Speakers | Sources Other Gear Software | Top Picks of the Year Top Picks | Custom Install How To Buy How To Use |
Tech 101
|
Latest News Features Blogs | Resources Subscriptions |
WHERE TECHNOLOGY BECOMES ENTERTAINMENT
 © 2025 Sound&Vision
AVTech Media Americas Inc., USA
All rights reserved

