- REVIEWS
Displays Electronics 
Speakers Sources Other Gear Software - HOW TO
How To Buy How To Use Tech 101
Are You Ready for Your Annual AV Spring Cleaning?
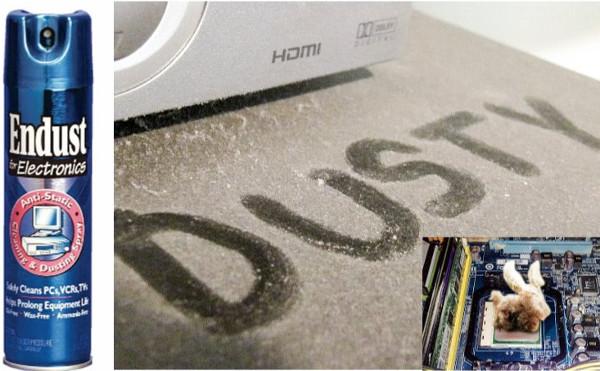
It’s no secret that heat kills electronics, but it isn’t a sudden, Chuck Norris neck-snap kind of killing, but more a slow, methodical, and diabolical David Fincher death, making it easier to neglect. However, besides lack of ventilation, the number-one contributor to your equipment’s untimely thermal demise is dust.
While most people give the front and top of their gear the occasional cursory swipe with a cloth or finger to keep it from looking like some Twilight Zone prop, dust problems usually occur in the back, sides, and underneath components. There, it slowly builds up, clogging fans, choking air vents, and coating chips and circuits in an insulated, thermal blanket that will eventually cause overheating.
Fortunately, the solution is pretty quick, easy, and costs virtually nothing. At least once a year give your system a general spring-cleaning “love in.” Not only will your gear look better—and last longer—it’s also an opportunity to give your system a routine checkup.
Here are a few things for your AV Spring Cleaning checklist.
Components
Remove the gear from your rack if possible so you can clean all sides. I clean my components
with specialty cleaners like Endust for Electronics along with a soft, lint-free microfiber cloth.
This gives the entire chassis a spit-and-polish shine, removing dust and any fingerprints, without harming the electronics or finish. For clogged areas or where a cloth can’t reach—like
fans or vent ports—I use my vacuum’s wand to suck out the nooks and crevices. A can of compressed air is another great tool for blasting inside components to loosen and dislodge any
nasties.
Cabinetry
While the gear is out, you’ll likely notice a coating of dust on/inside the rack itself. Pledge Dust & Allergen is great on a variety of surfaces and also makes your air cleaner. If you have any kids or pets, you’ll likely also find a variety of “surprises”—Cheerios, game pieces, pens, crayons, etc.—behind or under your rack.
Wiring
Another great haven for dust to gather is the bundle of cabling behind your gear. No matter
how clean I try to keep things, the wiring behind my rack often looks like the Joads are about to
roll through, Grapes of Wrathstyle. I usually give the back of my rack a monthly probe with the vacuum wand to vanquish the big dust bunnies, but wiping down the cable bundles with a damp cloth is part of my big clean. Checking wiring and connections should also be part of your maintenance list. Make sure cabling is properly labeled, use zip ties for wire management, and remove any cabling no longer being used. This definitely makes it easier the next time you need to service your system or upgrade to a new component.
Display
The front of your TV is a dust magnet, but the screen’s optical coatings require special care when cleaning. Fortunately, there’s a variety of screen cleaners specifically designed for cleaning high-performance displays, and these generally come with an ultra-soft microfiber cloth designed not to scratch or leave residues on your screen. Many displays have vents behind the screen that can collect dust and impede ventilation, especially when wall-mounted. Depending on your mount, this might be tough to access, but again, your vacuum can work wonders sucking dust from clogged vents and might significantly increase your display’s life span.


| Displays Electronics Speakers | Sources Other Gear Software | Top Picks of the Year Top Picks | Custom Install How To Buy How To Use |
Tech 101
|
Latest News Features Blogs | Resources Subscriptions |
WHERE TECHNOLOGY BECOMES ENTERTAINMENT
 © 2026 Sound&Vision
AVTech Media Americas Inc., USA
All rights reserved

