- REVIEWS
Displays Electronics 
Speakers Sources Other Gear Software - HOW TO
How To Buy How To Use Tech 101
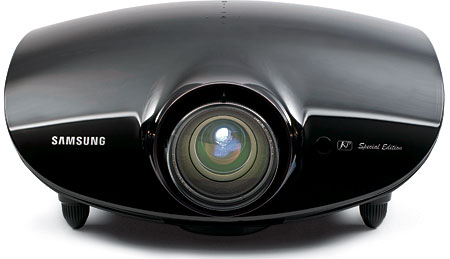
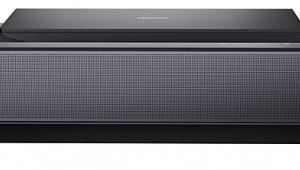
Samsung SP-A900B DLP Projector
Dynamic and Detailed
In these days of increasingly improved LCD and LCOS projectors, new DLP models seem to be few and far between. Some manufacturers have cut back on their premium DLP projector offerings (Sharp), and some have eliminated them altogether (Yamaha).
But here and there a few new DLP models have trickled out. For several years, Samsung has collaborated with video expert Joe Kane to produce some remarkable projector designs that offer both superb performance and useful features. The latest of these is the SP-A900B.
What’s Inside?
On the surface, the SP-A900B is a typical home theater projector. It’s sleekly modern and relatively large but not cumbersome. The zoom, focus, and lens shift (vertical only) features are all manual. The DLP color wheel has six segments, and the exhaust fan vents to the side through an opening that also allows a little light to leak from the case (undesirable but acceptable). The fan noise from the projector’s Theater (low lamp) setting is audible but unobtrusive; the Bright setting is louder but tolerable. However, with a 300-watt lamp on tap, you probably won’t need the Bright setting on any reasonably sized screen until well into the lamp’s useful life.
There are five aspect ratio options. None of them produce a properly proportioned image that fills a 16:9 screen from left to right with 480i or 480p letterboxed material that is not enhanced for 16:9. To do that, you must first upconvert the material to 1080i or 1080p and (oddly) select the Anamorphic option—not the more typical choices of Zoom 1 or Zoom 2. That’s not the main function of the Anamorphic mode; instead, it’s intended to process the image for use with an anamorphic lens and 2.35:1 screen (an application I didn’t test).
The Samsung accepts 1080p/24 sources and displays them at a refresh rate of 48 frames per second by repeating each frame twice. If you’re concerned that this might produce visible flicker, it did not.

Dynamic Black is a Texas Instruments technology that usually implies the use of a dynamic iris. However, as they’re organized in the Samsung’s menus, the Dynamic Black selections include not only Auto (dynamic) but also Manual (continuous fixed iris settings from zero to 100) and Off (iris fully open).
A Color Pattern control shuts off any or all of the primary colors (red, green, and blue) so you can display them one at a time. When used with a suitable test pattern, this is a useful way to check the accuracy of the projector’s color decoder and set the Color and Tint controls. This is normally done with filters, but it’s far more accurate this way.
The small, sculpted remote is one of the best I’ve used. It’s backlit, and it offers dedicated input selection buttons. It also provides direct access to several often-used controls, including aspect ratio.
Calibration
You can adjust all seven picture modes separately and set them differently for each input. The Tint control is grayed out and inaccessible in HDMI and component. You won’t need it. The film mode is manually accessible only for the 480i/576i component, composite, and S-video inputs. The three fixed Gamma settings (Film, Video, and Graphic) are set at the factory, but a calibrator may change them in the service menu.
The technique that Samsung and Joe Kane used to calibrate the projector’s gray scale makes use of an inherent feature of the DLP firmware that other manufacturers generally ignore. The process begins by measuring the coordinates and brightness of the out-of-box red, green, and blue color points, plus the white point.
The resulting readings are then put into a table in the service menu. From there, the projector calculates and applies the corrections that are needed to produce the correct D65 white point across the full gray scale, from light to dark. At the same time, the projector automatically calculates and saves its three selectable color gamuts: SMPTE-C, HD, and EBU (all found in the Color Standard menu).
To make the initial color and white point measurements for this process, you must use the internal test patterns provided in the projector. The process may not work correctly if you use externally generated patterns. Once the calibration is complete, you can use external patterns to check the results.
I performed the calibration in the Movie 1 mode. When you do this, the projector automatically calibrates Movie 2 to a color balance that’s optimized for older black-and-white films. Because of the characteristics of film projection when those films were presented, these films look best with a slightly warmer color balance. Movie 2 satisfies that need. (Technically speaking, Movie 2 will be positioned at the 5500K point on the black body curve of the CIE chart.)
The Samsung also includes traditional red, green, and blue white balance controls (high and low) in the user menu. You can use these to tweak the gray scale for each individual input, if desired. (The service menu calibration described above is global across all sources.)
Video Processing
The Samsung’s video processing was disappointing. It failed all of our deinterlacing tests (see the “Video Test Bench” chart). Moiré was also visible on our real-world tests from Mission: Impossible III on Blu-ray (the brick wall in chapter 7 and the stairs in chapter 8). And the diagonal ropes in the sailing ship’s rigging on the Spears & Munsil High Definition Benchmark Blu-ray Disc were loaded with jaggies.
However, the projector had no difficulty with 1080p/60 or 1080p/24 inputs and passed most of our HD tests when I deinterlaced these sources in either the OPPO BDP-83 Blu-ray player or the Integra DTC-9.8 surround processor.
Iris Eyes
I did most of my viewing and testing in the Movie 1 mode. I set the lamp to Theater (low), and I set Dynamic Black to Manual at settings ranging from 75 to 85 (which produced an output of 15 to 17 foot-lamberts on my 1.3-gain, 78-inch-wide Stewart Studiotek 130 screen). The lower the Manual iris’ numerical setting was, the wider the iris and the brighter the image was. The zero setting is fully open.
Dynamic Black’s Auto setting offered deeper blacks than the best Manual settings (though only a little deeper—see “HT Labs Measures”). It produced no obvious side effects, and on some (but not all) program material, I preferred it to the Manual setting.
The Auto mode’s only visually troubling aspect was that it opened up the iris on bright scenes. On my screen, this produced a peak white level of over 25 ft-L. You can’t use the Manual iris setting to dial this down, since the Auto and Manual functions cannot operate together. I wish they could. With both together, you could bring down the peak brightness in the Auto mode when needed, and at the same time further reduce the black level.
If you use a large screen, one with a low gain, or both, the Auto mode’s potentially excessive brightness may not be an issue. In fact, in either Manual or Auto mode, there’s enough reserve brightness to fill a much larger screen than mine.
Performance
Coming off a review of the Sony BRAVIA VPL-VW85 SXRD projector (Home Theater, November 2009) and recent exposure to JVC’s 2009 offerings, all of which produce stunning blacks, I found the Samsung’s absolute black level to be a little retro. But it’s still comparable to most DLP projectors, and it’s similar to what you’ll see in a good movie theater.
However, dark movie scenes aren’t all created equal. On most of them, particularly those that have at least a few bright highlights to give the eye a reference against which to judge black, the Samsung does a satisfying job. It handled the belowdecks sequence at the beginning of Master and Commander: The Far Side of the World reasonably well. But rather than the deep near-black it can be, a trace of grayness did creep into the gloom that surrounds the crewman making rounds with his lantern. The star field at the beginning of Stargate: Continuum showed plenty of stars (more obvious with the iris in Auto), although the blackness of space behind them could have been darker. But that important companion to a satisfyingly deep black level—shadow detail—was excellent in the nighttime ship deck scene that opens chapter 3. The Samsung also did a good job handling the details on the dark side of the Icarus II spacecraft in Sunshine. In this case, it was better in the Dynamic Black Auto setting than in Manual.
One other concern is DLP rainbows. I can’t come down too hard on the Samsung here; this is an artifact that’s common to one degree or another in all single-chip DLP displays that use a color wheel. On the Samsung, most likely because of its brightness, the rainbows were a bit more intrusive than average for a DLP design. Some people are highly sensitive to rainbows, while others never see them. They are most visible in dark scenes with bright highlights, particularly when the highlights are moving. An acid test for rainbows is in chapter 7 of Stargate: Continuum, where the characters wave flashlights as they move around in the otherwise dark gloom of a ship’s cargo hold.
|
|
| ||||||||||


| Displays Electronics Speakers | Sources Other Gear Software | Top Picks of the Year Top Picks | Custom Install How To Buy How To Use |
Tech 101
|
Latest News Features Blogs | Resources Subscriptions |
WHERE TECHNOLOGY BECOMES ENTERTAINMENT
 © 2026 Sound&Vision
AVTech Media Americas Inc., USA
All rights reserved

