Design the Ultimate Home Theater– On a Budget Page 3
For our ceiling, we chose the latter option. As I've mentioned, adding mass changes a wall's acoustic properties, which you'll have to take into account during the acoustic-treatment stage. While the idea of adding mass is a sound one, our experience (due mostly to our lack of construction experience) turned out to be painful. Anthony suggested using a product called SoundCor from Acoustic Innovations ($3 per square foot), a 0.125-inch-thick layer of vinyl. Everyone warned us that it was heavy. The two rolls that we needed to cover our 14- by 18-foot ceiling weighed 150 pounds each. Trying to apply the vinyl layer and the drywall to the ceiling essentially meant that we had to hold about 100 pounds of vinyl and a 4- by 8-foot sheet of drywall over our heads while one of us tried to screw it in. Even with the drywall lift we rented from Home Depot, it wasn't an easy task. I don't really know if this worked or not, given that our other walls are of regular construction. I have no qualms about using the material and would certainly recommend it for high-end theaters (where you can use it on all five walls) or in places where simpler isolation techniques aren't feasible. I'd just recommend that you have someone else install it, and make sure your contractor knows what he's getting into beforehand.
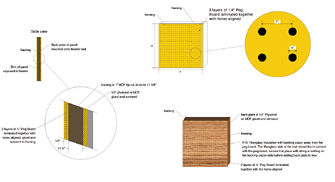
Since our new listening room is next to our office, Anthony suggested that we employ another technique—utilizing resilient channel—to help improve isolation between the two rooms. Resilient channel is a metal track that attaches to the bare stud framing ($1.25 per foot from Acoustic Innovations). You then hang a layer of drywall on the track, thus decoupling the new wall from the first. Unfortunately, most installers end up screwing the drywall into both the resilient channel and the stud framing, thus coupling the two and eliminating the benefit of the channel (see diagram G). While I originally planned to go this route and even bought some resilient channel, our experience with the ceiling gave us reason to consider other alternatives.
Another isolation option is a product from PAC International (www.pac-intl.com) called the resilient channel isolation clip, or RSIC-1. If you're in the construction phase, Kinetics Noise Control (www.kineticsnoise.com) and Owens Corning (www.owenscorning.com) also make products that replace the stud frame and have a resilient-channel-type system built into the replacement framing. Norm regularly uses the Owens Corning product.
Then again, a room is no quieter than its loudest component. If you build a room with soundproof walls but use a hollow-core door with large air gaps around the edges, your great new walls may be a wasted expense. The sound will just come through the door. Likewise, if you seal all of the doors and windows and isolate the wet bar's water pipes but don't seal the utility outlets, the environment may still be noisy. Norm refers to the door's air gap and the unsealed outlet as flanking paths, or paths of least resistance that sound takes to get around your isolation barricades. Sound is a crafty devil that can squeeze through any sized opening and travel through nearly any material. Keep this in mind as you choose an isolation technique. You might be better off with a less-expensive wall in one area, if it means you can put a more-soundproof door in another.
As I mentioned, you also want to consider interior sources of noise. You might find that a whirring DVD player or buzzing amplifier transformer can make a substantial amount of noise. The air flow from your air-conditioning system could also be an interior noise source (a substantial one, too) and is discussed in Tip #1. Can you stash your components in an isolated closet? If not, keep this in mind. An air-conditioning system with an NC 15 rating might be a waste if you don't isolate the noise from the fan-cooled DLP projector.
Acoustic Treatment
The final stage of our project was acoustic treatment. Our newly completed room had nothing but four bare walls, a bare ceiling, and a wood floor. It was like an echo chamber. Playing music or movie soundtracks in this room created an incoherent, blurred mess. First, we needed to find the right mix of absorptive and diffusive materials so that the room wasn't overly reverberant. We also didn't want a room with too little reverberation, which can sound dull and lifeless.
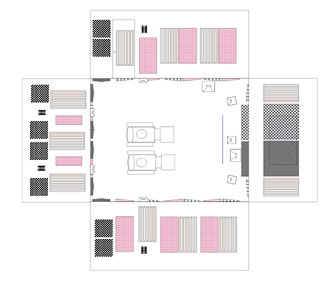
Our second goal was to eliminate slap echoes, a "zinging" effect that occurs when sound bounces between parallel flat surfaces. Contrary to some beliefs, Anthony has found that you can hear slap echoes between any parallel surfaces in the room.
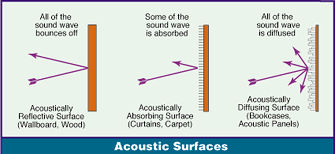
The third goal—and, in some ways, the most important—was to tame first-order reflections. These reflections bounce off of one room surface before reaching the listener. Their immediate arrival at the listener's ear can blur the direct sound. Second- or third-order reflections bounce off of two or three surfaces, respectively, but are usually less of a problem. Norm points out that first-order reflections from the floor or ceiling are usually the most detrimental to sound quality. Ideally, you want to use acoustic treatments to redirect or reduce first reflections by about 12 dB so that you can preserve the direct sound's clarity.

