- REVIEWS
Displays Electronics 
Speakers Sources Other Gear Software - HOW TO
How To Buy How To Use Tech 101
NAD Masters Series M15 THX Ultra2 AV Surround Sound Preamplifier M25 THX Ultra2 7-channel Power Amplifier Page 2
 Remote Control
NAD provides two remotes with the M15. One is a learning remote that can control up to eight devices. NAD calls it the HTRM (Home Theater Remote Masters Series). The other is a much smaller unit for the second zone. I'll only cover the larger, "HTRM" here.
This primary remote comes pre-programmed for NAD products, but may be taught to control other makes as well. Configurations for other products may also be loaded into the remote via USB to a PC using software downloadable from NAD's website.
The layout and color-coding of some of the buttons on the remote can be a bit confusing and intimidating at first, but I eventually got the hang of them. The remote is backlit, but the blue illumination behind the black lettering on the buttons is not all that legible in the dark. And consistent with a widespread industry design error in backlit remotes, the NAD has no separate "light" button. The backlight comes on only when you push one of the function buttons, and in the dark there's no telling what action that unseen and thus unidentified button might trigger.
On a positive note, however, the backlighting comes on only when it senses a low light level in the room. For that reason, it's very easy on batteries. It was several months before I had to change them.
Setup
The 480i-only limitation to the on-screen display for component, and the lack of any OSD over HDMI, will likely put off some potential buyers. To simplify matters, and avoid having to figure out when I could get the on-screen setup information and when I could not, I simply connected the M15's composite monitor output to the video input of a cheap portable DVD player and used its small screen to view the menus when I needed them.
To activate the OSD, you simply push Enter on the remote. There are seven sub-menus under the Main Menu, and some of the entries in the sub-menus have their own sub-layers.
The menus provide the usual level, distance, and crossover setup controls. To turn the level calibration test tones on or off, the manual says to press the Test button. But that Test button is actually a color-coded, multifunction button. The label on the button itself says Video, while the word Test appears above the button, along with the word Zoom. Three different designations for the same button! Confusing? Yes, but this button, and several others, are color-coded to correspond to the various devices the remote can operate. The selection buttons for those devices are labeled in the same color. For example, the Zoom label and the DVD device selection button are both in red, and Video and VCR are in green. It isn't difficult to figure out these relationships once you've learned the drill.
If you want to do a quick recheck of your channel levels at any time after the formal setup, you can turn on the test tones by simply pressing the Test (a.k.a. Video or Zoom!) button. This will also bring you directly into the Level Setting OSD, but you won't need the display to tweak the level settings. To cycle to the next channel test tone, press Enter. To change levels, press the up or down navigation buttons. To save your amended settings and drop out of the level setting cycle at any time, simply press Test again.
The Setup menus provide a selection of seven different crossover frequencies, from 60Hz to 120Hz in 10dB increments. There are also two available slopes for the subwoofer: 2nd Order and THX (4th Order). You can choose different frequencies for some of the channels (for example, 120Hz for the surrounds and 70Hz for the center), but the crossover points for the front left and right speakers and the subwoofer must always be the same. You can also simply select the THX option, which fixes the crossovers for all channels at 80Hz.
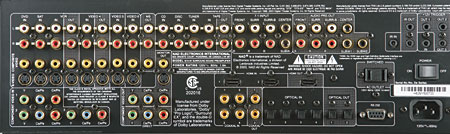
The video and audio inputs jacks on the rear panel may be linked together to the input selection options on the front panel or the remote by using the Source Setup menu. The remote is your best option for selecting a source, as there are individual buttons for each input that allow you to make the selection directly, rather than by the usual around-the-horn finger exercise. You can also rename the inputs, though they will still have their default names on the remote buttons, which could be confusing.
If you've linked one of the M15's AV inputs to a digital audio source in the Source Setup menu, and later break that digital connection for some reason, the input will not operate and the front panel will read "unlocked." (You'll get the same indication if the source is shut off.) To get the input functioning again you'll either have to reconnect the digital lead to the assigned digital input or go into the Source Setup menu and de-select the digital source that you've linked to that input.
The Audio Control menu offers Bass, Treble, Center Dialog, Audio Delay (10ms steps up to 140ms), LFE Level (0 to -10dB), and Enhanced Bass controls. Enhanced Bass brings your subwoofer back to the party if you've designated the front left and right speakers as Large in setup. But I recommend avoiding this, as it's an invitation to erratic and probably boomy bass, depending on the characteristics of your room. My preferred practice at all times is to designate all the full range speakers as Small (no matter how big they are physically) and use the subwoofer(s) to carry all the bass below the selected crossover points.
You can also switch the THX mode to Auto in the Audio Control menu. In this setting, all Dolby and DTS formats receive the full THX treatment. There is no provision for disabling the THX Re-equalization curve while THX processing is engaged. Re-equalization cuts high frequencies by as much as 6dB to compensate for overly bright soundtracks. Since I find the latter problem to be much less severe now than in the early days of home theater, I prefer to avoid this sort of equalization for most sources. For that reason, I did not use the THX processing for this review. According to NAD, THX did not allow them to offer a way to defeat THX Re-equalization only. But we have seen such a defeat switch on other THX-certified pre-pros and AV receivers.
There is a THX RES button on the remote that disables or re-enables all THX processing, not just the equalization. While it's in the same location as shown in the owner's manual, it's labeled differently.
Other useful features include five AV presets that may be linked to different inputs. These are set at the factory but may be changed by the user, and include speaker configuration, channel levels, distance, some THX settings, Enhanced Bass, and LFE Level.
Other available setup controls include THX Boundary Gain, a setting for the Distance between the side and back surrounds, and Analog (input) Sensitivity.
That Pesky HDMI
One important omission, mentioned earlier, is the video-only capability of the M15's HDMI inputs. You cannot pass multichannel PCM audio from the source to the NAD over the HDMI link. This limits you to the M15's single set of 7.1-channel analog inputs for SACD, DVD-Audio, and the new high-resolution audio formats found on many HD DVD and Blu-ray discs. And as noted above, this multichannel input provides no bass management. You are therefore captive to the bass management and D/A converter quality provided by the player or players that supply these sources (and with the M15's single multichannel analog input, it had better be just one player).
One relevant point here is that NAD's own M55 universal player does provide bass management from its multichannel analog outputs for all sources, including SACD and DVD-Audio.
Testing revealed that both the component and HDMI video switching in the M15 relay the resolution and all other integral qualities in the source through to the connected display.
M15: Problems and Quirks
I normally don't spend a lot of time around composite inputs, but when I tried the composite switching mode (composite in to composite out) the M15 stripped off the color, leaving an output that was black and white. Oddly, however, when I watched the composite input through the component output using the M15's video cross-conversion, the color came back!
I later found out that to see a composite input in full color through the main composite output you must change the Display Setup in the Main Menu from YUV (component) to CVBS (composite) and de-select any and all component video settings from the Source Setup menu.
The same situation applies to S-Video. For all practical purposes, therefore, if you have composite, S-Video, and component sources attached to the M15, and you want to see them in full color, you must view them all through the component output. In other words, with the composite and S-Video sources cross-converted to component.
But when you use this cross conversion, the M15 severely clips the blacks in any composite or S-Video source. Not only do all three PLUGE bars on the Digital Video Essentials DVD (chapter 12-2) disappear completely, but so do all blacks below, at best, about 12.5 IRE. If you have a composite or S-Video source that is important to you (Yo, Laserdisc fans!) the only convenient way around this is to run that source directly from the source to your monitor.
On a different subject, the setup test tones, as accessed from the front panel, are too inconvenient to be of any real use in your overall audio calibration. You have to hold the SPL meter at the seating position with one hand while using your second and third hands to simultaneously hold the Levels button and change the channel level setting. Or you will need two people.
But that won't be an issue if, as is more likely, you use the remote control to make your level adjustments. The front panel Levels control might be useful for small tweaks to the settings after the formal setup, but that can't be done without turning on the test tone. Fortunately, for those who want to make small changes without disrupting a movie, the remote provides separate controls for adjusting the level of the surrounds (all), the center, and the subwoofer (both, if two are used).


| Displays Electronics Speakers | Sources Other Gear Software | Top Picks of the Year Top Picks | Custom Install How To Buy How To Use |
Tech 101
|
Latest News Features Blogs | Resources Subscriptions |
WHERE TECHNOLOGY BECOMES ENTERTAINMENT
 © 2026 Sound&Vision
AVTech Media Americas Inc., USA
All rights reserved

