- REVIEWS
Displays Electronics 
Speakers Sources Other Gear Software - HOW TO
How To Buy How To Use Tech 101
Hands-On with JVC’s New Theater Optimizer Function
I did an in-depth review of JVC’s Frame Adapt HDR feature in late 2019. This latest update not only refines the HDR tone mapping on the company’s projector line but adds interface improvements to increase ease of use and customization. JVC sent me a RS3000/NX9 projector loaded with a test version of the upcoming firmware so that I could compare it directly to my own reference RS3000 running the previous firmware. According to the company, this beta firmware is likely to be identical to the official release that will be offered in November.
A Menu Refresh
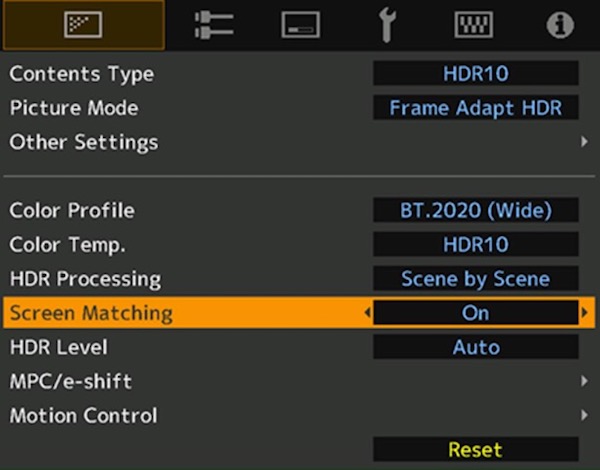
Before we get to the meat of the firmware update—Frame Adapt HDR and Theater Optimizer—I’ll first discuss some of the interface improvements it brings. The first thing I noticed when using the projector with the new firmware was a revision to the main picture setup menu, which now has a completely revamped Settings layout. The top selection, Contents Type, is where the user can select between Auto, SDR, HDR10, or HLG options. These settings correspond to another update in the Input menu where the earlier HDR Setting menu has been replaced with a new selection called Auto Picture Mode Select. Previously, there were only selections to predefine picture modes for HDR and HLG input signals, but JVC has now added options for SDR (2D) and SDR (3D).
Previously, when a JVC projector was fed an HDR signal it would automatically select the picture mode defined in the HDR Setting menu. The problem there was, when an SDR signal was input, the projector would default to the last manually selected picture mode, which could be an HDR mode. Adding predefined modes for SDR ensures that the projector will default to the correct picture mode for both SDR and HDR inputs when the Contents Type selection is set to Auto.
The main Picture menu also has a new option called More Settings where you’ll find the bulk of the projector’s normal picture options including lamp power and aperture settings, along with standard picture options such as contrast, brightness, color, and tint. With JVC’s previous firmware, these were spread out between the main and advanced picture pages.
JVC has also made changes to its projector color profiles. For example, the previous HDR color profile—one designed for wider BT.2020 gamut coverage but with no color filter to preserve light output—has been renamed as BT.2020 (Normal), while the BT.2020 color profile that engages the color filter is now labeled as BT.2020 (Wide). And there’s also a new Auto color mode that allows the projector to automatically determine which mode you should be using based on the colorimetry of the input signal.
For me, JVC’s biggest color profile improvement is the new Off options. These let you completely bypass the projector’s built-in color management for native color output with either no color filter (Off Normal) or a color filter in the light path (Off Wide). The new Off profiles are a great tool for performing calibration with an outboard video processor since they let you work with the widest color space available without the limitations that may be imposed by JVC’s own factory calibration. As a professional video calibrator, I can now get an even more precise colorimetry for any input source.
HDR Optimization, Optimized
JVC’s other new changes to the main picture mode settings are all in the HDR realm. The Frame Adapt HDR picture mode that the company added in 2019 offers true scene-by-scene or frame-by-frame adaptive dynamic tone mapping. This feature provides a massive advantage for maximizing the limited light output available with projectors when displaying HDR content, mainly by modulating image gamma on the fly to optimize the dynamic range for each scene or frame regardless of how bright or dark the content is.
In my earlier review of JVC’s Frame Adapt HDR picture mode, I found it had drawbacks that limited overall performance. A key piece of information required for dynamic tone mapping is how much light is actually coming off the screen—it’s difficult to adapt content for a specific setup if the projector doesn’t know how much light it’s actually working with. For example, there will be a huge difference in overall brightness when using a 100-inch diagonal acoustically transparent weave screen with a 0.7 gain and a same-size high-power reflective screen with a 2.6 gain. Different setups also have different screen sizes, aspect ratios, and ambient light conditions. Using a one-size-fits-all approach to estimate overall light output will deliver drastically different results with all these scenarios.
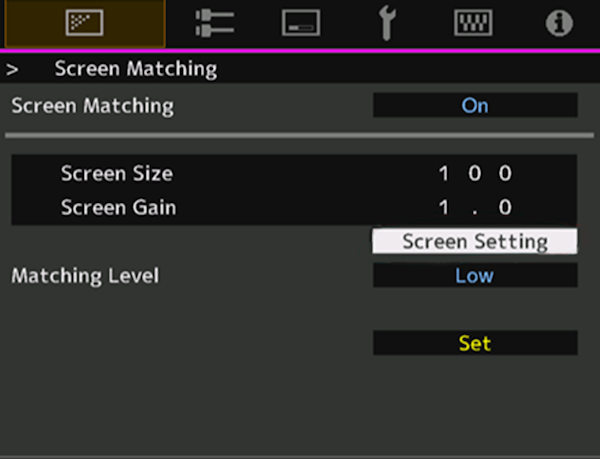
Ideally, there would be a way to manually enter the exact amount of light produced onscreen as measured by test equipment, but JVC didn’t think this option was feasible for most consumers. The alternative solution they developed is called Theater Optimizer. Located in the Frame Adapt HDR picture mode menu, this lets the user enter information about their exact screen size and gain. (The screen size option assumes a standard 16x9 format, so those with a wider aspect ratio screen need to enter in the relative screen size compared with a 16x9 screen.)
Theater Optimizer also takes into account other variables including lens zoom position, lamp mode (High or Low), screen material (if entered in the projector’s Installation mode), and the lamp timer (to compensate for bulb aging). This gives the projector’s tone mapping processing loads more information to draw on when determining how much light is actually coming off the screen. Theater Optimizer even saves different screen sizes and gains based on what Installation mode is selected, so those utilizing multiple zoom memories only have to enter the screen information once for each memory and the Theater Optimizer will adjust accordingly. Unfortunately, Theater Optimizer does not take into account if the projection system is using an anamorphic lens, a surprising omission given that there are Anamorphic A-D menu selections to tell the projector if you are using one.
Another caveat: Theater Optimizer does not automatically adapt over time to the information entered. If you change the lamp mode, zoom setting (manually, not from an Installation mode), or put a significant number of hours on the lamp, you will have to toggle the Set button in the Theater Optimizer menu so the projector can recalculate the tone map based on the changes.
An additional feature of JVC’s update is a completely new picture mode option for users of Panasonic’s UB line of Ultra HD Blu-ray disc players (particularly the DP-UB9000). JVC’s projector line includes color profiles intended to work with the Panasonic HDR Optimizer function discussed in my reviews of Panasonic's DP-UB820 player and of 2019’s firmware update. The new picture mode, Pana_PQ, makes it much easier to preconfigure the projector to take advantage of a Panasonic player’s processing if they prefer using it over JVC’s advanced Frame Adapt HDR mode. (I personally would recommend using Frame Adapt HDR over Panasonic’s built-in tone mapping.) By selecting this picture mode, you can choose from one of two Panasonic color profiles that put the JVC’s gamma into a 2.2 configuration that’s the ideal baseline for overlaying Panasonic’s tone mapping solution.
Performance
JVC sending me a projector loaded with the new firmware provided a rare opportunity to do a true side-by-side comparison of the older Frame Adapt tone mapping feature with the updated version. A main advantage was that I did not have to rely much on visual memory, which can be particularly challenging if there aren’t substantial differences to be seen. Keep in mind that when JVC’s new firmware becomes available it will overwrite all a projector’s existing settings, so any adjustments made by you or a professional video calibrator will be completely erased. The firmware takes about 20 minutes to load and requires only plugging a USB stick containing the firmware file into the projector’s USB port.
I’ve tested various HDR solutions for projectors since the format hit the scene and have even helped develop frame adaptive tone mapping for outboard video processors. For that reason, I have lots of experience to draw on. Right away, I wanted to concentrate on content that challenges tone mapping solutions when it comes to clipping artifacts and balancing high average picture levels. My go-to for both extremely high peak and average light levels is the Spears and Munsil UHD Benchmark disc. This disc’s UHD Montage is a powerful stress test for tone map solutions since it lets you jump between different versions (anywhere from a 10,000 nit to a 600 nit master) and almost instantly see how different nit levels are handled. Also, most of the UHD Montage has a very high average picture level (APL) that makes it difficult to display on a projector without artifacts. JVC’s previous frame adaptive tone mapping solutions had no issues with clipping, even when I jumped from the lowest nit grade to the 10,000 nit grade (I know of no other projector solution that comes remotely close to being able to do this) and the same held for the updated version.
The UHD Montage’s high APL did create a bit of a dilemma for Theater Optimizer, however. JVC’s new feature has an Optimize Level setting with Low, Medium, and High options, but no Auto one. This setting looks like it bounces between gamma curves to compensate for different APLs in content or even for room conditions. I always settled on Low to get the best image quality from the high APL images in the Montage. This beautifully preserved both contrast and color saturation, but there were also a few instances where the image had a slightly processed look that I do not see with more advanced outboard video processors. I saw something similar with the Ultra HD Blu-ray of The Meg, another extremely bright movie with a high APL. The JVC never revealed clipping issues regardless of what Optimize Level setting I chose, but even with Low selected there were scenes that looked a bit overcooked.
Next up, I watched movie titles with a much darker overall look, including Blade Runner 2049 and The Revenant. Maximizing the image for these required changing the Optimize Level setting to High, especially in the darkest moments of The Revenant. I found the difference in subjective image quality when switching from Low to High to be profound with these movies. It’s unfortunate that the Optimizer function doesn’t offer an Auto selection that bases its setting on APL, but since the examples I selected are extreme, I don’t think this will be much of an issue for regular viewing and that users will likely find a single Optimizer setting that works well for the majority of HDR content.
The final component of my test was to compare JVC’s updated tone mapping to the previous release on my existing projector. For this, I made a point of level-matching the projectors as close as possible and to ensure that both were using similar settings and throwing the same image size. The differences I saw were not overwhelming, but also not completely subtle. It was immediately obvious that providing additional information to the projector about the screen and other parameters via the Theater Optimizer yielded benefits. Mainly, the tone map consistently added a bit more punch on the projector with JVC’s updated firmware: images had a brighter overall appearance, colors were more vibrant, and contrast visibly increased.
Even with the Theater Optimizer switched to Off, the new firmware offers better granularity than the previous version for its HDR Level adjustment (5 settings vs. 3). I found that this helped, but not by a huge margin. The HDR Level Auto mode didn’t pick the setting I would have chosen personally, and it still seems to rely somewhat on content metadata to make decisions. I preferred the results I got with the Theater Optimizer engaged, but still wish that the optimizer function provided an Auto mode, which would be more in line with the experience I get when using outboard video processors like the Lumagen Radiance Pro. But overall, JVC’s latest projector firmware brings a step-up in performance to the company’s already industry leading HDR processing. Compared with other solutions on the market, there really isn’t anything that offers the same ease of use and consistently solid performance over a wide variety of HDR content.
Conclusion
With this latest firmware release, JVC has now developed two significant updates for its current projector line. Both add more performance-based features than what we’ve typically seen from the company’s previous mid-model updates, and either would have been worthy of new projectors with new model numbers. The fact that JVC provides these updates completely free to current projector owners is just icing on the cake and boosts the value of the product line considerably. JVC has continued to raise the bar for HDR playback from a projection system and in this particular respect has gained significant ground over its competition. I encourage all JVC owners to take full advantage of the new update when it arrives later this fall!


| Displays Electronics Speakers | Sources Other Gear Software | Top Picks of the Year Top Picks | Custom Install How To Buy How To Use |
Tech 101
|
Latest News Features Blogs | Resources Subscriptions |
WHERE TECHNOLOGY BECOMES ENTERTAINMENT
 © 2026 Sound&Vision
AVTech Media Americas Inc., USA
All rights reserved

