- REVIEWS
Displays Electronics 
Speakers Sources Other Gear Software - HOW TO
How To Buy How To Use Tech 101
Apple PowerBook G4 Laptop Computer Page 2
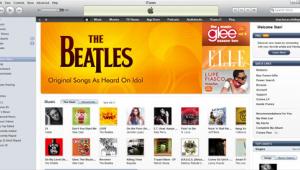
Pay and PlayApple burnished its reputation this past April with the launch of its online iTunes Music Store (applemusic.com). Where the record labels have tried, and failed miserably, Apple has succeeded mightily, offering a wide variety of music downloads and actually getting people to pay for them.
The Music Store makes it easy to browse through and download songs, and it charges reasonable fees - 99¢ a track and $9.99 for an album. But - and it's a big "but," and the reason this is coming up in a PowerBook review - to enjoy the Store, you have to have a Mac, the OS X operating system, and the iTunes 4 software. (Apple planned to open up the site to PC users by the end of the year.) While accessing the Music Store is a chore through a dial-up connection, everything's a breeze when you use a high-speed DSL or a cable-modem line. With a fast link, buffering the 30-second "preview" audio clips and downloading single tracks was almost instantaneous, while transferring entire albums from Internet to hard drive took about 7 to 10 minutes.
To complement my Music Store selections, I used the PowerBook's CD/DVD SuperDrive to transfer tracks from about 100 CDs to its hard drive. Since I wasn't, for the most part, copying entire discs but picking a few songs off each one, it took 4 hours to import about 300 selections. (The iTunes software copies audio at about 5 to 18 times the playback speed.) Once you insert the disc, iTunes presents a list of tracks. Check off the ones you want, hit the virtual "import" button, and you're done.
Of course, you could listen to your music on the laptop, but the small, built-in stereo speakers aren't hi-fi, and tethering yourself to a computer via headphones can be awkward. That's where Apple's iPod comes in. The latest version of the breakthrough MP3 player is smaller and lighter than the previous incarnations, but its 30-GB drive can hold even more music.
The iPod is automatically updated every time it's linked to the PowerBook via the FireWire port, with any music you've added since the last hookup being sent to the player. The first time I connected the iPod was a real shocker. Knowing I'd accumulated about 1,000 tracks, I figured I had plenty of time to make myself a sandwich while the transfer took place. But I'd barely walked out of the room before the system beep let me know it was done. Prime Cuts Impressed with iTunes, I checked out the other members of Apple's "i" family - iPhoto, iMovie, and iDVD - all of which come with the PowerBook. For raw material, I sent 30 photos and six 30-second video clips from a digital camera through the USB port, which took about half a minute, and transferred some video in real time from a MiniDV camcorder via the FireWire port.
You only need to know two words to do sophisticated video editing using iMovie: "cut" and "paste." So if you can handle rudimentary word processing, you can edit a movie. After importing some video clips into iMovie, I used the touchpad to shuffle their icons around in the Viewer Pane until I found a good batting order. Hitting the program's play button showed the clips in sequence. If I didn't like the flow, I rearranged the clips by dragging the icons into a new order. I then hit the Transitions button to add fade-ins, fade-outs, dissolves, and so on, and Titles to add an opening title.
Now for some music. Hit the Audio button in iMovie, and everything that you've stored in iTunes is available for use. Once I made a selection, I put the cursor at the point in the timeline where I wanted the music to start and hit "place at playhead" in the iMovie screen. If the music didn't work with the images, I highlighted the track, hit delete, and went back into the listings to pick another one. Like I said: cut and paste.
Mixing the original audio tracks on the clips with the new music tracks was easy, too. Hit "edit volume" and a horizontal line appears in the middle of each audio track - drag the line up or down to make the audio louder or softer. You can mix three different audio tracks together and can add voiceovers or sound effects through the built-in microphone or the audio input.
Like a Pro Another little jolt of culture shock: Until recently, it would have been inconceivable that you could create a DVD at home that looks as good as the ones you pick up at the video store. And while the learning curve is a little steeper for iDVD than it is for iMovie, it really takes only one evening of fumbling around to create wow-your-friends menus.
Apple offers a variety of predesigned DVD menus, but I wasn't bowled over by any of them, so I created my own. After selecting a scenic view from one of my video segments to serve as a full-motion background, I was ready to design the buttons.
Button making is ridiculously easy. Drag a video file to the menu template and a corresponding button is created, which is linked to the full-length segment. You can choose from a variety of button shapes and styles, label them using any font you want, and have still or moving images within them. Once created, you can position the buttons anywhere you want.
Hitting the preview button causes a virtual remote to appear on the screen. You can now go through your DVD as if it was already on a disc, selecting chapters by clicking on the menu screen or by manipulating the buttons on the remote. If everything in your DVD works the way you want it to, hit the burn button twice and iDVD prompts you for a blank disc. Put a blank DVD-R in the drive, and the software takes care of the rest. In 18 minutes (burning a disc takes about three times the length of the video in the file), I had a DVD I could play in any computer drive or standalone player that can handle DVD-R discs.
|
| |||||||||


| Displays Electronics Speakers | Sources Other Gear Software | Top Picks of the Year Top Picks | Custom Install How To Buy How To Use |
Tech 101
|
Latest News Features Blogs | Resources Subscriptions |
WHERE TECHNOLOGY BECOMES ENTERTAINMENT
 © 2026 Sound&Vision
AVTech Media Americas Inc., USA
All rights reserved

