The Page links are all messed up in this article. It's great info, but I had to adjust the URL manually to read all 4 pages.
- REVIEWS
Displays Electronics 
Speakers Sources Other Gear Software - HOW TO
How To Buy How To Use Tech 101
Table Talk: How To Set Up a Turntable Page 2
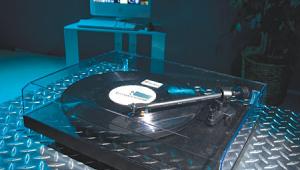
 1) Level the turntable
It’s difficult or impossible to get good performance from your turntable if it isn’t level. To level the table, place a spirit level (like the Clearaudio model seen here) atop the platter, then adjust the turntable or your equipment rack’s feet until it’s level. If your turntable or equipment rack doesn’t have adjustable feet, shim under the rack or turntable’s feet until you get it level.
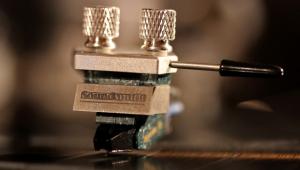
2) Install the cartridge
You can’t do any adjustments until the cartridge is in place. Almost all good tonearms use a standard half-inch mount, which uses two (occasionally three) tiny bolts to secure the cartridge to the headshell at the end of the tonearm. Some cartridges have threaded holes for the bolts, and for these you just need a tiny screwdriver to mount the cartridge. Other cartridges mount with nuts and bolts, in which case you’ll need something to hold the nuts while you’re tightening. I use a tiny socket, holding it in my fingers instead of using a spanner, but you can also use needlenose pliers.
Tighten the bolts so that the cartridge is secure but can still slide around a bit on the headshell. Now carefully — very carefully — attach the color-coded tonearm wire leads to the corresponding pins on the cartridge. I prefer to do this with my fingers, to make sure I don’t break any of the fragile parts, but I sometimes need a pair of tweezers to get the wire terminals onto the pins. If the terminals won’t fit, use a toothpick to ease them — carefully — open just a tad.
 3) Set the vertical tracking force
Vertical tracking force (VTF) is the force of the stylus pressing against the record. Too little and you’ll get distortion and/or skipping. Too much and you’ll prematurely wear out your stylus. The cartridge manual will tell you the proper tracking weight range for your cartridge.
To adjust VTF, you need a tracking force gauge. Some manufacturers, notably Pro-Ject, include a basic gauge with their turntables, but in my opinion the Shure SFG-2 mechanical gauge (seen in use here) is way better and well worth the $25 I paid for it. You can also opt for an electronic gauge, which will be more accurate but more expensive. My AcousTech digital gauge cost $79.
Before you set the tracking force, remove the stylus guard. Now “float” the tonearm by moving the counterweight at the rear of the arm until the arm and cartridge can fl oat smoothly across the platter without touching it. Some tonearms have a tracking force scale, marked in grams; if yours does, you’ll want to make sure it’s set to zero when the arm is floated.
Place the gauge on the surface of the platter (without a record on it) and gently increase tracking force by moving the counterweight slightly toward the cartridge. Many counterweights adjust by twisting around the tonearm. Measure the tracking force, and readjust the counterweight until it’s within the specified range. If your tonearm has scale markings for tracking force, you can use them to set VTF, but it’s a good idea to double-check it with a gauge.
NEXT: Page 3 »
|
| |||||||||
- Log in or register to post comments

Table Talk Links Restored
Submitted by Bob Ankosko on January 16, 2014 - 7:46am
The links have been fixed. Thanks for pointing this out. When the Sound & Vision and Home Theater sites merged some links were lost.


| Displays Electronics Speakers | Sources Other Gear Software | Top Picks of the Year Top Picks | Custom Install How To Buy How To Use |
Tech 101
|
Latest News Features Blogs | Resources Subscriptions |
WHERE TECHNOLOGY BECOMES ENTERTAINMENT
 © 2025 Sound&Vision
AVTech Media Americas Inc., USA
All rights reserved

