- REVIEWS
Displays Electronics 
Speakers Sources Other Gear Software - HOW TO
How To Buy How To Use Tech 101
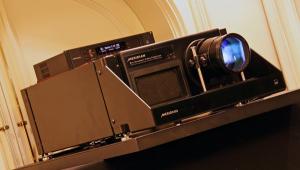
Runco D-73d 3D DLP Projector, Part 3
For most of the day, we used a Stewart 5D polarization-preserving screen (16:9, 87 inches wide, 2.5 gain), which I profile here. It was the latest version of the 5D material that can be microperfed and mounted in a retractable mechanism, though in this case, it was not microperfed, and it was mounted in a fixed CineCurve frame.
Walking around the room, I could see no apparent hot-spotting on or off axis, and the off-axis brightness was quite good up to about 30 degrees. According to Williams, a curved screen combats hot-spotting on high-gain material because the projector acts like a point source of light that is reflected back to the audience in parallel rays, much like a curved antenna with a point source at its focus. The important thing is to place the projector at a distance that corresponds to the center of the circle defined by the screen's curvature. I didn't have the opportunity to compare it to a conventional white screen on 2D material, but I didn't see any obvious color shifts.
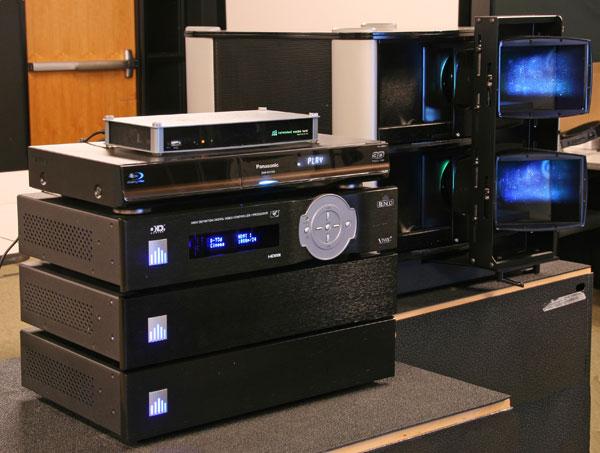
We used two source devicesa Panasonic DMP-BDT350 3D Blu-ray player and a Popcorn Hour A-110 media server loaded with custom 3D content. As described in Part 2, the sources were connected via HDMI to the 3Dimension 3D processor to separate the left and right images, which were then processed by separate DHD4 processors before being sent to the projector's two engines.
Measurement and calibration were performed using a Klein K-10 tristimulus colorimeterwith its LED conversion tables enabled so it would read the projector's LED-generated colors accuratelyand SpectraCal CalMan v.4 software along with a Quantum Data 780 test-pattern generator. I brought my Minolta LS-100 light meter, thinking the K-10 would not be as accurate at low light levels, but I was surprised that it gave much the same results as the Minolta.
We started by setting the basic picture controls. Then, we measured the peak-white and black levels in both 2D and 3D mode, making sure that Constant Contrast was off. The projector has no 2D-to-3D conversion, but it does provide a Frame Packed 3D mode that allows it to display 2D test patterns that can be measured.
Using my LS-100 directly on axis with the center of the screen, I measured an astounding peak-white level of 53.1 foot-lamberts in 2D mode with both projectors on. The K-10 was slightly below and pointing up at the center of the screen, and it measured around 40fL, indicating that the vertical viewing angle is more critical with this material than my casual observation of the horizontal viewing angle suggested. In any event, these numbers are very highadmittedly on a smallish, high-gain screenwhich means that 2D viewing could be easily done with one projector under these conditions.
In 3D mode, I placed one lens of the polarized glasses in front of the light meter and measured a peak-white level of 7.9fL, which is quite respectable for 3D. However, Williams maintained that this number represents the amount of light reaching one eye and should be doubled for the total amount of perceived light, in which case the peak-white level was 15.8fL, about one third the level in 2D mode with both projectors on.
Measuring the black level directly on axis yielded 0.025fL in 2D with both projectors on and 0.005fL in 3D mode with a glasses lens in front of the light meter (resulting in a total perceived black level of 0.010fL). Calculating the peak contrast ratio, it's 2124:1 in 2D and 1580:1 in 3D modeadequate, but not stellar.
Keep in mind that Constant Contrast was turned off; setting it to Low, the peak white level remained about the same while the black level dropped to 0.005fL in 2D mode and 0.001fL in 3D mode with a glasses lens in front of the meter. The resulting peak contrast ratios jumped to 10,620:1 in 2D and 7900:1 in 3D.
Next, I wanted to see the Rec. 709 and Native color gamuts, which were measured in 2D mode. Many thanks to Ray Coronado for his help extracting the following graphics.
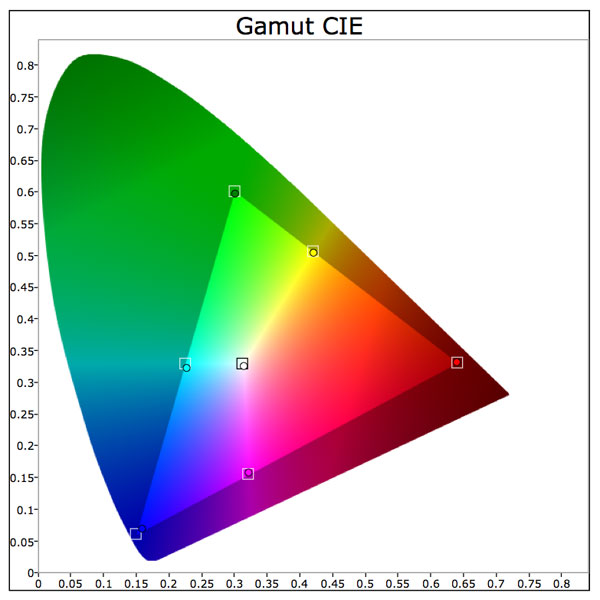
The Rec.709 gamut was virtually spot on all the way around. Blue was ever-so-slightly undersaturated, but not that you'd notice on real-world material.

As expected, the Native gamut is much larger and more saturated than Rec.709. However, notice that the white point remains in the same place for both gamuts.
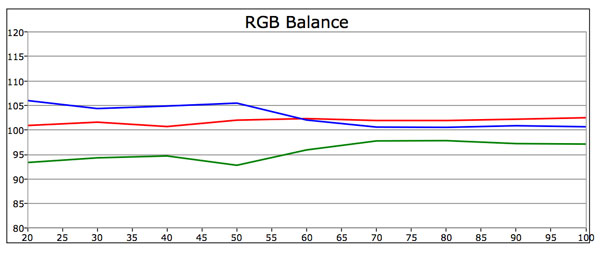
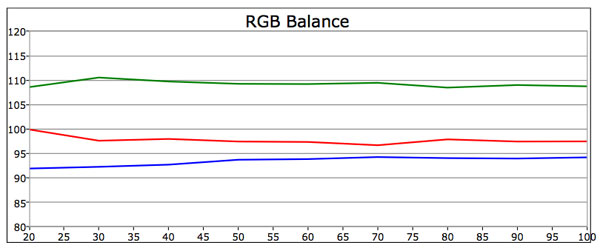
According to Williams, the entire grayscale should remain the same regardless of the selected gamut, so we measured it in the Rec.709 and Native gamuts with the color-temperature parameter set to 6500K. Above is the pre-cal grayscale in Rec.709; clearly, it's deficient in green.
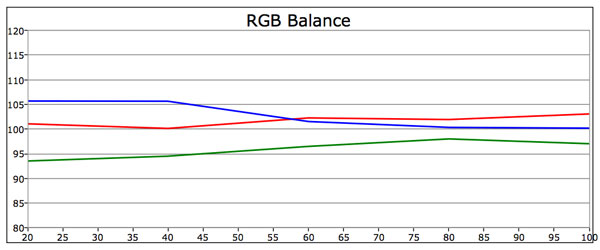
Here's the pre-cal grayscale in the Native gamutnot identical to Rec.709, but very similar.
We also measured the grayscale in 3D mode with a glasses lens in front of the meter. In this case, there was an overabundance of green and too little blue.
Finally, we calibrated the grayscale in 2D and 3D mode using the basic 2-point controls. The DHD4s can calibrate up to 100 brightness levels using the latest version of the CalMan software, but we didn't have time for that.
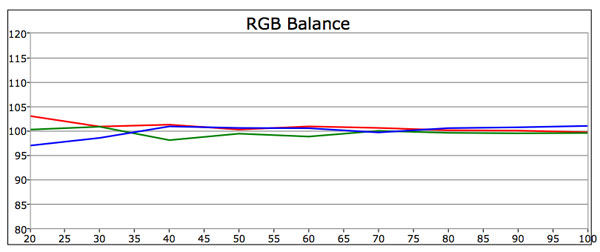
With the Rec.709 gamut in 2D mode, the grayscale dialed in quite well, with only a slight deviation at the low end. A 10-point calibration would easily fix this.
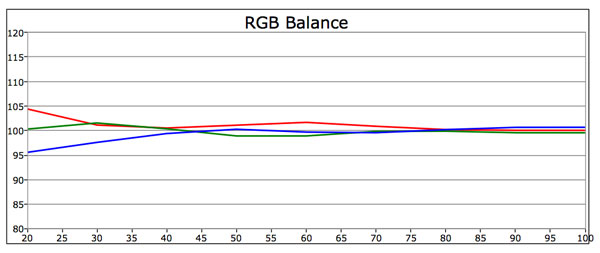
With the Native gamut, the deviation in the low end was a bit more pronounced. Again, a 10-point calibration would fix this.
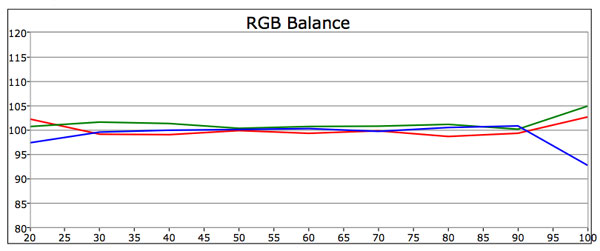
In 3D mode with a glasses lens in front of the meter, the grayscale calibrated very well except for the highest brightness levels, which could be addressed with a 10-point calibration. Unfortunately, I didn't take note of which gamut we were using for this measurement.
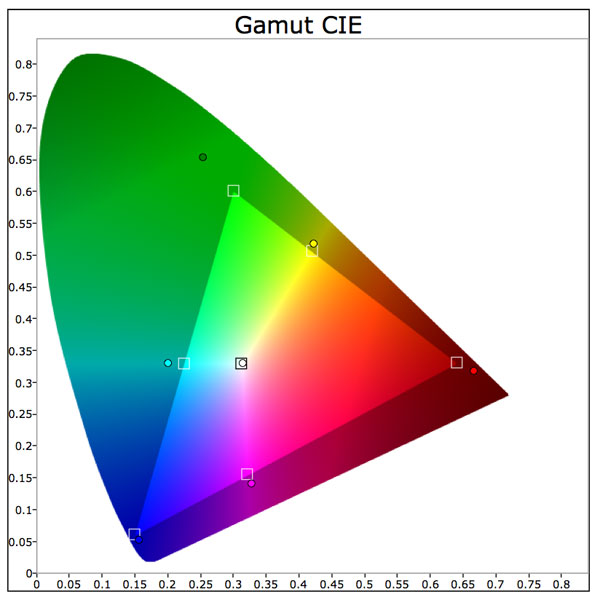
As you'll see in Part 4, I actually preferred watching real-world content in the Native color gamut with Runco Smart Color (RSC), which tones down the brightness of the colors to prevent them from glowing, and it corrects flesh tones to look more natural. The measurement depicted above was taken after calibration in the Native gamut with RSC engaged.
As you can see, most of the color points are somewhat closer to the Rec.709 targets than they are in the raw Native gamut, especially yellow, which is nearest to flesh tones. But green and red are still much deeper than Rec.709, which was obviousand pleasing to my eyein real-world material. Also, notice that the white point is spot on.
In the final installment of this report, I'll reveal what I saw watching actual 3D and 2D movies, so stay tuned!


| Displays Electronics Speakers | Sources Other Gear Software | Top Picks of the Year Top Picks | Custom Install How To Buy How To Use |
Tech 101
|
Latest News Features Blogs | Resources Subscriptions |
WHERE TECHNOLOGY BECOMES ENTERTAINMENT
 © 2026 Sound&Vision
AVTech Media Americas Inc., USA
All rights reserved

