- REVIEWS
Displays Electronics 
Speakers Sources Other Gear Software - HOW TO
How To Buy How To Use Tech 101
Out of the Box

Mark Schanbacher
Most buyers of a new TV simply take it out of the box, turn it on, and leave it at that. Unfortunately, they probably aren't seeing the best image quality the set is capable ofmost likely, it's too bright and too blue, the whites are clipped, and the blacks are crushed.
The good news is that it's relatively easy to improve the picture dramatically. If the TV complies with Energy Star 3.0 energy-saving guidelines, the first time it is powered up, a message will likely appear on the screen asking if it's going to be in a home or retail environment. Select "Home," which typically sets the picture controls so that the TV is not in its so-called "torch" modeas bright and blue as possible to attract attention on a showroom floor. Remember that your home is nothing like a retail environment, so the optimum settings are completely different. (In a few cases, selecting "Home" puts the TV in its torch mode anyway, so be sure to follow the steps outlined here in any event.)
Next, open the TV's picture menu, find the Picture Mode control, and select Movie, Cinema, or similarly named setting. This further refines the picture controls to produce the most accurate image possiblethat is, the color of gray is as close to neutral as possible, with little or no bias toward red, green, or blue, and the white level is not maxed out, which usually leads to white clipping.
To verify that the color of gray is as neutral as possible, find the control called Color Temperature or Color Tone, which might be in an Advanced submenu. This control has settings labeled Cool, Normal or Standard, and Warmin some sets, such as those from Sony and Samsung, there are two Cool and two Warm settings. Make sure this control is set to Warm (or Warm2 in a Sony or Samsung set). Most often, the Warm setting produces the most neutral color of gray, which is technically called the grayscale.
If your TV is THX certified, one Picture Mode setting will be labeled "THX," which is generally the most accurate preset mode. In my reviews of such sets, I've found the THX mode to be reasonably accurate, but I was able to get it even closer with some additional tweaking. In most cases, however, the THX mode prevents you from adjusting the picture controls, so if you want to take the next steps as described below, you'll need to select the Movie or Cinema picture mode and make sure the color temperature is set to Warm.
You can call it quits at this point, and the picture will be a lot better than if you had simply taken the TV out of the box and watched with its default settings. But it can be better still. If you want to take the next step, you need a setup disc, which typically costs around $25 to $35my favorites are HD Benchmark and Digital Video Essentials: HD Basics on Blu-ray and HDTV Calibration Wizard on DVD. (Digital Video Essentials on DVD is more comprehensive, but the menu system is very confusing for consumers.) I especially like HDTV Calibration Wizard for consumers because it guides you through the process step by step. To illustrate the following procedure, I'll use screen shots from HD Benchmark.
One last point before we get into ittry to perform this procedure in the same lighting conditions you will be using to watch the TV. Ideally, you should use subdued or no lighting, but if that's not practical, use whatever lighting will be present while watching, which will affect how you perceive the image.
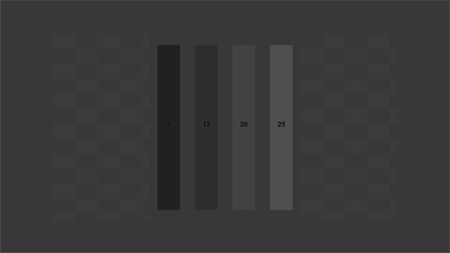
If you're not using HDTV Calibration Wizard, call up a test pattern called PLUGEif there's more than one, select the Low PLUGE. Find the Brightness control in the TV's picture menu and raise it's value until you see several dark vertical stripesone will be darker than the background and one will be lighter. The background is technically called "video black," the darkest stripe is said to be "below black," and the lighter stripe is said to be "above black." (In the PLUGE Low pattern from HD Benchmark shown here, there are four stripesthe two on the left are below black, and the two on the right are above black. Also, there's a faint checkerboard pattern in the background. The image above is intentionally misadjusted so you can see the below-black stripes.)
Reduce the Brightness control until the below-black stripe just disappears. In the PLUGE Low pattern from HD Benchmark, both below-black stripes should not be visible, and the checkerboard pattern should be just barely visible. In some cases, you might not see the below-black stripe at all because the TV or player clips anything below video black. If so, reduce the Brightness control until the above-black stripe is barely visible.

Next, find a test pattern called Contrast or Clipping. This pattern has sections that are above the level called "video white." Unlike black, you want to be able to see above video whiteofficially, there isn't supposed to be anything above video white, but real program material sometimes does include such information, so my philosophy is to set the TV so it can display this information. Find the TV's Contrast control (sometimes called Picture) and increase it until the above-white part of the pattern looks solid whiteit might well look this way at the default settingthen lower it until the above-white areas are just visible.
In the Clipping pattern from HD Benchmark shown above, the white rectangle in the upper left quadrant is the one to look atit consists of two squares, each with concentric areas of above-white information. At the correct setting, you should be able to see all of these areas as distinct from the others. Ignore the colored squares.
Before moving on, go back and check the PLUGE pattern again to make sure the Brightness is still set correctly. The Brightness and Contrast controls often interact, so you might have to go back and forth a couple of times to get them both right. These are the two most important controls to set properly in order to see the best possible picture on your new TV.
The next step is to set the Color (sometimes called Saturation) and Tint (sometimes called Hue) controls, but these are not as important for a couple of reasons. First, in most modern TVs, they are pretty close to correct out of the box. Second, they often require you to use a blue filter to set them while displaying a test pattern called Color Bars. Most setup discs come with a blue filter, but these filters are notoriously inaccurate, especially with LCD TVs, and they often lead to incorrect settings. Some TVs provide a so-called "blue-only" mode, which disables the red and green colors, making it easy to set the Color and Tint controls accurately, but most don't.

If your TV doesn't offer a blue-only mode, I recommend just leaving the Color and Tint controls at their default settings, which are probably fine. If your TV does have a blue-only mode and you want to make sure they are set correctly, display the Color Bars test pattern and engage this mode, then raise and lower the Color control while looking at the pattern; you will see some bars and other areas of the image appear to change in brightness relative to each other. Set the Color control so these areas are the same brightness. Repeat this process with the Tint control, which will cause different bars to vary in brightness. As with Contrast and Brightness, Color and Tint are interactive, so you might need to tweak them a couple of times before you're done.

The last step is setting the Sharpness control. Display a test pattern called Sharpness and increase the Sharpness control until you see white borders around the black lines on a gray background. Then, decrease the Sharpness control until these white borders disappear. In many sets, the best Sharpness setting is its minimum value.
This is as far as consumers can go, and it will dramatically improve the picture quality of any new TV. If you want to go the extra mile, you must have a qualified technician perform a grayscale calibration, which requires some serious training and expensive equipment, so such a calibration typically costs several hundred dollars. But it will probably further improve the picture, and you will be assured that the TV is producing the best picture it possibly can.
If you have an audio/video question for me, please send it to scott.wilkinson@sorc.com.


| Displays Electronics Speakers | Sources Other Gear Software | Top Picks of the Year Top Picks | Custom Install How To Buy How To Use |
Tech 101
|
Latest News Features Blogs | Resources Subscriptions |
WHERE TECHNOLOGY BECOMES ENTERTAINMENT
 © 2026 Sound&Vision
AVTech Media Americas Inc., USA
All rights reserved

