- REVIEWS
Displays Electronics 
Speakers Sources Other Gear Software - HOW TO
How To Buy How To Use Tech 101
The DIY Homeowner's Guide: Installing In-Wall and In-Ceiling Speakers
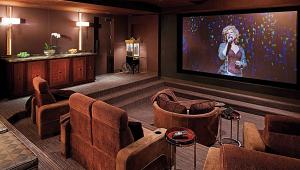
 Like many homeowners, you probably enjoy home theater, but you'd prefer not to have five speakers and a subwoofer on your living-room floor. Then consider in-wall speakers as a solution. The question is, can you install them yourself, or should you call a professional? The answer is, yes you can install in-walls yourself, with some planning, a few basic tools, and a little patience. Here's a step-by-step overview of the process of installing in-wall (or in-ceiling) speakers, as well as the parts and tools you'll need to complete the job like a pro.
Assuming you have a few basic tools (a cordless drill, screwdrivers, tape measure, level, wire cutters, and a staple gun), the cost of this project, excluding the speakers, should be about $150 to $200 (for the fish tape, hand drywall saw, stud finder, and speaker switcher).
Step 1: Select Your Speakers
Whether you're installing two or five speakers, there's a wide variety of in-wall and in-ceiling speakers available at every price range. Audition and select speakers based on your personal sound preferences and budget. Try to use the same model speaker for all channels in the system for consistent performance. Don't pay too much attention to appearance, because almost all models offer removable grilles that you can paint to match your walls or room décor.
With the exception of some high-end models, most in-walls are rectangular, between 10 and 18 inches tall, and designed to fit between wall studs, which are spaced 16 inches on center. Many speakers are round and suitable for in-wall or in-ceiling installation. Some in-wall speakers come with enclosures or back boxes, and some do not. In general, speakers with enclosures have more predictable bass performance because they are not dependent on the volume of the wall cavity, which varies among homes.

In-wall subwoofers are also available that fit neatly into a wall cavity. Most in-wall subwoofers are passive, meaning they are not powered and need a separate amplifier.
Step 2: Determine Speaker Placement and Locate Obstructions Behind the Walls
Ideal speaker placement for the front speakers (left and right channels) is 6 to 10 feet apart and positioned at seated ear level, about 38 to 42 inches from the floor. Try to position the speakers at least 3 feet from a corner, because bass can sound overemphasized when speakers are installed in a corner. Try to locate the center-channel speaker directly between the left and right speakers at the same height. You can install the surround speakers higher in the wall, but they should be the same distance from the listening position as the front speakers, if possible.
Once you've found the best location for the speakers, check for any obstructions behind the wall, such as pipes or wires. The easiest way to do this is to drill a small 0.25-inch hole in the wall and insert a coat hanger bent at a
90-degree angle. Move the coat hanger around to feel for any obstructions. If you find any, it's easy to patch the small hole and find another location. Another method is to cut a larger hole and insert a small mirror to view the inside of the wall cavity for potential obstructions. It's important to locate the wall studs and install the speakers directly between them. You can locate the studs by tapping on the wall, but the best way is to use a stud finder, available for about $15 at a hardware store or home-improvement center. If you don't find any obstructions, and you've located the studs, it's almost time to cut the drywall.
Step 3: Cut the Holes for the Speakers
This is where planning is most important. Before you cut the holes for the speakers, jump ahead to Step 4 and consider how you will run the wires from the amplifier or receiver to the speakers. Although you've identified the best location for the speakers, you may find that running wires to that location is difficult or impossible. Once you confirm that you can install the wires, you can proceed with cutting the holes.
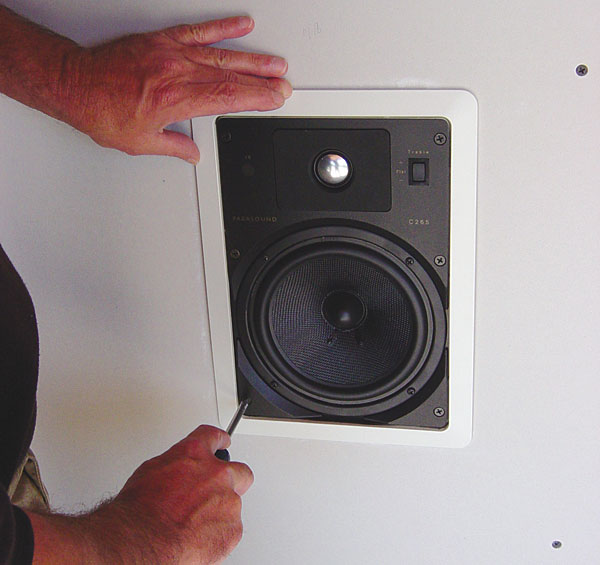
Most in-wall speakers come with a cutout template. Position the template on the wall where you want the speaker and trace an outline with a pencil. Use a level to make sure the template is properly aligned and straight. Remember: Measure twice and cut once. Although you can use an electric jigsaw to cut the hole, it's easier to control a hand drywall saw, and it spreads less drywall dust. You can buy a hand drywall saw for $5 to $10. Start by drilling a 0.5-inch hole in the inside corner of the traced outline, insert the drywall saw, and cut around the perimeter. Don't concern yourself with rough edges; the speaker's frame will cover them.
> Helpful Tip: Use a shop vac, not a household vacuum cleaner, to clean up any drywall dust. The fine-grained drywall dust will ruin a household vacuum cleaner. I learned this lesson the hard way.

Step 4: Running the Speaker Wires
The most labor-intensive part of the job is running the wires from your amp or receiver to the in-wall speakers. This step also deserves the most consideration and planning. There are four choices for installing speaker wires. You can run them overhead through an attic space; beneath the floor if you have a basement or raised foundation with a crawl space; behind the baseboards, through the wall, and up to the speakers; or use flat speaker wire that adheres to the wall surface up to the speakers. Option four is the least desirable. Depending on your home's construction and the distance from the audio components to the speakers, the easiest method is probably through the attic. Evaluate the accessibility of each area where you plan to install the wires. You may find that a combination of installation methods works best for you.
To run wires through walls, also known as fishing, you'll need a tool called a fish tape, which electricians use to pull electrical wires through inaccessible areas. Fish tape is a length of stiff wire with a hook at the end. A long fish tape is wound around a reel, and a short fish tape (4 feet) is not. In some cases, you'll need both to complete the job. You can purchase a long 25-foot fish tape for about $20.
If you are running the wires overhead through the attic, you may need to drill an access hole through the top plate(s) (one or more two-by-fours) of the wall and down into the wall. If you are working from beneath the floor, you may need to drill a hole in the bottom plate(s) up into the wall. If you're running wires laterally through the walls, you may need to cut small holes in the drywall to expose the studs and drill holes large enough for the wire. The drywall holes only need to be 1 inch high and wide enough to expose both sides of the stud. And you can easily patch them. If you decide to run wires behind the baseboards, remove them and cut a channel into the drywall with a utility knife, run the wires, and then replace the baseboards.
The recommended size or gauge of the wire you use depends on the distance from the amplifier or receiver to the speakers. Typically, 14- or 16-gauge wire works well for most installations up to 100 feet. Beyond that, use 10- or 12-gauge wire, which is larger in diameter and requires larger holes. Use good speaker wire for the best sound quality. It's a good idea to staple or secure the wire in place, whether you're running the wires through the attic or under the house. Be careful not to pierce the insulation around the wire while stapling.
When working in the attic or under the house, be sure to wear gloves, a mask, and a cap to protect you from dust, fiberglass insulation, and other hazards.
Note: If you are installing speakers in several rooms that are powered by one amp or receiver, it is important to install a switcher with an impedance-matching device. This is essentially a small box with several speaker connectors that ensures that the component will work with multiple speakers. An Internet search for impedance-matching speaker switchers found multiple models that will accept up to six pairs of speakers for under $100.
Step 5: Installing the Speakers
If you want to paint the speaker frames and grilles to match the walls, paint them before you install them. Always use spray paint and mask the speaker components. Some in-walls come with a paint mask for this purpose. Several light coats of paint are better than one thick coat.
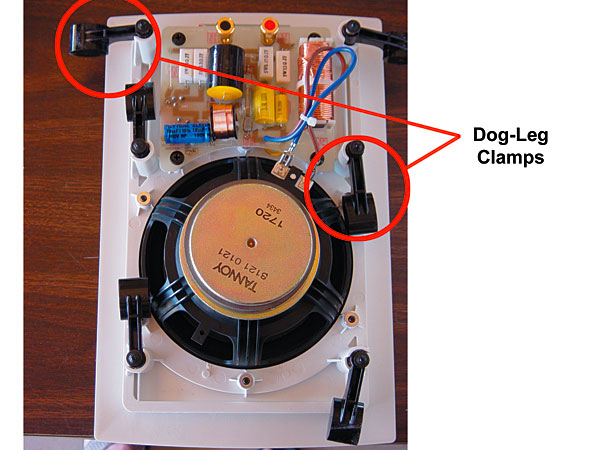
Most in-wall speakers use four or six dog-leg clamps to secure the speaker to the wall, and some have a gasket that goes between the speaker frame and the wall to prevent vibrations and wall rattles. After inserting the speaker (and gasket, if applicable) into the cutout, tighten the screws on the front of the speakers to move the clamps into position and attach the speaker to the wall. Some speakers use a perimeter clamp, which uses the entire frame to clamp the speaker to the wall. Both types work well when properly installed. Some in-wall speakers are installed in two pieces. The frame is secured to the wall, and the speaker is then inserted into the frame.
Consider installing some insulation (R-13) in the wall cavity behind the speakers to improve sound quality. The width of the insulation is usually pre-cut, so you only need to cut it to length and insert it in the opening behind the speakers.
Step 6: Connect Speaker Wires to Amplifier or Receiver and Test for Sound
Strip about 0.5 inches of insulation from the end of each speaker wire, and insert the wire into the correct speaker terminal on the amplifier, receiver, or speaker switcher. Each speaker has a positive (red) and a negative (black) terminal, and amplifiers have similar identifying marks or colors. It's important to connect them correctly.
Turn on the amp or receiver to perform a sound check. Start at a low volume, in the case of a problem. Listen to each speaker, and use the balance control (stereo receiver) or speaker test tones (multichannel receiver) to make sure all channels are connected correctly. If you don't hear any sound from a speaker, shut off the receiver and check your connections. If the receiver turns on and then immediately shuts off, you probably have a wire connected incorrectly, bare wire touching metal, or a bad connection. Re-check the connections on each speaker and on the back of the receiver. > Helpful Tip: Speaker wires usually have marks or colors that identify positive and negative wires. If yours don't, use tape to mark them for easy identification.
Step 7: Optional, but Highly Recommended
Turn on your favorite movie or music, sit back, and enjoy your work.

Parts and Tools Required:
1. Cordless drill with a variety of bits
2. Hand drywall saw
3. 25-foot fish tape
4. Stud finder
5. Gloves, dust mask, and cap
6. R-13 wall insulation
7. Screwdrivers (Philips and slotted)
8. Wire cutters with insulation stripper
9. Level
10. Tape measure
11. Staple gun
- Log in or register to post comments


| Displays Electronics Speakers | Sources Other Gear Software | Top Picks of the Year Top Picks | Custom Install How To Buy How To Use |
Tech 101
|
Latest News Features Blogs | Resources Subscriptions |
WHERE TECHNOLOGY BECOMES ENTERTAINMENT
 © 2025 Sound&Vision
AVTech Media Americas Inc., USA
All rights reserved

