- REVIEWS
Displays Electronics 
Speakers Sources Other Gear Software - HOW TO
How To Buy How To Use Tech 101
The Setup Page 5
 |
| Helpful Hint You can paint your dish to match your house. Just don't use lead-based or glossy paint, which will interfere with performance. |
You can now finish assembling the dish by threading the coaxial cable through the mast and arm and connecting it to the LNB, which you can then secure to the arm. Run the coaxial cable from the antenna to a grounding block (which you can pick up at a RadioShack or your local hardware store) and then from the block into your house. Then run a ground wire from the block to a proper grounding location, such as a cold-water pipe. Your system must be grounded in accordance with local codes, the National Electrical Code, and the manufacturer's requirements.
Before affixing the coaxial and grounding cables, make a "drip loop" by bending the cables in a 3- to 5-inch loop or "U" below the grounding block. This will prevent moisture from running directly from the cables into the house - it'll drip off the bend instead. Use silicone sealant to seal all outside connections (some antennas come with rubber weatherproof connector sleeves) as well as the hole you'll need to drill for the cables to enter your house.
Depending on your house's layout and construction, and how far the dish is from the receiver, running the cable could be the toughest part of the installation. Make sure you'll be able to snake the wire through the hole in the side of the house and through the intervening wall or walls to the receiver. Try to locate the dish near the room where you'll have the TV so there's only one wall to run the wire through.
My Aim Is True
 |
| Place the dish assembly on the mast and position it for maximum signal strength. |
Whew! Now it's time to aim the dish for maximum signal strength. Since you'll need to hear the beeping tones that indicate you've locked in a signal, position your TV so you can hear it from wherever you're installing the dish - even if that means hooking up a portable TV -or enlist the aid of a friend. (The signal strength will also be indicated on the screen, but you probably won't be in a position to see this.)
Bring up the onscreen dish-pointing menu. At first, the signal-strength meter probably won't be indicating that you're getting a signal even if you've aimed the dish in the right general direction. Adjust the dish's azimuth and elevation settings in small increments (the calibration markings on the dish assembly will help with this) until you get a signal, and then continue until you have the maximum signal strength. Since the beep will become higher or more rapid as you close in on the optimal position, you'll be able to keep your eye on what you're doing instead of the TV screen.
Next, run a cord from a nearby telephone jack to your receiver's phone connection so your satellite program provider can contact the special-access "smart" card in the receiver, activate access to pay-per-view events, and perform other functions. If you don't have a phone jack nearby, get a long phone cord and plug it into any available jack for now. But plan to install one nearby or use a wireless phone jack instead. Now you're all set to call your satellite program provider to tell 'em you're online, and order those hundreds of channels you've been lusting for.
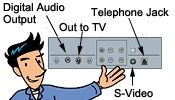 |
| You'll need to run a cable from a nearby telephone jack to the satellite receiver. Depending on the model, you might be able to send a component-video signal to your TV and 5.1-channel Dolby Digital surround sound to your A/V receiver. |
Hook Me Up! If you're one of those people who want satellite TV not just for the vastly expanded programming but also for the improved picture and sound quality, hook up the satellite receiver to your TV or home theater receiver using the best possible video and audio connections. Using the A/V outputs on the satellite receiver will give you stereo audio and also give you better video than the "out to TV" RF coaxial output. Using the S-video output will give you better video still (assuming your TV has an S-video input, as most newer models do).
Most satellite receivers have multiple sets of A/V outputs, making it easy to connect them to both a TV and a VCR or to run the signal to more than one TV. You can also feed the signal to more TVs by splitting the receiver's coaxial RF output (as is commonly done with cable-TV signals). Since you're getting the signal from a single receiver, though, you'll see the same program on all the TVs. But you can use an RF remote-control/repeater unit to change channels from a remote location.
Most satellite receivers also let you switch between satellite broadcasts and terrestrial broadcasts via a regular antenna, for seamless transitions between channels regardless of the signal source. Some newer receivers even have an HDTV tuner, wideband component-video or VGA jacks, and digital audio outputs so you can enjoy HDTV broadcasts from both EchoStar and DirecTV with the highest-quality picture and 5.1-channel surround sound.
It's impossible to list all the connection possibilities, but most receiver manuals spell all the options out in detail. Ambitious DIYers can go hog-wild patching satellite TV into a multiroom or whole-house distribution system - but that's a topic for another article.
That's all for now, folks. The sky is calling! The sky is calling!
|
| |||||||||


| Displays Electronics Speakers | Sources Other Gear Software | Top Picks of the Year Top Picks | Custom Install How To Buy How To Use |
Tech 101
|
Latest News Features Blogs | Resources Subscriptions |
WHERE TECHNOLOGY BECOMES ENTERTAINMENT
 © 2025 Sound&Vision
AVTech Media Americas Inc., USA
All rights reserved

