- REVIEWS
Displays Electronics 
Speakers Sources Other Gear Software - HOW TO
How To Buy How To Use Tech 101
The Setup Page 3
Now go outside to the mounting location and move a compass around until its pointer is due north. Then locate the tick mark on the compass that corresponds to your azimuth coordinate. That's where you'll need to point the dish. (If your compass lacks degree indications you'll have to estimate. Remember that due east is 90°, due south is 180°, and due west is 270°.) Double-check to make sure you have a clear line of sight. You can use a protractor to establish the angle of elevation, though holding your arm out halfway between straight in front of you and straight over your head will tell you approximately where 45° is. You can then estimate the correct angle.
Assembly Period Assemble the antenna before you take it to wherever you're going to mount it. This is actually pretty easy (a lot easier than, say, putting together the bike you bought for your kid). All small-dish satellite-TV systems are similar and consist of the same basic parts:
- a reflector dish to collect the signals broadcast from the satellite - typically about 18 to 22 inches wide and more or less elliptical depending on which service you're using and what kind of programming you want to receive;
- a low-noise block downconverter, or LNB for short - a small module that fits onto the end of the dish's support arm, picks up the signals reflected off the dish, converts them to lower frequencies suitable for transmission through coaxial cable, and sends them to the receiver;
- a mast and mounting foot; and
- a support arm that attaches to the dish, holds the LNB, and fits on top of the mast.
First, attach the support arm to the reflector dish using the appropriate nuts and bolts (they should be supplied). Then set the elevation of the dish using the calibrated elevation indicator and scale on the side of the support arm. Loosen the nuts near the elevation indicator, move the dish so the indicator lines up with the number that corresponds to the elevation setting you got earlier from the onscreen menu, and tighten the nuts.
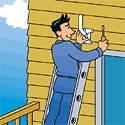 |  |
| Left: Mount the antenna mast on wood siding, brick, or concrete. A roof can be unstable, and drilling the holes can cause leaking or other damage. Right: Use a plumb line or a bubble level to make sure the mast is vertical. | |
 | 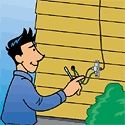 |
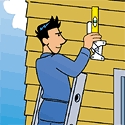
| Left: Attach the support arm to the dish and install the LNB. Right: Run a cable from the dish to the grounding block and then through the house wall to the receiver. Be sure to run a wire from the block to a proper ground. | |
|
| |||||||||


| Displays Electronics Speakers | Sources Other Gear Software | Top Picks of the Year Top Picks | Custom Install How To Buy How To Use |
Tech 101
|
Latest News Features Blogs | Resources Subscriptions |
WHERE TECHNOLOGY BECOMES ENTERTAINMENT
 © 2025 Sound&Vision
AVTech Media Americas Inc., USA
All rights reserved

