- REVIEWS
Displays Electronics 
Speakers Sources Other Gear Software - HOW TO
How To Buy How To Use Tech 101
Mysteries of the Turntable Explained Page 3
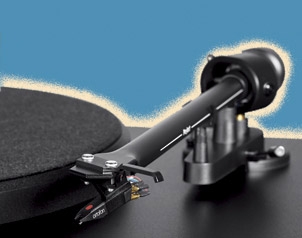
As mentioned earlier, installing and aligning a half-inch-mount cartridge is a particularly fiddly job, so unless you feel you missed your calling as a jeweler or eye surgeon, it probably pays to have a pro do the job. As with those unwanted vibrations discussed earlier, tiny alignment errors can make or break your 'table's performance. And when you consider that cartridges tend to be both extremely fragile and hideously expensive for something so small, this is not a task for the timid. But if you're still game, place the turntable where it's close to eye level with plenty of strong light. I like to use high-magnification reading glasses along with a small LED flashlight, since this makes those tiny alignment errors easier to see.
Make sure you have the stylus cover in place - if you have a moving-magnet cartridge that lets you remove the stylus assembly, even better. You first need to attach the four output wires, and then physically attach the cartridge to the headshell. The wires attach using tiny collars that slide over the four pins on the cartridge. There is supposedly a standard for the pin size, but often you'll find that the collars need to be tightened to get a snug grip on the pins. I carefully squeeze the collars with needle-nose pliers as needed, although be sure not to flatten them so much that they won't push onto the pins. Standard color coding is white and blue for the left channel, and red and green for the right channel, with the white and red wires connected to the positive output pins.
Most cartridges come with hardware to attach the cartridge to the headshell, and some even have internally tapped mounting holes that make the job much easier. Otherwise, I prefer to use M2 stainless-steel hex-head screws and nuts, since a hex key is less likely to slip and take out your stylus than is a flat-blade screwdriver. Many cartridges have magnets that are powerful enough to suck your screwdriver tip right into the stylus area, so watch for that too.
Aligning the cartridge in the headshell could be the subject of an entire article by itself. But basically there are up to six points of alignment you need to adjust. Always start by setting the tracking weight, since you don't want to make all of the other adjustments only to discover that you were crushing the cartridge with 12 grams of pressure the whole time. Use the manufacturer's recommended setting to start, and set the anti-skating adjustment to match. Then adjust the overhang, which is the front-to-back position of the cartridge in the headshell. If your arm didn't come with a tool to do this, there's a host of both commercial and free gauges available for this job, some easier to use than others.
Next, you have to adjust the zenith, which is the rotation of the cartridge in the headshell when viewed from directly above. You want to get the cartridge - or more precisely the tiny cantilever that holds the stylus - square with the lines on your alignment gauge. Azimuth involves rotating the headshell so that the cartridge is absolutely perpendicular to the record when viewed from head on. (Many arms don't allow for this adjustment, even though it's one of the most critical.)
Finally, you have to adjust the vertical-tracking and stylus-rake angles, two interrelated settings that are affected by both the height of the tonearm in its mounting pillar and to some extent by the tracking force. While getting these right does make a difference, I feel that their importance is often overplayed in audiophile communities, and I would argue that most of the other adjustments are far more critical. Many arms don't even let you adjust these, so don't get too bent out of shape about them.
Once you have everything optimized, go back and recheck each setting. You'll find that some of the earlier adjustments have been affected by the later ones, so you'll need to do some fine-tuning. There are plenty of online resources if you want to get deeper into this. For instance, vinylengine.com is an excellent free resource for alignment protractors, owner's manuals, and more general information. (See the sidebar above for more.)
All of this might sound pretty involved, but I find that there's a direct correlation between how carefully I set up a turntable and how much enjoyment I can get from it. The extra effort and care you give to your 'table's adjustment will be paid back every time you pull out one of your vinyl treasures.
ONLINE TURNTABLE RESOURCES
• For a good article that goes into more depth on cartridge alignment, see: deadwaxcage.com/vzone/cartalign.asp. Also check out: Audiophilia • To see the original papers about cartridge alignment on which most current methods are based, go to: Helices.org • The most relevant page at Vinyl Engine, which includes lots of downloadable protractors and strobe discs along with other info, is: Vinyl Engine • A tonearm database with an in-depth discussion of alignment can be found at: Biglobe • For more on capacitive and resistive cartridge loading, go to: Hagerman Technology
|
| |||||||||


| Displays Electronics Speakers | Sources Other Gear Software | Top Picks of the Year Top Picks | Custom Install How To Buy How To Use |
Tech 101
|
Latest News Features Blogs | Resources Subscriptions |
WHERE TECHNOLOGY BECOMES ENTERTAINMENT
 © 2026 Sound&Vision
AVTech Media Americas Inc., USA
All rights reserved

