- REVIEWS
Displays Electronics 
Speakers Sources Other Gear Software - HOW TO
How To Buy How To Use Tech 101
It Came From Above Page 3
The distribution box and in-wall volume controls are, respectively, the SpeakerCraft S4 ($149) and VST60 (approximately $70). The S4 selector allows you to connect up to four pairs of speakers to any receiver or amplifier. Sonically neutral, according to SpeakerCraft, the selector enables you to turn the music on or off in any room with the push of a button. To identify the room that a particular button controls, the S4 comes with nearly 100 room labels. My personal favorites are the "smoking room" (not to be confused with the "cigar room") and the "maid room." I can just imagine a poor hausfrau being subjected to my abrasive musical tastes.
Of special note, the S4 (there's also an S8) features SpeakerCraft's InstaLLock Connector Plug. At one end, the connector plugs into the speaker selector; at the other end, a special connector easily connects to the speaker leads. The speaker-lead connector differs from others in that it requires no wire stripping. You simply open the correct "connector lever," place your wire inside, and snap it shut. The connector can be hooked up to the speaker leads ahead of time and then secured inside the wall to any available stud.
Most speaker selectors slide backward every time you push a button on their front panel, which can be annoying when you manage to push the entire box right off the back of the shelf and down into the rat's nest of wires behind your components. To combat this, the S4 has suction cups on it to secure the box. This is a small detail, but it's one you'll come to appreciate. The S4 also features Rear Protection Override, which ensures that the electronics and speakers in your system will remain safe, even while simultaneously playing multiple pairs of speakers.
In-Wall Volume Control  The VST60 offers a 12-step "make before break" switch design. The action on this piece is tight, giving the impression that it's built to exceptional tolerances. In fact, SpeakerCraft guarantees that the knob will never come off. The VST60 requires a mounting depth of 21/2 inches behind the faceplate, which means it will fit nearly all standard single-gang junction boxes and plaster rings.
Plotting the Course
Once you have decided where you wish to install (or have installed) the speakers, volume controls, and distribution box, it's time to plot the wire path from the selector box to the volume controls to the speakers—or the reverse. We'll assume you're going to place the distribution box in your component rack, but that's not mandatory. Because the box is a passive device (no AC required), you can mount it anywhere. Nonetheless, once you've determined locations for the equipment, installing such systems typically boils down to a series of compromises: compromises about where you can mount components in the walls or ceilings, where you can locate in-wall panels, etc. It's entirely possible (and probable) that there's a stud or some other obstruction lying right where you wish to mount a speaker. The stud or heating duct can't move, so the speaker must. Also, you want to avoid mounting the volume control in the same canal as the house's electrical system, such as wiring that leads to a light switch or outlet. You especially want to stay away from dimmer switches, as they radiate RF noise that can introduce noise into the audio system.
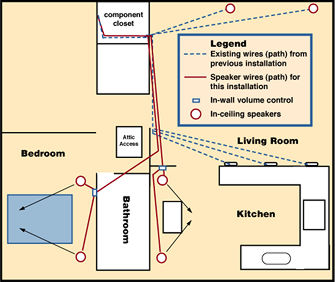
Your first order of business is determining the feasibility of your desired mounting locations. A thorough attic reconnaissance will go a long way toward providing you with "the lay of the land"—most notably, where to mount the speakers and what path the speaker wire must travel. In this particular installation, the distribution box's location is on top of the component rack. As the living room's in-wall speaker array was already wired, we knew the wiring path we'd be taking from the components to the attic access (see diagram E). Thus, we determined where we wanted the new speakers and volume controls to go and then worked back from them to the component rack. The attic recon showed that there were no major obstructions between the desired speaker and volume-control locations and the attic-access point. The only major problem was that the wall in the bedroom had solid framing for 12 inches from the light switch, which meant that the bedroom's volume control would have to be mounted a bit farther down the wall than we would've liked. Compromise.
|
| |||||||||


| Displays Electronics Speakers | Sources Other Gear Software | Top Picks of the Year Top Picks | Custom Install How To Buy How To Use |
Tech 101
|
Latest News Features Blogs | Resources Subscriptions |
WHERE TECHNOLOGY BECOMES ENTERTAINMENT
 © 2026 Sound&Vision
AVTech Media Americas Inc., USA
All rights reserved

