- REVIEWS
Displays Electronics 
Speakers Sources Other Gear Software - HOW TO
How To Buy How To Use Tech 101
How To: DIY Audio Measurement Page 4
Making Weird Noises
The first decision you have to make when measuring your audio system is: Do you care about the quality of the sound your entire family hears, or do you only care about the sound you hear? While the latter stance might seem selfish, it's simpler because you only have to make measurements from your favorite seat. If you want to make the sound good in every seat, you'll have to run a measurement in every seat, then average the measurements.
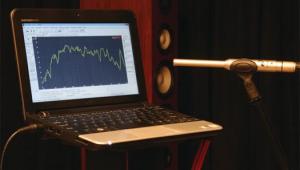
There's no need for me to detail True RTA's operation when you can read about it in the User's Guide. I will warn you, though, that before using it, you have to load a microphone calibration file - either the one that came with your mike or the generic ECM-8000 file provided with the software. You also have to calibrate True RTA to cancel out any flaws in your computer's internal sound card. Both steps take only seconds. You may also want to calibrate True RTA's sound-pressure level (SPL) reading. SPL isn't critical here, because you only care how loud one frequency is relative to another, not how loud they are on an absolute basis. However, if you want to get the SPL readings in the ballpark, just play a test tone, place a RadioShack or other brand SPL meter next to the measurement mike, and enter the SPL reading in decibels into True RTA.
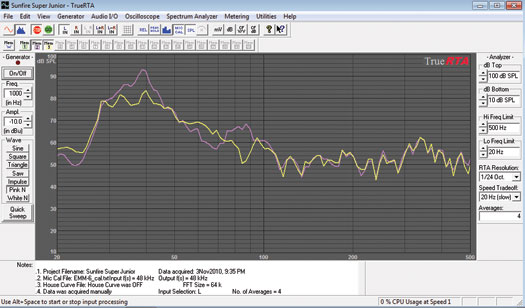
The basic procedure for one-seat measurement is simple. Position the microphone so that it's in the same place your head would be when you're seated. Select the pink noise generator in TrueRTA, then click the On/Off button. You should hear noise coming from the speakers. Now click the Go button to activate the analyzer. Hit the Stop button and you'll see the frequency response for your system. Save the graph by going to View/Save to Memory. If you're focusing on bass, turn the high-frequency limit for the graph down to 500 Hz. You can now see which bass frequencies are giving you problems. (Using True RTA's Quick Sweep feature is easier than using pink noise, but I find it unreliable.)
If you see unevenness below 80 Hz or so, try to fix it by moving your subwoofer, moving your listening chair, or using an equalizer such as the SVSound AS-EQ1, the Velodyne SMS-1, or the Behringer Feedback Destroyer. If you see unevenness at your subwoofer crossover point (typically 80 Hz), try reversing the phase on your subwoofer or selecting a different crossover point if your receiver offers that capability.
After you've made your correction, run the measurement again. You can now see how the new measurement compares to the original. Keep experimenting until you get the smoothest possible bass response.
With just a little bit of work, you may achieve truly astonishing results. Instead of bass that sounds like the indistinct, annoying boom of a hopped-up Honda Civic passing by, you'll get the same realistic, accurate, tight bass heard in the best movie theaters and recording-studio control rooms. And all for a couple hundred dollars - plus another $25 or so if you opt for the lab coat.


| Displays Electronics Speakers | Sources Other Gear Software | Top Picks of the Year Top Picks | Custom Install How To Buy How To Use |
Tech 101
|
Latest News Features Blogs | Resources Subscriptions |
WHERE TECHNOLOGY BECOMES ENTERTAINMENT
 © 2026 Sound&Vision
AVTech Media Americas Inc., USA
All rights reserved

