- REVIEWS
Displays Electronics 
Speakers Sources Other Gear Software - HOW TO
How To Buy How To Use Tech 101
Consider Calibration Page 2
 I tested the SpyderTV with two LCDs I had in house. Compared with the numbers I would've set using DVE and a color filter, the SpyderTV's results were respectable. Color temperature, brightness, and contrast were on the money, but color and tint required some fine-tuning. The SpyderTV won't be as accurate as more advanced measurement equipment, but it's a solid solution with enough accuracy and cool quotient to appeal to the blossoming videophile, yet it's still easy enough for the average user.
Level 3: Professional Calibration
For the HDTV owner who just wants his or her TV to look great and doesn't need to know how it got that way, or for someone whose TV needs more correction than basic picture controls can provide, professional calibration is the way to go. A professional calibrator can perform the basic setup described in this article, but also uses advanced measurement tools, like the Photo Research PR650 spectraradiometer in our lab, to evaluate and correct gray-scale and gamma settings, when possible. It is the professional calibrator's job to make your TV look its best in your room.
With the right equipment and some patience, you can get a great picture at home.
Datacolor provides a database of calibrators trained to use their professional equipment at www.spydertvpro. com, while the Imaging Science Foundation provides a list of ISF-certified calibrators at www.imagingscience.com. The cost of a professional calibration varies, but ISF's recommended price ranges from $225 to $325, depending on display type.
Whichever method you choose, we highly recommend you take the time to properly set up your HDTV. You've already invested so much time and energy into selecting the right display; don't sell yourself short by simply plugging it in, sitting back, and waiting to be dazzled. Calibration won't transform a bad TV into a good one, but it can help an average TV look better and a great TV look its very best.
Your TV's Picture Controls: What to Adjust
Out of the box, most TVs default to their most inaccurate, exaggerated state—usually a preset picture mode called Vivid, Sports, or Dynamic, in which the contrast, brightness, and sharpness controls are set too high, the color temperature is set to Cool (and thus very blue), and an LCD backlight is almost at its maximum. The resulting image looks artificial—with false edges, unnatural colors, little or no white detail, and an excessive amount of noise, which is especially evident with lesser-quality sources.
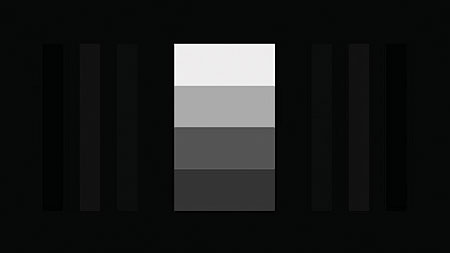
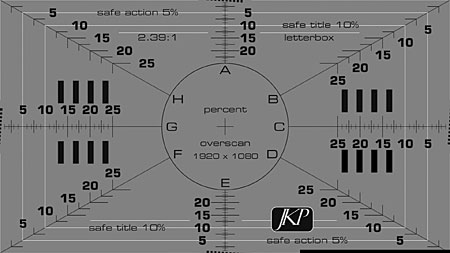
Patterns from DVE HD.
We recommend you make following adjustments right off the bat (the mode names vary by manufacturer):
• Select a more natural picture mode, preferably a Movie or Cinema mode for a theater, or a Standard or Neutral mode for a bright living room.
• Select a more accurate color temperature. The Warm setting is usually the closest to 6,500 Kelvin. If it looks too red for your taste, a Medium or Normal setting is still a better choice than Cool. If your TV offers numerical color-temperature settings, 6,500 is the target. If it looks odd at first, watch it for a day and you won't be able to go back to Cool.
• If your LCD or DLP TV has an adjustable backlight, turn it down to less than 50 percent to start. The minimum setting will produce the best blacks but may be too dim. Even in a bright room, you seldom need as much light output as the maximum setting creates.
• Turning the Contrast down on a plasma, even a little, will prolong its life and reduce the chance of burn-in or image retention.
Here's an example of how to adjust the remaining parameters using the new Digital Video Essentials High Definition HD DVD:
• Brightness (Test and Calibration menu, chapter 1). Turn down the brightness setting just until the below-black (or PLUGE) bar disappears into the background.
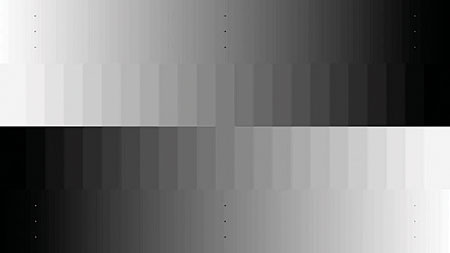
• Contrast (Test and Calibration menu, chapter 14): Make sure there are distinct steps between the whitest bars. If your TV's contrast is too high, these bars will blend together, meaning you've lost white detail. It is especially important to turn down the contrast on a plasma TV to prevent image retention.
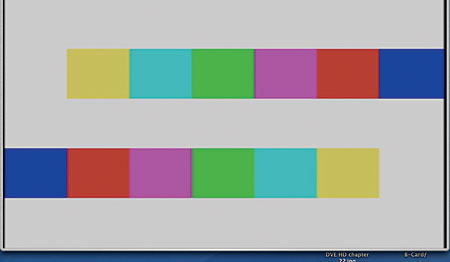
• Color/Tint (Test and Calibration menu, chapter 5): Using the supplied blue color filter, the blue boxes should match the blue background as closely as possible.
• Sharpness (Test and Calibration menu, chapter 22): Do you see white lines and/or ringing around the black lines? If so, turn down the sharpness control until they disappear.
|
| |||||||||


| Displays Electronics Speakers | Sources Other Gear Software | Top Picks of the Year Top Picks | Custom Install How To Buy How To Use |
Tech 101
|
Latest News Features Blogs | Resources Subscriptions |
WHERE TECHNOLOGY BECOMES ENTERTAINMENT
 © 2026 Sound&Vision
AVTech Media Americas Inc., USA
All rights reserved

