- REVIEWS
Displays Electronics 
Speakers Sources Other Gear Software - HOW TO
How To Buy How To Use Tech 101
Audio Calibration
 The art of making your whole system sound great.
There's more to getting the home theater of your dreams than piecing together a bunch of equipment. First, you have to get everything assembled and connected correctly. Then, you've got to make sure that all of the settings are correct and adjust your gear so that it reproduces your material the way it was intended. This is the process of calibration. Proper calibration is the final step that can make your home theater perform its best.
Calibration can compensate for variations in the equipment itself and—probably more importantly—for environmental factors. The chief environmental factor that can influence your home theater's performance is the room itself. Some of the most important factors that affect the final performance of your theater are room acoustics, seating location, speaker placement, and the amount of ambient sound.

The specific calibration process differs depending upon the equipment you've chosen to incorporate. The desired result, however, is the same. If you've designed the room correctly and given careful consideration to the equipment, calibration can yield fantastic sound. You'll have accurate frequency response, good dialogue intelligibility, and tight, powerful bass.
So, how do you make this all happen? You can—as with any or all steps in the home theater–building process—either do it yourself or hire a pro. If you hire a pro, you'll get the benefit of his years of experience and specialized tools. The downside to the hire-a-pro approach is, as usual, its effect on your bank balance. Usually, you'll save a bit of cash using the do-it-yourself approach. The other advantage to going it alone is that it will be a fulfilling learning experience. In this column, we'll focus specifically on audio calibration and move on to video next month.
Getting Started
The goal of calibrating the audio system in your home theater is to get a smooth, even frequency response at the primary listening position. You also want the correct sounds to arrive at your ears at the correct times. In addition to the primary listening position, you should also be able to get good performance at the other seating locations, if you've done your homework during the design process. During that process, you should have addressed various influences on the final sound, such as room acoustics and speaker placement. During the calibration process, you'll make minor tweaks in placement. Then, you'll measure and keep adjusting until everything is as close to perfect as you can make it.

The most basic part of theater audio calibration is making sure that all of the speakers' levels are balanced. It is critical for accurate sound that none of the speakers is too loud or soft with respect to the others. This is a relatively simple process that you can perform with a sound-pressure-level (SPL) meter and a test tone played through each speaker, one at a time. Your receiver or surround processor has a speaker-setup section in its setup menu. The first thing you'll typically see is a list where you can set the number of speakers in your system and the size of each. This is where you'll select how many surround speakers you're using and whether you're using a subwoofer.
When you select the size of your speakers, you'll usually have the choices of large, small, and none. None is pretty self-explanatory. The small and large selections, however, have less to do with a speaker's physical size and more to do with its low-frequency-response capabilities. When you set the size to small, the internal crossover circuitry in the processor routes the low bass frequencies away from the main speakers and to the subwoofer. If you're using a small monitor or bookshelf-type speaker, you should select small, not because of the size but because this kind of speaker can be pretty anemic in the bass region. The same is true with many center-channel speakers.
In many cases, you should select small for all of your speakers, even if you're using a nice set of large, full-range tower speakers that your wife hates. The reason for this is twofold. First, the extended bandwidth limits the amplifiers that power the main speakers. If you cut out the bass, the amps have more power for the rest of the frequency range. This is especially important with midpriced receivers. They can have marginal power supplies and will really wake up when you stop asking them to amplify the low bass.
The other reason to select small is that, while larger speakers may be able to play very low, they may still sound better, play louder, and have less distortion if you don't ask them to plumb the depths of the lowest octave or two. Your subwoofer is specifically designed to handle these lowest notes, and, chances are, if you picked a good one, it'll do a better job with low bass than your other speakers.
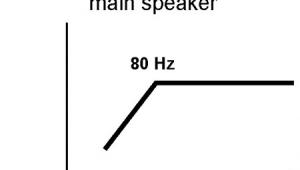
Most good-quality receivers and surround processors let you choose different frequencies as a crossover point. This allows you to get a better match between the capabilities of your speakers, subwoofer, and electronics. In addition, the lower the crossover point, the more difficult it will be to localize your subwoofer. If, for example, you are using a set of full-range speakers for your left, center, and right channels, you would probably want to try a lower frequency, around 50 or 60 hertz, as the starting point for your crossover. On the other hand, if you're using a set of mini monitors with 3.5-inch woofers for your main speakers, you'd want to start with something much higher, say 120 to 150 Hz. In the end, you'll have to experiment with this setting until you find the best sound.
After you set the size, you can set the level. During this procedure, your processor will play a test tone through each speaker. You'll measure each speaker's level with an SPL meter placed at the primary listening position. Some receivers include a calibration feature. If yours does, it probably came with a specially calibrated microphone. You simply plug it in and start the process. The receiver will play the tones and make all of the necessary adjustments automatically.
If you must do it yourself, go down to RadioShack and pick up part number 33-4050. It's a low-tech analog meter, but it's been a calibration staple in many pros' toolboxes for years. There are other meters, such as the B&K Precision 732A, the Brüel & Kjaer 2250 Light, and the Gold Line SPL120. These are all very fine instruments. But they're many times the price of the RadioShack meter, and, for home use, the RadioShack unit is fine. Set the meter to slow response and "C" weighting.
The above procedure works fine for setting each channel's overall level. To adjust the subwoofer for the best sound, however, you'll need to go a bit further. Now that you've made the leap and gotten yourself a brand-spanking-new SPL meter, you should also have something to measure besides those boring tones your receiver plays. For that, you'll need a test disc.
Using a Test Disc
I like Digital Video Essentials because it has a plethora of audio and video test patterns. Ovation's Avia Guide to Home Theater is also a good test DVD. Another great disc for audio calibration is the Rives Test CD. The really cool thing about the Rives disc is that it has tones that are Shack compensated. They already include equalization to compensate for the variations in the RadioShack meter's response. In case you aren't using the Rives test tones, the RadioShack meter reads low by about 7 decibels at 20 Hz, 5 dB at 25 Hz, and about 2 dB from 40 Hz to 100 Hz. This is according to independent measurements performed by a number of different individuals. Keep these corrections in mind when you're calibrating your subwoofer.
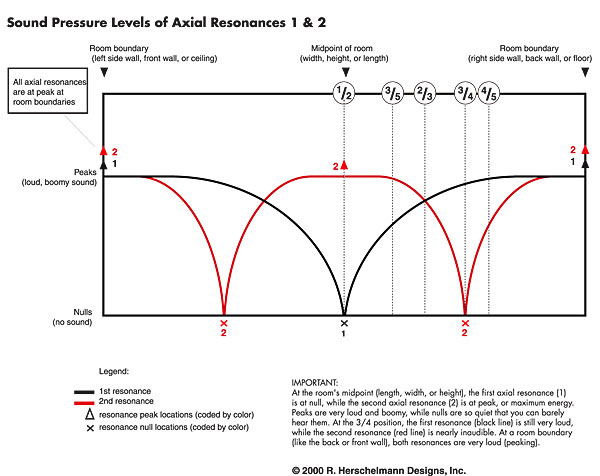
Before you begin calibrating the subwoofer, you'll want to get the sub into the best location. You've probably heard countless times that bass is nondirectional and you can put your sub anywhere. Don't fall for this garbage. Due to the essence of low-frequency sound, you may not be able to localize a correctly crossed-over subwoofer, but you sure can make it sound bad by putting it in the wrong place. A room's bass response depends on its shape and dimensions, the listening position, and the location of the subwoofer. You'll have peaks and dips in the low-frequency response that vary by frequency and location within the room.
These dips in response are also known as nulls. The goal of calibration is to make the dips as shallow and narrow as possible. Because nulls result when sound waves cancel each other out, like ripples in a pond, no amount of equalization boost will solve the problem. It will only make your subwoofer hate you. To reduce the frequency nulls, you must relocate either your subwoofer, your walls, or yourself. Obviously, the first and last choices are the easiest. One of the simplest ways to find a good sub location is to swap places with it. Let it get the money seat while you crawl around on the floor listening for the most natural bass sound. Play some fairly bass-heavy music or soundtracks. It's hard to use this approach with just test tones.
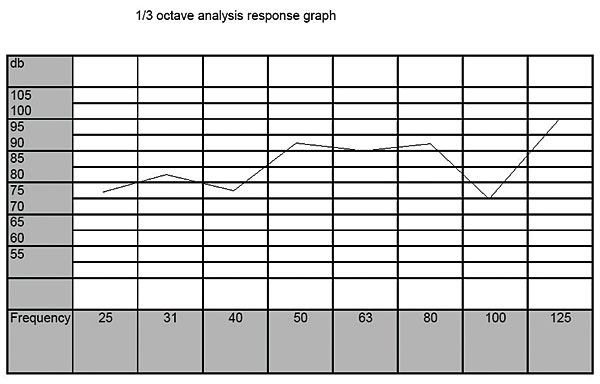
After you've found a good spot and wrestled your subwoofer back to the floor (watch your back), you're ready to start the measurements. Place the microphone at the listening position, as you did before. Play test tones through your speakers, starting with the 1-kilohertz tone. Adjust your receiver or processor's volume to produce about 80 dB on your SPL meter. To do this, set the meter for the 80-dB range and adjust the volume until the meter reads "0." To adjust the sub, you'll first need to plot its response. Play the tones, starting with the 20-Hz tone and working your way up. Use some graph paper to note the level that the meter measures for each tone. (See the diagram above.) When you've plotted the response in one-third-octave increments from 20 Hz to 125 Hz, you can begin to make adjustments.
Note any large peaks or dips in the measured response. Again, resist the temptation to adjust your equalizer to correct the dips. In fact, before you make any adjustments, try adjusting your subwoofer's position once more. Move it around a bit and watch the effect on the frequency-response curve. If you're comfortable with its placement, you can start fiddling. If you're using a graphic equalizer, it should have at least one-third-octave resolution. You can use a parametric equalizer to target the trouble areas very precisely. Remember, peaks only. Reduce the level on the equalizer at the trouble frequencies until the response is as smooth as you can make it at your listening position.
In 99.97265 percent of cases, you won't be able to achieve the proper calibration by using just your receiver's bass adjustment, so don't try it. You'll just make everything sound muddy or boomy. The bass-adjustment-response curve on your receiver doesn't have the correct shape to target just the problem frequencies. It's too broad, and, in most cases, it begins rising at a certain frequency, called a turnover frequency (usually about 100 Hz), and raises the whole spectrum below that point.
You'll also note a distance setting in the speaker-setup menu. Naturally, this compensates for the differences from each speaker to the listening position. The distance setting delays the sound from the closest speakers so that it arrives at your ears at about the same time as the sound from the farthest speakers. Simply measure the distance from your ear to each speaker when you're sitting at the listening position and enter the distances in the setup menu.
When you're done, check the frequency response again. The settings can affect one another, so it may take a bit of fiddling to get everything dialed in correctly. When you're really done, put on your favorite music video and rock out.


| Displays Electronics Speakers | Sources Other Gear Software | Top Picks of the Year Top Picks | Custom Install How To Buy How To Use |
Tech 101
|
Latest News Features Blogs | Resources Subscriptions |
WHERE TECHNOLOGY BECOMES ENTERTAINMENT
 © 2025 Sound&Vision
AVTech Media Americas Inc., USA
All rights reserved

