- REVIEWS
Displays Electronics 
Speakers Sources Other Gear Software - HOW TO
How To Buy How To Use Tech 101
Yes, We Have No Bananas
Of course, there are numerous ways to do this, even apart from screw terminals and a pro-type connector called a Speakonthe former being antiquated and the latter used mainly in pro audio. For home audio, bare wires are the hair-shirt solution. They're cheap and cheerful and the preferred method of the great unwashedthose innocent souls who believe that the skinny wires sold in big-box electronics stores as "speaker wire" are just handy dandy. And unless the ends of the wire are tinned with solder to hold the strands together, or you are very careful and twist the bare wire tightly, stray strands can create nasty shorts.
Bare wires can also be used with heavier cables, but you won't find bare-wire terminations on audiophile speaker cables. Bare-wire termination can be serviceable, but it's not very elegant. No cachet, no cash. (Quickwhat's the difference between wire and cable. Wire is cheap, cables are expensive.)
One step up from bare wire is a thin, pin-type connector, which may be straight or bent at an angle. The pin is slipped through the hole found in most speaker binding posts. It's rarely used by serious audiophiles, however, as it offers a relatively small contact area.
Spades are the preferred audiophile solution. They're flat and provide a secure connection over a wide area. But they must fit around the central post on the speaker or amp terminals before you can tighten them down, and these posts come in different sizes. If you've been doing audio long enough, you're sure to have come across more than one situation where the post was too thick for the slot in the spade. The fix usually involves sliding one tine of the spade into the hole in the binding post, which is a kludge at best and insecure at worst. In addition, the speaker terminals on most multichannel receivers are too close together for spades and usually can't accommodate them anyway. In fact, using either pin connectors or bare wires of any reasonable size is also a challenge on the crowded back-panel real estate typical of most AVRs.
Banana plugs might just be the best solution for the amp-speaker connection short of direct soldering to the terminalswhich is hardly practical. They're certainly the most convenient by far, making it possible to rapidly set up and swap out gear. (Reviewers really appreciate this, particularly in multichannel systems!)
But like everything else, there are banana plugs and then there are banana plugs. I've seen single plugs priced anywhere from $2 to nearly $200 per pair. That's not a typoI really mean 2-0-0. While most banana plugs are made of brass with gold plating to prevent oxidation, some of the more expensive varieties use gold plating over solid copper. Does this make a difference? I can't say, since I haven't compared the two constructions. I suspect the do-it-yourself market for $100-$200 bananas is rather limited, but those prices may help explain why some of today's ready-made speaker cables are hitting the stratosphere.
But if you're making your own cables, or repairing some older, favorite speaker cables whose connectors have seen better days (something I plan on doing), you might be in the market for more practical banana plug options.
So what should you look for? There are both single and dual banana plugs. I don't recommend the latter, as many binding posts these days are spread too far apart for thema result of European nanny-state regulations designed to avoid confusion with some types of European AC power outlets. Most of the banana plug slots on speaker terminals now come with plastic plugs in them for the same reason, but these can usually be pried out easily.
One problem with many banana plugs, and the reason why they have a dubious reputation in the audiophile community, is that they can be slightly loose or become so with repeated use. Even when new, their tolerances can vary just enough to prevent a reassuring connection. The only good solution to this is a locking banana plug.
Enter the plugs you see in the photo above. I discovered them while surfing through an obscure website, Amazon.com. They are made in China (where else?) by GLS Audio, distributed worldwide by Orange County Speaker, Inc., and are available through Amazon. The only catch at Amazon is that the minimum buy is $30, which gets you five pairs at $6.00/pair. Buy more, and the price comes down slightly; 10 pairs cost $50 or $5.00/pair. I ordered 10 pairs, but there was an error and I ended up getting (and being charged for) 20 pairs. I'm keeping them anywaya lifetime supply, perhaps?
Amazon offers non-locking plugs from GLS as well, but at $4.00/pair in quantity, they are so close in price that the locking version is the smart choice.
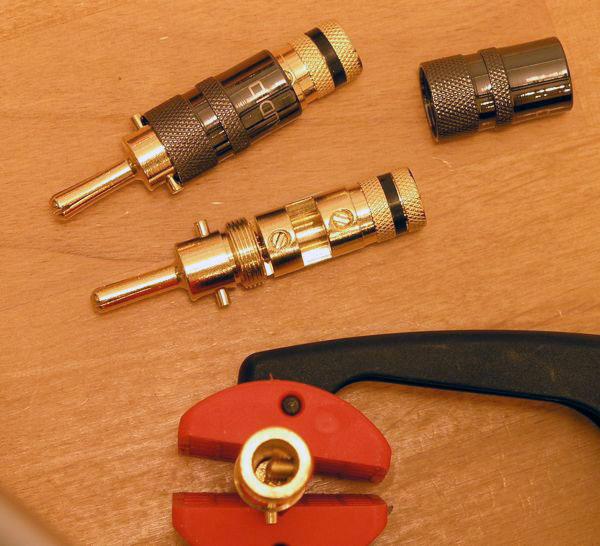
How does the locking function work? After inserting the plug into the banana jack, you screw down the black chrome shell (see photo). As the shell turns, it exerts pressure on a small crossbar, pushing the crossbar forward so that it pushes on a thin pin located in the center of the contact rod. As the pin pushes forward, it spreads out the contact rod's four tines, locking the banana plug in place. Look closely at the plug in the top of the photo and you'll see the spread-out tines. Simple and elegant. In fact, some of the most expensive locking banana plugs operate in exactly the same way.
To attach the cable to the GLS banana plug, you first remove the black chrome collar, fully exposing the access tube and its two setscrews, as seen in the center of the photo. The rear screw is a strain relief for the cable, while the front one makes the contact with the bare wire. Check out the bottom of the photo, which shows the view looking down the rear barrel of the plug. You can see the rear, strain-relief setscrew protruding into the barrel. Before attempting to insert the wire, back this screw out just enough so that the barrel is clear. But unscrew it no farther or it will fall out and possibly get lost. (One of my packages came with a few spare screws, but the other did notor they got lost in the packing.) Then do the same for the front screw.
Nextand before you go any furtherslip the locking barrel onto the wire, in the correct direction, before attaching the stripped wire to the plug. And be sure to connect the positive lead to a red-banded banana and the negative to one with a black band. Even pros sometimes get the polarity reversed!
If you've stripped the wire correctly, the back screw will dig into the insulation for strain relief, while the front screw will lock onto the stripped wire. The lock on the wire works best if you strip off enough insulation to let you double up the bare wire (depending on its gaugebut even my 12-gauge wire needed doubling over). I had to experiment with this before I got it right. If there's not enough wire beneath the setscrew (or not enough insulation beneath the strain-relief screw), the screw can turn past its threads before it secures the wire (or the insulation) and fall loose inside the barrel. You'll then have to retrieve it carefully and reinstall it.
The banana plugs I bought came with a screwdriver, but I found it to be a bit small for the job; if you have a set of small, flat-bladed jeweler's screwdrivers, you'll be good to go. But watch where you put your fingers while holding the plug to tighten the setscrews. Those small screwdrivers are sharp, and a slip could leave you with a nasty cut.
The plugs are said to be good for wire up to 10 gauge, but that ultimately depends on the thickness of the insulation. I had to shave down some of the insulation on the vintage Monster Cable THX cables I use for the long runs to my surrounds, which then allowed it to slip into the barrel far enough to engage the strain-relief setscrew.
The plugs are just over two inches long. Make sure you have at least three inches of clearance behind your amp or receiver before you consider using themthe extra inch allows room for the wires to bend down toward the floor. And if you're an enterprising do-it-yourselfer and want to add shrink wrap on the back of the plug, allow even more clearance. If you do use shrink wrap, be sure to keep it clear of the black barrel, which needs to rotate for tightening. And make sure the wrap is color coded because it will likely cover up the red or black band on the plugs themselves. You could also solder the cable into the banana plug after tightening everything down, but that would render it unusable for future re-use.


| Displays Electronics Speakers | Sources Other Gear Software | Top Picks of the Year Top Picks | Custom Install How To Buy How To Use |
Tech 101
|
Latest News Features Blogs | Resources Subscriptions |
WHERE TECHNOLOGY BECOMES ENTERTAINMENT
 © 2026 Sound&Vision
AVTech Media Americas Inc., USA
All rights reserved

