- REVIEWS
Displays Electronics 
Speakers Sources Other Gear Software - HOW TO
How To Buy How To Use Tech 101
Cleanup On Aisle A/V
But this tome isn't about vinyl. It's about the sticky business of keeping our audio-video systems relatively tidy. Working on this should be at least an annual event for every A/V fan, and for the inveterate tweaker and/or reviewer it should happen even more often.
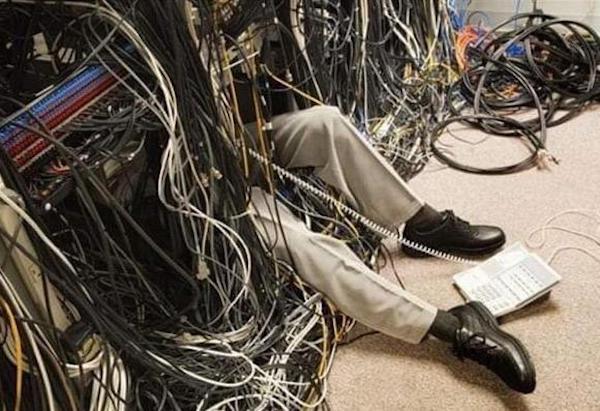
Begin with the equipment stand or rack. Ever look behind it? I know that's torture, but somehow since last year, when you carefully routed all of the cables into neat rows, they were re-entangled by your house leprechaun. A re-do is therefore a must. It starts by disconnecting everything from your A/V receiver, both the sources at the front end and the loudspeakers. Fortunately, last year you carefully labelled all of the connections for your 7.2.4 system, so the reconnection will be easy (?). Those zip-ties made specifically for this purpose, or even your own DIY versions, certainly made things easier! Seriously, however, if your connecting wires aren't labelled, do so now before you pull them all out. This will dramatically speed up the reconnection process and minimize the risk of your hair catching fire.
After you've cleaned out behind the now cable-free rack, removing dust bunnies, the kids' crayons, spare change, and the odd dried-up cicada that escaped the yummy cicada stew you whipped-up last month, it's time to do the rearranging of your equipment rack you've always wanted but never did because the connected wires were in the way. Just be certain that your cables, particularly from the AVR to the loudspeakers, are long enough to work with the new setup. Also be sure that the new arrangement offers adequate ventilation for components that tend to run hot, or leave room for outboard cooling fans (see my last blog for more on the latter).
That done, it's time to plug everything back together. Begin with the connections on the bottom of the receiver, then work upward from there. This makes it less likely that you'll end up with a new rat's nest, at least on most AVRs where the speaker connections are on the bottom with the inputs higher up.
It's always good practice avoid running power and signal cables close together and in parallel to each other. If they must pass near each other they should, if possible, cross at right angles. This layout isn't always easy to do, but if you do run them in parallel and hear no audible hum you're probably okay.
As you do your new setup check that none of the connections themselves are either too loose or too tight. Plugs and the matching jacks are supposed to be standardized in size so that an RCA jack from company A will securely grip an RCA plug from company B. But with today's worldwide manufacturing, small tolerance variations happen and can have annoying consequences. We've all experienced a plug that was too tight, but the extreme case, where later removal of the plug took part of the jack with it, isn't uncommon. If it requires abnormal force to insert the plug into the jack, try a different cable, particularly from a different company.
Before you reconnect those 22 speaker wires to your AVR, check for stray wire strands to avoid shorts if you're using bare-wire connections. With banana plugs the connection can be a tight fit, but speaker jacks tend to be more rugged than input (RCA) jacks so there's little risk of damaging a speaker jack (on either the AVR or speaker end) when removing a tightly fitting banana plug. Some audiophiles prefer spade lugs for speaker connections, but these don't work on all AVRs, and even if they do they can be harder to secure than banana plugs or bare wires.
On several occasions I've had to expand the tines on a banana plug to fit the terminals on a new speaker under review. To do so carefully insert a thin screwdriver blade under the tines of the plug (the expansion bands near the tip of most banana plugs) and twist the screwdriver slightly to expand the tines outward just enough to allow for a secure connection. (Just be careful not to stab yourself with the screwdriver; trust me, it's easy to do!) An alternative to this is lockable banana plugs, but these aren't widely used on affordable speaker cables so are more widely used either in the DIY market or on multi hundred- or thousand-dollar (ulp!) commercial cables.
Specialized fluids designed to clean contacts and otherwise improve the jack-to-plug transmission are also available. They might have their place, though I find them a bit tweaky and have never used them. But that shiny, flat, metal surface, as seen by the naked eye, is anything but flat when viewed microscopically. If that troubles you, simply google "electronic contact cleaner" for ideas.
Speaking of tweaky, some audio cables are marked for direction. That is, it's intended that you orient them so the arrows follow the direction of the signal flow. While this idea can be totemic for some audiophiles, technically speaking it's nonsense. It won't hurt anything to follow the arrows if it makes you feel better, but I know of no well-run tests, blind or otherwise, that have shown it to offer any audible benefit.
Video cleanup, apart from the same connection concerns, is mainly about taking care of a dirty screen. If you're lucky, with no tiny and/or sticky hands among family or visitors, you may never have to clean a screen apart perhaps from a light dusting performed either with compressed air or with soft feather duster or microfiber cloth, the latter used lightly without applying pressure.
But when more extensive cleaning is needed, projection screens and flat screen TV are two different animals. For a projection screen I strongly recommend getting advice directly from the manufacturer and following it closely. That applies doubly to a light rejecting screen, which often involves tiny ridges on the screen designed to pass or reject light depending on the direction it comes from. Clean such a screen the wrong way and you might damage these ridges and destroy the screen's light rejecting properties, ending up with a screen that's now likely inferior to an ordinary flat design. And never roll up a retractable screen unless it's completely dry.
For a TV screen, in the likely event you can't contact the manufacturer for a recommendation (given the relative size of the TV market vs the projection equivalent), the best advice I've seen on line, beyond the obvious (compressed air or very light dusting as noted above), involves dish soap heavily diluted in distilled water (5% soap, 95% water) and a large-looped microfiber cloth. Lightly dampen (not soak!) the cloth and gently wipe the screen. then dry it gently with a dry microfiber cloth and a similarly light touch. Never spray a cleaning solution, however mild, directly onto any type of screen.


| Displays Electronics Speakers | Sources Other Gear Software | Top Picks of the Year Top Picks | Custom Install How To Buy How To Use |
Tech 101
|
Latest News Features Blogs | Resources Subscriptions |
WHERE TECHNOLOGY BECOMES ENTERTAINMENT
 © 2026 Sound&Vision
AVTech Media Americas Inc., USA
All rights reserved

