- REVIEWS
Displays Electronics 
Speakers Sources Other Gear Software - HOW TO
How To Buy How To Use Tech 101
Connecting With Your New AV Receiver
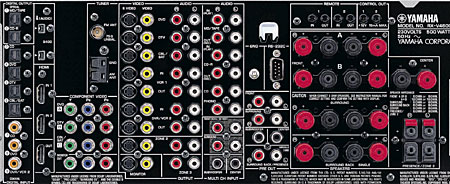
So you just bought your first AV receiver (AVR), and now you're staring in fright at the back panel and what looks to be several thousand connectors jammed together tighter than the squares on a New York Times sukodu puzzle – and just about as incomprehensible. Don't feel bad. Rocket scientists have been known to suffer heart palpitations in the same situation.
Or maybe you're thinking about buying a new AVR, and you've smartly decided to do a little research about the topic before cautiously exposing your credit card to the harsh light of day. Well, you're in luck. We're going to make the whole topic of the connections between your AVR and the rest of your system's components can't-go-wrong anyone-can-do-it simple to understand. (Okay, that may be a bit of an exaggeration. Let's just say we're going to make it simpler.)
Start with this thought. The AVR is the component that brings everything in a home theater together. Video signals from components such as a DVD player typically go through the AVR on their way to the TV. Audio signals leave the DVD player, get processed and amplified in the AVR, and are then sent to your speakers. Think of the AVR as being a home theater system's Grand Central Station (only without all the noise and the expensive shops), and it'll make it a bit easier to comprehend why we're suggesting you hook things up a certain way.
Use Your Thumbs
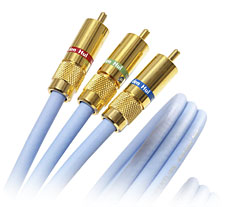
The first rule of thumb when you're hooking up any home theater system is to use the highest quality type of connections possible. When it comes to video, for example, you have the choice of using – in decreasing signal quality – the following types of connections: HDMI, component video, component, S-video, composite video, and (egads!) RF. There are fewer possibilities when it comes to audio: HDMI (only for limited applications at the moment), digital (coaxial or optical), and analog RCA.
 The second rule of thumb is to make things as simple as possible which, in many cases (although not all), means using as few cables as possible. There will be times, however, when you'll have to decide between simplicity and picture/sound quality. If multiple people are going to be using your system, you may want to opt for simplicity. After all, home theater is supposed to be about entertainment, not a battle of wits. On the other hand, if it's only going to be you and another person who will be hogging all the fun, the quality of the experience may trump ease-of-use. We know what we'd do, but it's your system. You'll have to be the judge.
The third rule of thumb is use the best cables you can afford and keep them as short as possible. There are two reasons for this. Shorter cables cost less than longer ones, and shorter cables are less prone to signal degradation. Short, however, doesn't mean so short you can barely get the cable to reach the connectors on the back of the gear. Use cables that are long enough so that you can easily slide the AVR or source component out from the shelf in case you have to check on the connections or remove a piece of gear for repair, but try not to use cables so long that you end up with a tangled rat's nest in the back of your equipment cabinet.
All clear so far? Good. Now we're going to get to the nitty gritty. (If you have enough cables, you can make it the knitty gritty. . .or, well, maybe not. . .)
It's Good To Be Typecast
The most important connection is the one from the AVR to the TV. Remember, all the video signals from your components go through the AVR and then on to the display. From a performance standpoint, you definitely want to use the highest quality connection possible. For simplicity's sake, the ideal is to have only one cable connecting the AVR to the TV. When you set up your system this way, you can use the AVR for switching between sources, and the TV always stays on the same input. All you'll need to do with the TV is turn the power on and off.
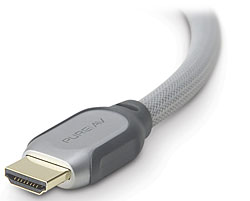 The best-case scenario is to use an HDMI cable. One end is connected to the HDMI MONITOR OUT on the back of the AVR and the other is connected to the HDMI INPUT on the HDTV. (Yes, it will have to be an HDTV since analog TVs don't have HDMI inputs.) The HDMI connection provides the best video quality, can carry audio in addition to video signals, and has only one small connector on each end of the cable to deal with. For AVRs or HDTVs without HDMI connections, component video is the next best choice.
Unfortunately, it's quite possible that not all of the source components in your system will have HDMI outputs. Some may only have component video, while others may be limited to S-video or composite video. In this case, you'll want a receiver capable of cross-converting incoming video signals up to the highest level connection you have running to your TV. Cross-converting isn't cheap (especially from analog to HDMI, which is digital), however, so at the moment you'll only find that feature in the more expensive AVRs. But this allows you to send a variety of signal types into the AVR, and still use a single HDMI connection to the display, which is far simpler by avoiding input switching in the HDTV.
Looks Better But Not So Simple
If your AVR doesn't cross-convert video signals you might want to run more than one type of cable from your AVR to your HDTV. The type of cables to use will depend upon the outputs of the sources in your system. For example, you might have a Sony PlayStation3 (HDMI), an older-model DVD player (component video), and a Nintendo Wii (composite video). With this assortment of components, you'll need to use three sets of cables – an HDMI cable, a set of component video cables, and a composite video cable – with each one going from that type of video output on the back of the AVR to the appropriate input on the HDTV.
 Using the three cables assures that you'll see the best picture quality possible regardless of what you're watching, but it means you'll have to switch inputs on your HDTV when you switch sources. (At this point, your new AVR is relegated to being only an audio switcher/processor.) You can simplify things, reduce the total cost for cables, and eliminate the need to switch TV inputs by hooking everything up using the lowest level cable, which is usually composite video, but the picture quality will be limited to basic NTSC analog video. (Excuse me while I wash my mouth out with soap for even suggesting that.)
Connecting source components to your AVR is actually very simple once you've figured out how you'll be connecting the AVR to your TV, although this is the point at which the number of cables behind the AVR multiplies and the anxiety levels rise. Don't sweat it, though. Follow the rule of using the best type of connection and the shortest cable. Then plug one end of each cable to the video output on the back of the component – say a DVD player – and plug the other end of the cable into the back of the AVR that's labeled DVD INPUT. Unless you want to get fancy, you only need to hook up one type of video cable from the source component to the AVR. As we've mentioned, the types of connections you'll use depends on what types of cables you've run from the AVR to the TV.
Now We've Got To Make It Sound Good
In the majority of home theater systems, the TV isn't used for audio playback at all, so there's rarely a need to connect an audio cable from the AVR to the TV. (See, that part was really simple.) Hold your applause, though, because each one of your source components will be sending audio to the AVR.
The newest AVRs handle audio as well as video through the HDMI connection. Shout "hallelujah!" and count your blessings if you have one of the few AVR and sources currently capable of this. You will have achieved electronic nirvana because you'll only need to run one HDMI cable per source to your AVR. The unpleasant reality is that most AVRs and sources require separate audio and video connections.
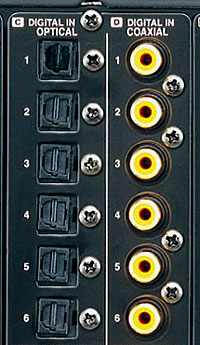 For audio, the best connection is typically digital. To help make things confusing and sometimes annoyingly incompatible, there are two types of digital audio connections: Toslink optical and coaxial. Toslink optical uses a skinny fiber optic cable to connect the source to the AVR. Coaxial uses an RCA-type cable. Some sources have both sets of outputs on the back. Most AVRs have both types of inputs – although often they'll only have one type of digital input for a particular source. For example, the DVD input may use a Toslink optical connection while the CD player's digital input may require the use of a coaxial digital cable. Regardless of the type of connection, if it's a DVD player, for example, you'll connect one end of the digital cable to the DIGITAL OUT on the back of the player while the other end gets plugged into the DVD DIGITAL IN on the back of the AVR.
If you've run out of digital inputs or your source component doesn't have a digital output, you can use a standard RCA cable to connect the stereo analog outputs on the back of the source component – say, maybe, a VCR – to the stereo analog input on the back of the AVR. A digital audio connection is best; not only because it typically sounds better, but because it will allow your AVR to use 5.1-channel Dolby Digital or DTS processing.
See, Cables Can Be Fun!
If you've read this far, you're either pretty determined to understand what it's all about, really into this kind of thing, or so confused you're thinking about getting a cheap clock radio for your main sound system. Regardless of which category you fall under, remember to follow those three rules of thumb: use the best quality type of connection you can; try to use as few cables as possible to connect sources to the AVR and especially from the AVR to the TV; and use the shortest and highest quality cables as possible. After that it's a simple matter of taking it one component at a time and connecting the outputs to the inputs.
Now, see how easy that was?


| Displays Electronics Speakers | Sources Other Gear Software | Top Picks of the Year Top Picks | Custom Install How To Buy How To Use |
Tech 101
|
Latest News Features Blogs | Resources Subscriptions |
WHERE TECHNOLOGY BECOMES ENTERTAINMENT
 © 2026 Sound&Vision
AVTech Media Americas Inc., USA
All rights reserved

