- REVIEWS
Displays Electronics 
Speakers Sources Other Gear Software - HOW TO
How To Buy How To Use Tech 101
A Great Picture in Five Minutes Flat

Start By Putting Your Best Mode Forward
Lots of TVs come with features and "enhancements" that are anything but. Just about every TV has a preset picture mode that defeats many of these nefarious features. Start by looking for and engaging presets called "MOVIE" or "CINEMA," or something similar.
 Got DVD?
From here on out, all you need is a DVD with a THX logo on the cover that's been made in the last several years. And there are plenty of them that should be sitting on your shelf right now. Here's a list of just a few of the most high profile THX titles:
All six Star Wars movies and the Indiana Jones trilogy, Pirates of the Caribbean: The Curse of the Black Pearl, the Toy Story movies, Finding Nemo, and Cars.
The Tests- The Right White
Pop in any of these discs and navigate to the THX Optimizer menu- usually in the Set Up menu on disc. Click on the THX Optimizer logo and select VIDEO TESTS from the Optimizer menu. This brings up the CONTRAST/PICTURE SET-UP screen. Use this pattern to adjust the white level of your display, which is likely to be labeled either CONTRAST or PICTURE in your TV's on-screen menu.
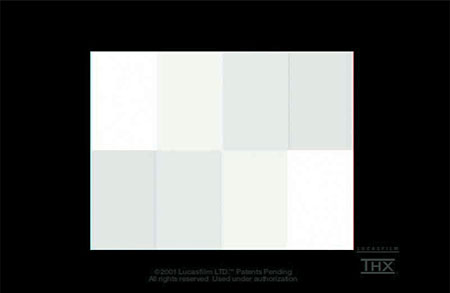
Click PLAY TEST, and you'll see a white rectangle that on further inspection should consist of eight white boxes of varying brightness. Turn up the CONTRAST on your TV until the individual boxes within the rectangle disappear, turning the pattern into a uniform white box (see figure). At this point you're seeing what we call "white crush." The gradations of the varying shades of white at the high end of the grayscale have been "crushed" or blown out. Now back the CONTRAST adjustment down until all eight boxes are visible again- you are now assured that you will see all the detail at the top of the brightness range. Moving forward with your properly adjusted display, when you see bright white details blown out, you can be assured the fault is in the program material.

Now, many displays will not crush white detail and make those eight boxes disappear no matter how high you run up the CONTRAST. This is OK, because there's a second, fine tuning step that should be taken even if your TV does crush whites. Raise the CONTRAST control and watch for color shift in the brightest boxes. Again, back CONTRAST down until the bright white boxes are white again. The sweet spot for your CONTRAST setting is the point at which all eight boxes are visible with no color tint in the brightest white boxes.
Trust your eyes and don't be afraid even if the CONTRAST is only at the 50% point of its range.
The Tests- Fear of a Black Hat
Skipping forward in the Optimizer menu brings up the BRIGHTNESS/SET-UP menu. BRIGHTNESS is the predominant label for the adjustment you'll find in your TV's menu that controls its black level.
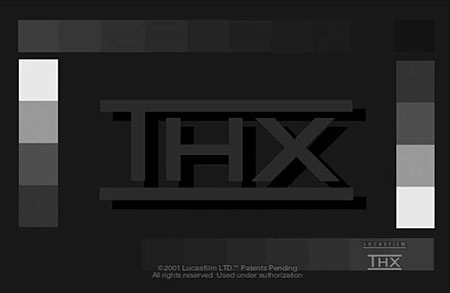
Clicking PLAY TEST brings up a pattern with a charcoal-gray THX logo at center screen. Turn the BRIGHTNESS control on your TV up until the "drop shadow" behind the T-H-X letters is revealed (see figure). If you see the drop shadow, drop the Brightness back down until the drop shadow melds into the black background and you're done. Now picture information that is below the threshold of absolute black will remain correctly obscured while you'll still see all the parts of the image that are above black.
If the drop shadow doesn't appear when you run the BRIGHTNESS all the way up, check your DVD player settings. Make sure your player's setup menu is set to "Pass Information Below Black," if there is a "lighter" or "darker" setting, use the latter, and if there's a choice between 7.5 IRE and 0 IRE set it for 0.
If the drop shadow isn't revealed no matter how your disc player is set up, look at the black boxes at the top and bottom of the THX pattern- you should see seven of them. Lower the BRIGHTNESS control until the seventh box disappears, and then raise it again just until you can barely see it. That seventh box is just barely above absolute black. When you can just see that box you're seeing as much shadow detail as your system will allow, but no more. Now you'll see all of the details in dark scenes that you're supposed to see—but just as importantly you won't see the parts of the image that the filmmakers want to be in absolute darkness.
Now that your black level is dialed in, go back and re-check the white-level adjustments you made on the first pattern, and then touch black level up once again before moving on. White and black level adjustments are interactive, so checking and re-checking is worthwhile.
The Tests- Color Me THX
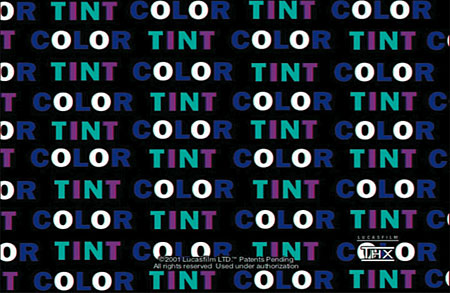
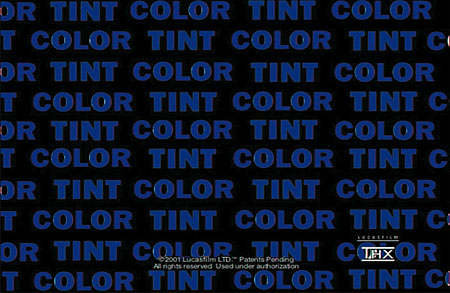
Next in the THX Optimizer suite is the COLOR AND TINT SET-UP. The COLOR adjustment on your TV adjusts the intensity of the primary colors: red, green, and blue. TINT or HUE will do the same for the complementary colors (magenta, yellow, cyan). To use pattern properly requires a blue filter, which can be found at photography stores, or THX sells a pair of cool glasses loaded with blue filters (not to be used as sunglasses) that you can buy here.
If you've thrown down for the blue filter or glasses, look through the filter and run the COLOR control on your TV up and down until the "color" words in the pattern are a uniform blue (see figure). Repeat with TINT; done deal.
If the blue filter isn't for you, there's a far simpler way to adjust color. Something you'll see in every feature film (apart from those that are computer animated) is excellent for adjusting color—flesh tones. Over the course of a few weeks watch some movies, and adjust COLOR until the flesh tones look right with the majority of material. If you want a short cut, I most often use chapter 17 of Shakespeare in Love. The characters' skin tones are purposefully pale, with rosy cheeks. Make sure they look that way and you can't be far off.
Adjusting TINT is tough without a filter, but more often than not can be left at the default position without serious deleterious effect.
The Tests- Looking Sharp
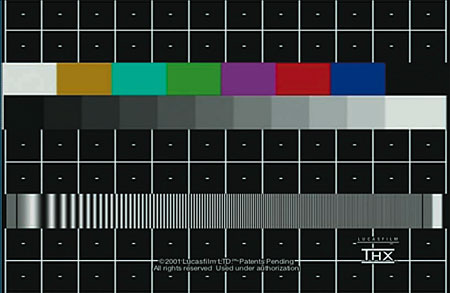
The THX Optimizer's "MONITOR PERFORMANCE" pattern has a frequency-burst area to adjust the SHARPNESS on your TV. The SHARPNESS adjustment is like an equalizer in audio—it typically boosts what is essentially the upper midrange of the video signal. Keep in mind that increasing SHARPNESS does make the image appear sharper and more detailed, but often at the expense of adding artifacts. Use it judiciously.
The MONITOR PERFORMANCE pattern has a frequency-burst, which you'll see as a long row of vertically oriented black and white lines. Look at the smaller and more closely spaced lines at the far right and run the SHARPNESS control up. The lines at the far right of the burst will blur (see figure, but keep in mind that your computer monitor might be dulling the pattern). When the line are blurred your display is now "sharpened" to the point that fine details are being obscured, which means the image is actually softer with respect to real detail! Now back the SHARPNESS down just to the point that those fine lines become crisply defined again and that's where it ought to be.
The Final Word
What's I've offered above is a guideline for setting up your display. At this point you can be reasonably assured that any anomalies you see with program material are in the program material itself, not your setup. But this isn't curing cancer here, and there is some room for seasoning to taste to some degree. But don't stray too far from these guidelines without acknowledging that you're forfeiting some of your right to be critical of program material.
In particular, I've seen displays that had more impact with either white, black or both slightly crushed. And I've also seen displays that looked soft unless SHARPNESS was raised to the point that artifacts are evident on test patterns. Sometimes a few artifacts are more acceptable than a soft overall image.


| Displays Electronics Speakers | Sources Other Gear Software | Top Picks of the Year Top Picks | Custom Install How To Buy How To Use |
Tech 101
|
Latest News Features Blogs | Resources Subscriptions |
WHERE TECHNOLOGY BECOMES ENTERTAINMENT
 © 2026 Sound&Vision
AVTech Media Americas Inc., USA
All rights reserved

