- REVIEWS
Displays Electronics 
Speakers Sources Other Gear Software - HOW TO
How To Buy How To Use Tech 101
Anatomy of an Install: Your Steps To Home Theater Nirvana

Phase Control
Different integrators break it out differently or call it by different names, but the same process generally applies to all custom install projects. That’s true for a single home theater room or an entire wholehouse integration project that might involve multiroom audio and centralized control of lighting, HVAC, security, or other subsystems. We’ll focus on a dedicated theater room being built from scratch as part of a new construction or renovation project. The basic steps are exactly the same if you’re retrofitting a theater to an existing space. The key difference is that retrofits aren’t usually subject to significant wait time between phases while other parts of the job (such as electrical and drywall) are completed.
The first phase of the install is the planning and design phase. This is followed by the prewire, in which all the required cables are put in place. The trim-out is where those wires get terminated to wiring blocks or fixed with connectors in anticipation of installing the gear. In the installation phase, all the equipment goes in and gets connected. The tail end of this phase, or what some installers might call the completion phase, involves testing and tuning all the gear. At that point, you’re done. But, realistically, there’s another stage I like to call the debug phase that takes place over days or even weeks to get the system’s operation and performance fine-tuned to perfection.
Phase I: Planning and Design
Figuratively speaking, the heaviest tool you (or your integrator) will lift in any install job is a pencil. Before you proceed, I can’t stress enough how critical it is to fully think through every technical and aesthetic detail of your installation, and then plan ahead for the things you won’t think of. Only after you identify your needs and wants, specify the equipment and room design, and account for all the variables, can you count on a reasonably smooth progression of the job and a positive result.
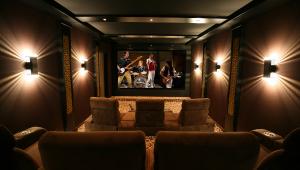
The planning and design phase covers a lot of ground. If you’re building a room from scratch, you’ll have the option of calculating its dimensions. Squares are bad for sound, and rectangles are good. There are formulas that help minimize the potential for issues with poor bass reproduction caused later by room boundaries. If you’d like your room acoustically isolated from the rest of the home—to keep ambient noise out and theater sound in—you’ll need to plan for that during construction. You’ll have to decide aesthetic issues like how to cover the walls and what color to make them. Darker is better for projection systems, especially in the area surrounding the screen where light from the image can reflect back. Fabric wall coverings or acoustic treatments can greatly improve sound quality compared with bare drywall. Seating plans should be considered, and if you anticipate more than one row of seats, now is the time to think about a riser for the back seats and confirm appropriate sight lines to the screen. Special design considerations, such as props for a themed theater or ornate art deco panels, should be mapped out in advance.

Lighting and electrical needs must be accounted for. Here, it’s generally best to have all the gear on the same dedicated 20-amp circuit (or circuits if the equipment needs dictate) to minimize the chance for interference from appliances elsewhere in the home or hum from ground loops that can occur between separate circuits. Don’t forget to spec extra AC outlets behind your flat-panel HDTV, at your projector location, and wherever your powered subwoofer might go. Light fixtures, locations, and bulb types should be specified to avoid issues with glare and/or electrical or mechanical noise. Some fixtures can rattle when the system is cranked up and the big bass of a subwoofer courses through the room. Even HVAC plans should be thought through. Metal registers, for example, can also rattle or ring. If possible, you’ll want to avoid loud blower noise that will distract you every time the system kicks on.
During planning, you must determine the location of every component in the system so you’ll know where to run wires, and you’ll need to preselect at least some of the gear. Two-piece projection systems should be spec’d in advance to ensure you can achieve the desired image size on the screen from whatever projector and projector location you’ve targeted. You’ll have to decide early if you’ll use freestanding, in-wall, in-ceiling, or on-wall speakers so construction brackets and enclosures or low-voltage electrical boxes can be applied—and so you’ll know how to best prepare your cables inside the studs during the prewire. Box speakers or in-walls can be placed behind acoustically transparent fabric panels that effectively hide them and give your theater a polished look, but you’ll need to plan for it.
During the design phase, you’ll select a location for your equipment rack. This might be in a closet off your room or a rack out in the room, but its position will determine the end or starting point of most of your wire runs. It will also determine what accommodations you’ll need to make to operate the system if you can’t comfortably point a remote at it from your viewing area. You’ll need to make sure you allow for convection or fan cooling.
As part of this phase, you’ll have to tap into your audio/video expertise (or that of your expert) and map out the point-to-point wiring that connects all the components. Knowing all the wire types that go into a home theater and what they’re used for is obviously critical. You’ll need to establish the types and lengths of all the cables to properly plan your prewire. You’ll also need to know any details about your local electrical code as it relates to low-voltage wiring in walls and be prepared to pull any permits if required.
Phase II: Prewire
Assuming you’ve planned properly, you’ll have the information you need to create a document called a wiring schedule to assist you in conducting your prewire. This document lists every long-distance wire run for the project, including its type, the location of each of its end points, and its approximate length. Additionally, a wiring schedule might include the required type of termination for each cable end, from bare wire to an appropriate connector or wall plate.
A spreadsheet program can be effective for creating a wiring schedule. If you assign separate columns to the cable type, end points (A and B), and length, you can resort the spreadsheet as needed. For example, you can go line by line in the spreadsheet and list each of your cables, working methodically through your system diagram. Once it’s complete, you can sort by cable type, which allows you to easily sum the total lengths for each type and know how much of each to order. Later, when it’s time to run all the required cables to, for example, the low-voltage electrical box behind the main HDTV, you can sort by, say, Endpoint B, and all the different wire types that go to that box—HDMI, Cat-5, maybe a speaker wire for the center channel—will group together so you can easily prepare them in bunches whose ends can be taped together and pulled simultaneously for greater efficiency.
How much wire you use will depend on the size of your room, but it’s not unusual to run several hundred feet of different types in a typical one-room install. Cables run inside walls must be rated for in-wall use as defined by the National Electrical Code (NEC) and your local electrical code, and in-wall cables running between floors must be rated for riser use.
For a new-construction theater room project, you’ll be wiring in open studs, snaking the cables through holes drilled in the studs. (Note that electrical codes determine how large a hole you can drill in different types of structural members to pass wires through while still retaining their integrity; it’s generally an inch or less.) The best time to do the prewire is after the electrical work has been completed and before any insulation goes in. This will allow you to clearly see the best routes to avoid problems that might be caused by the interaction of high- and low-voltage wiring. (See “Snakes in a Den” on page 38 for more about wiring techniques.) Wires should be coded to your wiring schedule and clearly labeled with the same markings on both ends using stick-on numbered labels made for this purpose or with permanent marker on the cable sheath or a tag made from white electrical tape. Before you begin wiring, you’ll mount low-voltage electrical boxes at most locations where you’ll be terminating or bringing out wires. These boxes can later accommodate a connector plate, a volume control, or a wire passthrough plate that allows passage of a large bundle of wires (such as you might find coming from the wall at the back of a rack). Boxes are generally placed at standard outlet height for wall terminals and at light-switch height for volume controls; boxes for in-wall keypads or touchscreens for control systems should be higher up for easy access.
Speaker cables won’t require a box if they terminate at an in-wall or in-ceiling speaker location. You may wish to mark the open studs with a pencil or Sharpie to identify your destination points; these will be covered later when the wallboard goes up. Alternately, you can use pre-construction brackets provided by the speaker manufacturer (usually at extra cost) to specify the exact location of each speaker for the drywallers who will come in later. Target the space directly between studs so there’s enough clearance to mount the speaker. If you don’t use brackets, you’ll tack a service loop of cable to the inside of the studs at the location you plan to cut in later to mount the speaker. When you bury speaker (or other) wires in the wall for later retrieval, make sure you can get to any wire ties through the future wall opening, and take detailed measurements of their locations. Digital photos of the open wall can be useful; compose your shots so they contain some element that won’t be covered by drywall and will act as a reference—perhaps a nearby electrical outlet, switchbox, or light fixture—and measure off those.
For a retrofit job, you’ll cut into drywall at each box location to mount retrofit rings that will later accommodate connector plates or passthrough plates, or you’ll saw appropriate cutouts for in-wall/in-ceiling speakers. Either way, once the boxes are mounted and locations marked, you’ll go about the business of actually running wires.
For the most part, you’ll run just one or two wires from the rack to each location in the room. But an HDTV or projector location is a little different. These days, the low-voltage box location behind your wall-mounted HDTV may have any or all of the following cables intended for immediate connection or tucked in the wall for possible later use: 1 x HDMI or 2 x Cat-5e (or Cat-6) for the HDMI and/or HDMI balun run; 1 x Cat-5e for Ethernet to accommodate Internet streaming or other services; 1 x Cat-5e for IR control to the TV’s front-panel sensor via an attached IR emitter (two conductors required); 1 x optical audio out to send TV audio from streaming services back to the sound system (this can also be accommodated in some modern A/V receivers and TVs with the HDMI Audio Return Channel feature or skipped entirely if a Blu-ray player, set-top media box, or other rack-mounted component handles your streaming); an optional RG6 coax TV line to capture off-air broadcasts with an antenna and the set’s internal tuner; and perhaps a two-conductor speaker cable to feed a center-channel speaker that might be mounted right below the TV. And it never hurts to throw in one extra Cat-5e, just in case any one of the other Cat-5e cables you’re really counting on gets damaged or kinked in the pull.
Projector locations won’t have much beyond wires for one or two HDMI (or equivalent balun) connections for video. But you’ll want a Cat-5e for an IR emmitter and another if the projector triggers a retractable screen up front. Some of the newest projectors also include Ethernet jacks for firmware updates.
Phase III: Trim-Out
After the drywall has been applied, it’s
time to prep your prewired cables for the install. That means cutting them to appropriate lengths, terminating them with the appropriate connectors or plates, mounting the plates to your wall boxes as required, and cutting any holes for speakers that the drywallers didn’t make. There are a variety of tools that simplify and speed the stripping and termination of different cable types. Cat-5e or Cat-6 terminations require a specialized crimper to lock the ends with industry-standard RJ-45 plugs. RJ-45 jacks require a punch-down tool. To terminate coax cables, whether RG6 or the RG59 mini coax used for in-wall component video cables, you’ll need a dedicated stripper (for each) and another crimper for compression connectors. You’ll find these online or at your local Home Depot or Lowe’s in the electrical department if you’re willing to make the investment and do it right.

Another tool that’s very helpful, if not required, is a tone kit. It consists of an audio generator and a wireless wand with a little speaker that picks up and amplifies the audio signal at the other end. This lets you verify all your wire labeling and is invaluable for identifying wires that are mismarked, unmarked, or illegible. A toner is also great for troubleshooting later if something’s not working.
Terminal plates come in different varieties, but you can purchase modular box straps and terminal inserts at the big home-improvement stores or online. You can mount as many as half a dozen different terminals in a single-gang wall box, which allows you to mix, for example, an RJ45 Ethernet jack, speaker posts, and an RCA subwoofer jack on one wall plate. Where it’s appropriate, such as behind a wall-mounted HDTV or your rack, use a passthrough plate.
If walls and ceilings are painted at this point, it’s not unusual to mount and wire up any in-wall or in-ceiling speakers. Otherwise, you can do this at the final installation phase.
Phase IV: Installation
When you get to the installation phase, it’s time to build your rack. That means you’ll place your gear in a rack, closet, or cabinet with appropriate ventilation (or forced cooling), make connections from the sources to the AVR, and connect the AVR to the display and the speakers. You can do this any which way and create a mess, or you
can dress your rack in such a way that you don’t end up with a rat’s nest that gives you agita every time you have to swap something around or check a connection. Rack-building is an art form, and a meticulous rack, with its different wires coming together at the sides and then snaking off again on each shelf to find their individual destinations, is a thing of high-tech beauty. Some integrators build the rack in the shop where they can dedicate an expert technician to the task, then ship it to the site and make the room connections. Plastic wire-ties and Velcro straps, a little sense of aesthetics, and a lot of patience go a long way toward making your rack something you can be proud of.
Along with connecting your components, you’ll likely be installing some kind of universal remote control during this phase. You’ll want an activity-based remote that sends a string of commands (called a macro) with one button push to properly switch all the components. And you’ll be better off with one that sends its commands via radio frequency signals (RF) rather than relying on traditional infrared (IR) commands that can miss their mark if you don’t keep the remote perfectly pointed for the full sequence. RF operation is also desirable if your rack is in a cabinet or closet. Since all your devices usually require IR commands to operate, setting up an RF remote involves attaching IR emitters to the front of your components that are then wired to the little receiver unit that comes with your RF remote. You’ll also need to program your remote so those one-touch buttons work the way they’re supposed to, or pay someone to do it. Logitech’s Harmony remotes remain among the easiest and most accessible for computer-based, end-user programming, but they still benefit from an experienced programmer.
Once your system is all wired up, you can confirm it’s operating with all your sources and work on adjusting the audio and video for best performance. Get through that, and congratulations—you’re ready for the big premiere!
Picture Perfect
Whether you do the project yourself or hire a pro, expect to find a few things not quite right in the days and weeks following the completion of your home theater. Audio and video tuning may require extra tweaking over time as you tune things to your personal taste and experiment with bass settings over a wide range of program material. If you’re using a macro-based remote, you might also find that some command sequences don’t fire perfectly every time. This suggests there might be some required tuning of the delays between commands that can be facilitated in programming. Make a list as you go, then either fix these little gremlins or bring back your installer to do it for you. There’s no reason to live with remote misfires or picture or sound quality that don’t lift you to a higher plane. Take the time to get things as close to perfect as you can, and you’ll be rewarded with many happy hours of movie-watching pleasure.


| Displays Electronics Speakers | Sources Other Gear Software | Top Picks of the Year Top Picks | Custom Install How To Buy How To Use |
Tech 101
|
Latest News Features Blogs | Resources Subscriptions |
WHERE TECHNOLOGY BECOMES ENTERTAINMENT
 © 2025 Sound&Vision
AVTech Media Americas Inc., USA
All rights reserved

