- REVIEWS
Displays Electronics 
Speakers Sources Other Gear Software - HOW TO
How To Buy How To Use Tech 101
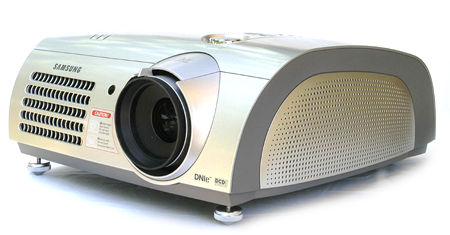
Samsung SP-H700AE DLP Projector
As expected, the image looked incredible. And of course, I asked for one to review as soon as it became commercially available. It took quite a while, but Samsung finally sent me a sample a couple of months ago, roughly a year and a half since that first demo in Vegas.
First Glance
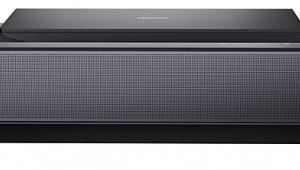
The SP-H700AE presents a streamlined visage that is somewhat retro, a bit reminiscent of the Teardrop travel trailer from the 1930s and '40s. On the front, the lens is positioned to one side with the air vent next to it firing forward. I like this design, since it doesn't vent hot air to the side where someone might be sitting (like me whenever I'm over at editor Tom Norton's house to watch movies).
The lens provides manual focus and zoom on the barrel; there's no electronic control from the remote or front-panel controls. The same goes for vertical lens shift, which allows the projector to be placed up to 5% above or below the picture area. There is no horizontal shift at all. As with most such products, the SP-H700AE can be configured to operate as a front or rear projector from a ceiling- or table-mounted position, but the lens must be centered horizontally on the screen. In addition, it's best if the projected light path is perpendicular to the screen; the Samsung includes vertical keystone correction, but it's better to avoid using it if possible to prevent a loss of perceived resolution.
On the top of the projector are several controls, including the vertical lens-shift dial as well as Menu, Power, and Source (input-select) buttons and a 4-way cursor-navigation rocker with central Select button. The rear panel houses all the connections, with DVI, RGB (VGA), S-video, composite, and two component video inputs as well as an RS-232 port and AC power-cord receptacle. Both the front and back provide IR receiver windows for remote commands, which makes placement more flexible.
Despite its simplicity, the illuminated remote is remarkably well-designed, with separate On and Off buttons that make it easy to manage the power from a universal or learning remote. Direct-access buttons for all inputs are very welcome, and other buttons provide direct access to the menus that let you specify the aspect ratio, picture preset, picture settings, and vertical keystone correction. The complete menu system is called up with the Menu button, and a 4-way cursor-navigation cluster with central Enter button lets you select the parameter you want. The Quick button calls up the previously viewed menu, which is handy, and the Info button displays operational information, including the number of hours on the lamp. The only head-scratchers are the Still button, which freezes the image (you would normally do this from the source device), and the Install button, which inverts the image for ceiling installation (once the projector is installed, you don't want easy access to this function, though it's no big deal to restore if it's flipped accidentally).
The menu system is a model of good organization; I never had any trouble finding my way around once I learned the meaning of the four icons on the left that represent the main menus. A text label for the selected menu (and submenu) appears at the top of the screen, but I do wish all the main-menu icons were also labeled in the left column. The four menus let you select and name the inputs, adjust the picture, perform setup functions, and specify menu options (language, position, translucency, and display time).
The manual is certainly well-organized and easier to read than many Asian manuals. However, it's pretty skimpy on detail; for example, the only explanation of Film Mode is this: "Supports enhanced screen quality for films of 24 frames." I assume this is 3:2 pulldown correction, but there's nothing about whether you must turn it on for film-originated material and off for video material or if the On setting automatically detects film and video and behaves accordingly. (I'll reveal the truth about this later.) On the other hand, the manual includes handy tables of which inputs and resolutions support which Picture Size settings and the appropriate throw distances for different screen sizes.
Features
Thanks to Kane's influence, the SP-H700AE offers a number of unique features that set it apart from other projectors. First, it provides three color-gamut choices: SMPTE C, HDTV, and EBU. SMPTE C corresponds to the NTSC color gamut used in conventional analog TVs for the past 50 years, HDTV corresponds to the phosphor colors specified for—you guessed it—HDTV, and EBU is the color space used for PAL and SECAM. Interestingly, most TV post-production facilities in the US still use monitors with SMPTE C phosphors when creating HDTV content, so the SMPTE C color gamut should be used even when watching HDTV, at least for now. Kane hopes that these facilities will convert to monitors with HDTV phosphors in the future, and when they do, this projector will be ready with its HDTV color-gamut setting.

The color-temperature settings are not labeled Warm, Medium, Cool, or anything like that—they are labeled with color-temperature values: 5500K, 6500K, 8000K, and 9300K. Also available are three gamma presets, which are supposedly optimized for film (gamma = 2.6, the professional CRT value), video (2.7), and graphics (2.8, a common value in Europe). Also, there are 12 gamma settings in the service menu that can be assigned to the three presets.
Picture Size lets you specify the aspect ratio: Full (anamorphic), Panorama (non-linear stretch), Zoom1, Zoom2, and 4:3. Not all Picture Size settings are available for all inputs and signal resolutions; in particular, I'm bummed that 4:3 is not available for the DVI and RGB inputs at 720p, though it is available for component 720p. Panorama and Zoom2 are available only for 480i and 576i inputs. In my book, all picture sizes should be available for all inputs and resolutions.
Although there is no horizontal lens shift, the projector does include the ability to shift the image slightly up, down, right, or left to achieve perfect alignment with the screen, and this can be set independently for each input resolution (though you need something like Digital Video Essentials or an Accupel signal generator to do it properly). Overscan can be turned on or off, and Samsung's Digital Natural Image engine (DNIe) can be turned on or off or placed in a demo mode that lets you see the difference in a split-screen configuration. (Like all such processing, I kept it off.)
Finally, Film Mode (3:2 pulldown) can be turned on or off. When it's on, this mode picks up 3:2 pulldown quickly and reliably, as indicated by the Snell & Wilcox Zone Plate test pattern (3:2 rate) on Video Essentials. However, it does nothing with field-rate or frame-rate video, as revealed by the corresponding Zone Plate patterns; in fact, there was absolutely no difference in these patterns with Film Mode on or off, so we left it on and saw no problems with video-sourced program material.
The Film Mode is available only for analog inputs. Analog 480i and 576i signals are deinterlaced by Faroudja's DCDi chipset and then upconverted to 720p by a Genesis chipset; all other input signals bypass DCDi and are processed by the Genesis chipset only. This includes 1080i inputs, which are first deinterlaced to 1080p and then downconverted to 720p.
There are four preset picture modes: Dynamic, Standard, Movie1, and Movie2, which are configured with color-temp settings of 9300K, 8000K, 6500K, and 5500K, respectively. In addition, each input includes three separate user memories in which all picture-control settings—including the ubiquitous Contrast, Brightness, Color, Tint, and Sharpness—can be saved. That's 15 user memories in all (the S-video and composite inputs share the same three memories). To adjust the picture controls, you enter the Custom Picture mode, which also provides access to RGB offset and gain controls, though this is not revealed in the manual at all.
Setup controls include four installation settings (front or rear projection from the ceiling or floor), two lamp settings (Theater and Bright), and vertical keystone correction. There are also a number of PC-specific settings. But perhaps the most interesting feature in this menu is a selection of internally generated test patterns, including Crosshatch, Screen Size (various aspect-ratio markers with 5% and 10% safe-area indicators), Color Standard (standard color bars with SMPTE C, HD, and EBU selectors), and five full-field colors (red, green, blue, white, and 6500K white). When the red, green, blue, and white fields are displayed, the projector's color-correction circuitry is turned off; the 6500K white field turns the circuitry back on. These test patterns are a godsend when it comes to setup and calibration.


| Displays Electronics Speakers | Sources Other Gear Software | Top Picks of the Year Top Picks | Custom Install How To Buy How To Use |
Tech 101
|
Latest News Features Blogs | Resources Subscriptions |
WHERE TECHNOLOGY BECOMES ENTERTAINMENT
 © 2025 Sound&Vision
AVTech Media Americas Inc., USA
All rights reserved

