
Although assembly may be time-consuming for Corpus Christi, it's a solid choice for those building a budget-friendly home theater without compromising on quality.
- REVIEWS
Displays Electronics 
Speakers Sources Other Gear Software - HOW TO
How To Buy How To Use Tech 101
VApex PRO Fixed Frame Screen Review


AT A GLANCE
Plus
Highly affordable
Good uniformity
Quality construction
Minus
Time-consuming to assemble
THE VERDICT
The VApex PRO is a great option for anyone looking to put together a home theater on a budget without cutting corners.
Recent advances in projection screen technology have created a shift in home A/V from cave-like theaters that block out every last drop of light to open spaces that integrate with the rest of the living environment. For screen manufacturers, a main mission over the past few years has been to design models capable of withstanding some degree of ambient light while delivering good image quality over a wide viewing angle. Known as ambient-light-rejecting (ALR) screens, these do exactly what their name suggests: cancel out the impact of lamps, overhead lighting, and undraped windows so that the light you see reflected off the screen is primarily what’s beamed at it by the projector. However, ALR screens remain pricey. Case in point: The Elite Prime Vision DarkStar 9 costs upwards of $3,000 for a 110-inch-diagonal model. At that price, there’s a good chance that the projector you’d buy would cost less than the screen itself.
Fortunately, for those of us who still value a more traditional darkroom home theater experience, the trend has been toward better and better value among classic white screens. And with the cost of decent quality 1080p front projectors dropping down below $1,000, you might be asking yourself, “How much should a basic fixed screen designed for a light-controlled home theater really cost?” If the answer that entered your mind is “about $250,” then I’ve got the screen for you: the VApex PRO Cinema Matte White Fixed Frame Screen from online retailer Visual Apex. At $249 for a 110-inch-diagonal model—and $219 for the 92-inch-diagonal screen I tested—the VApex PRO is almost scary cheap for what you get. In some cases, you’d pay more for a white bedsheet (OK, a 1,000-thread-count Egyptian cotton one).
Setup
The VApex PRO comes in a single box that contains everything you need to construct the screen. A printed installation manual is included, and there’s a video guide on the company’s website that I’d recommend you check out before starting.
Assembling the screen frame was a matter of clearing out a large area on the floor, putting down protective material (a plastic sheet will do), and connecting the frame components using the supplied joint connectors and corner braces. To attach the screen to the frame, you insert tension rods along the screen’s edges and affix the screen to the grooves running along the back of the frame. While the frame assembly process is simple enough, each connector and brace requires numerous screws to hold it in place—a time-consuming process. You may want to enlist an assistant to help out.
Once the screen is affixed to the frame, the final step is to insert plastic fix plates into the grooves that run along the frame’s back. This was a matter of starting from the center of each side and working my way out to the edge. Once completed, the screen was sufficiently taut; comparing it with my reference Stewart Filmscreen Cima Neve, a snap-on fixed frame that costs $1,675, I noted no difference in screen tension between the two.
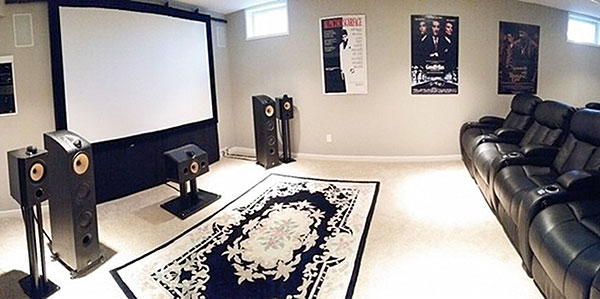
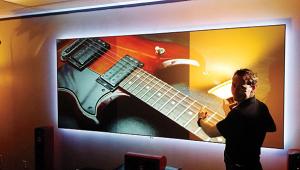
The screen kit also comes with basic brackets for wall-mounting. After you install these, the screen snaps on, and you slide it horizontally for proper centering. The VApex PRO’s aluminum frame is covered with black velvet to absorb any light spill coming from a projector. At 4 inches wide, this also creates a sufficient border to frame and isolate the image in case the wall located behind it is a tone other than dark gray or black.
Performance
I used a Sony VPL-HW65ES projector with 176 hours on its lamp for my evaluation. Before recalibrating the Sony to the screen, I made an initial set of measurements on the VApex to get an idea of how it compared with my more costly reference Stewart Cima Neve, which uses a similar 1.1-gain matte white screen material. White window patterns measured on the VApex were slightly less bright, though the differences were minimal. Grayscale measurements also indicated a bluish cast compared
with the performance of the Stewart, though that difference was some-
thing that could be compensated for easily via projector calibration.
Looking at a full-field gray test pattern, I didn’t notice any overt hotspotting or color tinting on the VApex; the illuminated screen looked uniform from the center out to the far corners. I also didn’t notice any uniformity issues when viewing from 30 degrees off axis, which is exactly the result you should expect to get with a low-gain white screen material like that used for the VApex PRO.
With both of those important boxes checked off, I next performed some measurements to see how the VApex would stack up objectively. Starting with a fairly hot peak brightness of 31.1 foot-lamberts at the screen’s center, the brightness dropoff to the left and right sides ranged within 5.3 ft-L. The difference between the screen’s center and corners, meanwhile, ranged within 7.7 ft-L. Grayscale measurements remained consistent within 200 degrees across the screen’s horizontal center and within a 400-degree range at the top and bottom corners. Overall, these numbers are impressive and com- parable with my measurements of the Cima Neve, though the Stewart model did show slightly better brightness uniformity between the screen’s center and edges.
Returning to the subjective realm, I re-watched a movie on the VApex PRO that I had just watched on the Stewart Cima Neve: 10 Cloverfield Lane. The picture looked equally detailed, though highlights seemed a bit hotter and colors more saturated on the VApex than what I recalled from the movie’s appearance on the Stewart screen. Even so, differences were within adjustment range, allowing me to quickly equalize the VApex PRO’s image to my satisfaction.
Conclusion
DIY-ers setting up a home theater may be inclined to cut corners on the screen, instead choosing to use a white wall, screen paint, or even the above-mentioned bedsheet as a projection surface (the horror!). It’s these folks who would benefit the most from buying a VApex PRO. Not only does this entry-level fixed-frame model offer quality construction, but assembling it is easy (if time-consuming), and video performance is spot-on. And with such a screen priced under $250, you’d be crazy not to buy one.
Here’s something more to chew on: When a 110-inch VApex PRO is paired with a late-generation entry-level projector, such as the Optoma HD142X (watch for our review) or the InFocus ScreenPlay SP1080, the total package works out to just around $800. I’m sure that such a combination will make a budget-minded DIY-er happy, and not just because they saved lots of money—though that certainly never hurts.
NEXT: Specs »
|
|
| ||||||||||
- Log in or register to post comments


| Displays Electronics Speakers | Sources Other Gear Software | Top Picks of the Year Top Picks | Custom Install How To Buy How To Use |
Tech 101
|
Latest News Features Blogs | Resources Subscriptions |
WHERE TECHNOLOGY BECOMES ENTERTAINMENT
 © 2024 Sound&Vision
AVTech Media Americas Inc., USA
All rights reserved

