- REVIEWS
Displays Electronics 
Speakers Sources Other Gear Software - HOW TO
How To Buy How To Use Tech 101
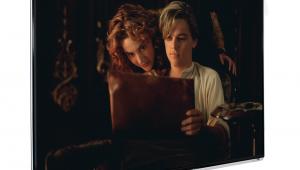
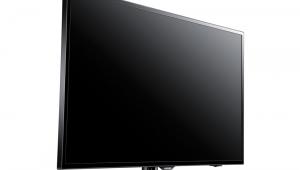
Toshiba 52XV545U LCD TV Setup & Tests
Like virtually all TVs, the 52XV545U offers several picture modes, and the Movie mode was actually quite close to the optimum picture settings, though blacks were a bit crushed (Brightness was a little too low) and whites were a bit clipped (Contrast was a little too high). If you tweak any of the settings in a preset mode, the mode switches to Preference, which could be confusing.
When adjusting the picture controls, you can start with any picture mode, including the one labeled Preference. However, when I selected the Preference mode and entering my settings, I was surprised to find that ringing—ghostly white halos surrounding black lines on a gray background—was very pronounced. Even more surprising, when I selected the Movie mode and adjusted its settings (causing the mode to automatically switch to Preference), there was no ringing to be seen, even though the Sharpness setting was the same in both cases. Obviously, it's better to tweak the picture controls in the Movie mode than to start in the Preference mode.

As I was taking the peak-white and black-level measurements, I noticed that the white- and black-field uniformity was not great. With a white field, the corners and edges were slightly darker than the center, and with a black field, the corners were slightly lighter, though neither case was egregious. Like most LCDs, the apparent black level increased as I went off axis, and black shifted toward blue-green. Again, this wasn't terrible, but I wouldn't want to watch this set from more than 30 degrees from the centerline.
Oddly, the user menu offers only two calibration controls: B Drive and G Drive, which affect blue and green, respectively, at the high end of the brightness range. I would much prefer to have red, green, and blue controls for high and low brightness, or at the very least, an R Drive control in the user menu. Still, I was able to improve the set's measurements significantly using just the B and G Drive controls, which brought blue and green into close alignment across the brightness range, though red was still deficient (see Measurements).
The service menu has all six controls needed to perform a full calibration, and unlike the 52XF550U, the low-end controls are effective. (In the previous model, these controls didn't do anything when I adjusted them, and even if they had, each one reverted to its default value when I selected another control and then returned to it.) Perhaps Toshiba took my comments about the previous set to heart and corrected this problem.
Using the service menu, I was able to get the measurements even closer to correct than with the B and G Drive controls in the user menu (see Measurements). I returned the B and G Drive controls to their default values before performing the service-menu calibration.
In another reversal from the 52XF550U, the ColorMaster controls did far more damage than good to the 52XV545U's picture. As you can see in the Measurements section, the green color point was way off the mark, and the ColorMaster green controls were not able to correct it completely. I was able to bring the other colors into line with their targets, but when I displayed real program material, it looked terrible, full of noise and weird contouring. Also, the colors didn't look right at all, so I decided to disable the ColorMaster settings and review the set au naturel.
Looking at the HQV Benchmark DVD at 480i via component, I was most interested in the effect of the SRT upconversion technology. I started with the color-bars test, which also includes some bursts—alternating lines of black and white as well as others with alternating lines of two different colors—at different frequencies. (The higher the frequency, the thinner the alternating lines.) With SRT turned off, the horizontal black-and-white high-frequency burst was almost completely rolled off, as was the vertical color burst.
Turning SRT on, I discovered that it has three modes, and each mode has a 5-step Level setting. According to the manual, Mode 1 is intended for low-quality standard-def content with lots of noise, Mode 2 is for DVD content, and Mode 3 is for 720p broadcast content. There's also an Auto mode that automatically adjusts SRT according to the input signal.
As I played with these settings, going from Mode 1 to 2 to 3 seemed to increase the contrast; the Level setting did the same thing at higher values. High Level values also introduced obvious edge enhancement and noise. In addition, Level 3 caused banding in the vertical high-frequency black-and-white burst, while the other level settings did not. Mode 2 at Level 2 seemed to sharpen the bursts the most without adding undue edge enhancement.
Next, I looked at the HQV detail test, which is a clip of a road and bridge with lots of fine detail. It quickly became clear that Mode 1 actually softened the picture from DVD (as it had on the bursts), whereas Mode 3 looked too edgy. Once again, I settled on Mode 2 Level 2 as the best setting—this did, in fact, sharpen the image noticeably. Higher Level values seemed to sharpen the image even more, but it started to look unnatural and noisier.
Moving on to my other standard tests, jaggies were moderate and most pronounced on the waving flag. The set's DNR (digital noise reduction) was reasonably effective without softening the picture, even on its High setting, though the Auto setting didn't seem to do much at all. MPEG NR softened the picture a bit without doing much for mosquito noise, so I left it off.
The set's processor picked up 3:2 pulldown pretty slowly, taking a full second to lock on and then losing the lock at the end of the race-car clip. Unfortunately, the Cinema Mode control has no auto setting, so you must manually select Film or Video depending on the content, though even in Video mode, the 2:2 clip had a fair amount of jaggies. The mixed 3:2 film with video text crawls took a moment to stabilize, then it was fine, but the diagonal bass strings were more jaggy than I usually see them.
On the HQV Benchmark HD DVD at 1080i via HDMI, jaggies were invisible, and the video resolution-loss test was solid as a rock. The film resolution-loss test took about a second to lock onto the 3:2 cadence, then it was fine except for an occasional loss of lock. The seats in the bleachers lost a fair amount of detail during the pan.
Unlike the 52XF550U, Film Stabilization in the 52XV545U actually improved things in the pan across the bleachers in this test—specifically, it smoothed the motion considerably, especially in the Smooth setting. The Standard setting was not as good, and turning Film Stabilization off was the jerkiest of all.
Turning to the FPD Benchmark Blu-ray test disc, ClearFrame improved the detail and sharpness of the scrolling monoscope pattern, but the bursts in the pattern were full of smudging artifacts. Moving characters, such as the pan across a world map, were sharpened quite a bit with no ill effects, as were the license plates of passing cars. However, it didn't do as much to improve the sharpness of some of the other motion clips, especially the girl on a swing—her fine-striped blouse looked a bit sharper with ClearFrame on, but it was still pretty blurry.
This disc also includes some mostly black and mostly white shots with subtle gradations. The differentiation between different shades of black in the mostly black shots was okay but not the best I've seen, while the differentiation in the mostly white shots was fine.
- Log in or register to post comments


| Displays Electronics Speakers | Sources Other Gear Software | Top Picks of the Year Top Picks | Custom Install How To Buy How To Use |
Tech 101
|
Latest News Features Blogs | Resources Subscriptions |
WHERE TECHNOLOGY BECOMES ENTERTAINMENT
 © 2024 Sound&Vision
AVTech Media Americas Inc., USA
All rights reserved

