- REVIEWS
Displays Electronics 
Speakers Sources Other Gear Software - HOW TO
How To Buy How To Use Tech 101
Subwoofer Setup Secrets

There's more to setting up a subwoofer than just plugging it into your system and turning it on, but it's not rocket science. Follow the steps below, and you'll get solid, powerful bass with a minimum of headaches.
1. Unpacking
|


2. Planning Read the owner's manual and consider where you could place the sub. They usually sound best positioned in a corner with at least 6 feet of wall to either side. Decide whether you're going to use the sub's crossover or the one in your receiver. The crossover, or low-pass filter, helps you achieve the best blend between the sub and your main speakers. (Some subs have a switch so you can bypass the crossover when you're using the one in your receiver.) If you go with the sub's crossover, you can use either its line-level input or its pair of speaker inputs. The main difference is that it's easier to make line-level connections, requiring only one cable run from your receiver to the sub.
3. Wiring Measure how much cable you'll need to go from the receiver to the sub, then add another yard for slack. If you're making a line-level connection (using the crossover either in the receiver or the sub), you'll need a standard audio cable with an RCA jack on each end. Run the cable from the receiver's subwoofer output to the sub's line-level input. If you opt for a speaker-level connection, you'll need speaker wire, and plenty of it - especially if your sub is more than a few feet away from your A/V rack. For this hookup you need to run wires from your receiver's front left/right channels to the sub and from there to the speakers.
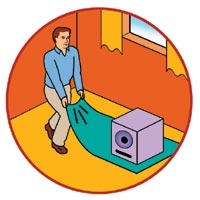
4. Placement Move the sub into position either by pulling it across the carpet or, if you have a bare floor, by dragging it on a piece of rug. Make sure the sub is resting on a flat side - not on a driver, a port, or the controls! Placing the sub so the control panel is facing out will make it easier to do setup adjustments. Don't worry if the port or driver is facing the wall, but try to keep the sub at least a foot out into the room.
5. Hookup Turn off your system. Hook up the sub, and check your connections against the diagram in the manual. Turn the crossover control up to its highest frequency, turn the volume all the way down, and set the phase control to 0. If the manual has any recommended settings, start with those. Plug in the power cord, make sure the volume on the receiver is turned all the way down, and then switch on your system and the sub. It's easier to do the next four steps if you have someone manipulate the controls while you sit in the listening position.
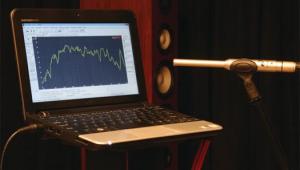
6. Level While you can make settings by ear using movie soundtracks and music, you'll get the best results using a sound-level meter and test tones. (All of the necessary signals are on the Sound & Vision Home Theater Tune-Up DVD.) It's also helpful to write down your settings so you can go back to ones that worked particularly well. Set the receiver for two-channel (stereo) playback, then play the test signals at a moderate volume. Turn up the sub's volume until its rumble blends with the sound from the other speakers, go past that point, and then nudge back to it.
7. Crossover Using pink noise (like the circulating test tones provided by all Dolby Digital receivers), dial the crossover-frequency control down until the front left/right speakers and the sub sound like distinct high- and low-frequency sources. Then turn up the control until the sounds blend. For small speakers with limited bass, you might have to turn the control all the way up. For large speakers that put out some deep bass, turn it down and then up until the sounds blend.
8. Phase For subs with a two-position switch for phase, or polarity, alternate between the 0 and 180° settings until you find the one that gives the most bass at the listening position. (If the 180° setting works best, repeat Steps 6 and 7.) If your sub has a phase knob, turn it until the bass suddenly becomes louder.
9. Optimizing Since there can be a lot of interaction between the crossover and level controls (changes in the crossover frequency can have an impact on the volume), repeat Steps 6 and 7 until you have the best blend. Now listen carefully to recordings that you know have strong, solid bass. If the bass is boomy, turn down the sub level. If the notes from an acoustic bass change in volume in ways that sound unnatural (certain notes are too loud or soft), adjust the crossover. If male voices sound unnaturally deep, turn down the crossover frequency.
Next, use your receiver's setup procedure and a sound-level meter to make sure the sub and the front and surround speakers are properly balanced. Once you feel you've achieved the best possible blend, turn the sub around to hide the controls (if this is appropriate with your model), attach the grille and any feet or spikes, and you're ready to rumble.
- Log in or register to post comments


| Displays Electronics Speakers | Sources Other Gear Software | Top Picks of the Year Top Picks | Custom Install How To Buy How To Use |
Tech 101
|
Latest News Features Blogs | Resources Subscriptions |
WHERE TECHNOLOGY BECOMES ENTERTAINMENT
 © 2024 Sound&Vision
AVTech Media Americas Inc., USA
All rights reserved

