Cool article! What about the entry door to the room? A standard interior door is going to let out a bunch of sound from the gap between the bottom of the door and the floor. Do you add a soundproof entry door?
- REVIEWS
Displays Electronics 
Speakers Sources Other Gear Software - HOW TO
How To Buy How To Use Tech 101
Reduce a Home Theater to Silence Page 2
Decoupling for Dummies
For retrofit and new-construction scenarios in which double framing isn’t feasible, Grimani recommends a simpler, less expensive solution that delivers surprisingly good results: Use isolation bushings (also called clips) to separate, or decouple, drywall from studs or joists. Embodying a new class of soundproof-simplifying solutions that emerged 10 or 15 years ago, the isolators attach to the studs, typically on 24- or 48-inch centers, with the rubber side of the bushing facing the stud (in the case of PAC International’s Rubber Sound Isolation Clip, RSIC-1). The opposite side of each isolator supports a horizontal metal rail called a hat channel onto which the drywall is fastened. Isolation bushings and related hardware are also available from Kinetics Noise Control, which makes the IsoMax Resilient Sound Isolation Wall and Ceiling Clip. “The isolators push out the drywall about an inch and a half and act sort of like car bushings, which isolate the body from road vibrations,” Grimani explains.
For retrofit and new-construction scenarios in which double framing isn’t feasible, Grimani recommends a simpler, less expensive solution that delivers surprisingly good results: Use isolation bushings (also called clips) to separate, or decouple, drywall from studs or joists. Embodying a new class of soundproof-simplifying solutions that emerged 10 or 15 years ago, the isolators attach to the studs, typically on 24- or 48-inch centers, with the rubber side of the bushing facing the stud (in the case of PAC International’s Rubber Sound Isolation Clip, RSIC-1). The opposite side of each isolator supports a horizontal metal rail called a hat channel onto which the drywall is fastened. Isolation bushings and related hardware are also available from Kinetics Noise Control, which makes the IsoMax Resilient Sound Isolation Wall and Ceiling Clip. “The isolators push out the drywall about an inch and a half and act sort of like car bushings, which isolate the body from road vibrations,” Grimani explains.

Isolation bushings are ideal for new construction but make sense for retrofits as well—as long as you’re willing to remove the existing drywall. “Pulling down drywall seems crazy to some people, but it’s not really that hard to do,” Grimani says. “In a couple hours, it’s gone, everything is cleaned up, and you’re ready for new drywall (especially if you hire a pro to do the job). Put in those bushings with a layer or two of drywall, a bit of insulation, and you can gain about 15 dB of additional soundproofing over a standard wall for an STC of 55 dB. That’s a huge improvement between rooms. The main benefit is in the midrange, but with low frequencies it really seems like the bass transfer is largely gone.” And, as we’ll see in a moment, there are ways to make a good thing even better. (Here’s a fun fact: To get to 55 dB of isolation between rooms using only half-inch drywall, you would have to use seven layers on each side of the wall!)

Soundproofing by the Numbers
Like they say in sports, “No pain, no gain.” If you’re willing to put in the time and effort and put up with the inconvenience of living in a construction zone for a few days—or longer if it’s a DIY project—it is possible to add soundproofing to an existing home theater space. But it’s not a walk in the park.
“There is no doubt in my mind that working from scratch in a new construction setting is a lot easier than a retrofit,” Grimani says. “If you want to soundproof an existing home theater so you can enjoy the latest action movies with their steady stream of big bass wallops without waking the kid sleeping next door, doing it as a retrofit is complicated. That’s not to say you can’t do it, but be prepared to do a fair amount of construction.”
When it comes to new construction, the principles and techniques are the same. “It’s just that you don’t have to figure out how to retrofit stuff or worry about disrupting the family during construction,” Grimani says. “You just want to build it right the first time.”
Whether you’re looking to soundproof an existing room or working with plans for a new home or addition, Grimani has come up with 10 basic steps to effective sound isolation. Of course, results will vary depending on the materials and specific techniques used, but if you follow the basics, you’ll achieve worthwhile results. Says Grimani, “At minimum, if you want to get to the point where you have reasonable isolation across all frequencies—bass, middle, and highs—here are the steps.”
1 Rip down the drywall on the theater side.
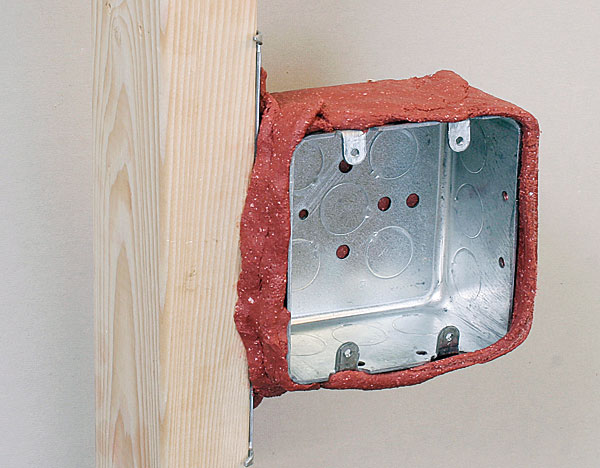
2 Clean up everything and plug all the holes. “Basically, put caulk anywhere it looks like there’s a junction or a gap to get rid of the transfer points,” Grimani says. Drape putty packs on the backside of all electrical outlets. IsoBackers from Kinetics Noise Control work well and are fireproof and electrically nonconductive.
3 Add insulation. Grimani recommends a special type of insulation known generically as rockwool and sold under the trade name Roxul. “Rockwool is a very high-order thermal insulation made of volcanic rock that’s been spun into a fiber,” he says, noting that it’s not very common in the U.S., especially in more southern states. If you can’t get it, just use regular fiberglass insulation.
4 Secure isolation bushings to the studs and ceiling joists, following manufacturer recommendations. As noted earlier, examples include PAC International’s Rubber Sound Isolation Clip (RSIC-1) and Kinetics Noise Control’s IsoMax Resilient Sound Isolation Clip.
5 Mount a metal hat channel (also called a hat track, furring channel, or resilient channel) onto the isolators; it’s called a hat channel because it looks like a hat when you look at it in cross section. “The track squeezes into the metal part of the isolation blocks and provides support for your drywall,” Grimani explains. “The tracks go horizontally, kind of like ribs every 24 inches or so. So now, instead of vertical studs, you have a bunch of horizontal metal tracks that you hang your drywall from.” Hat channels are available from PAC International and Johnson Bros.

6 Install 5⁄8-inch plywood. Position the 4-by-8 sheets horizontally and use screws to secure the wood panels to the hat channel. Note: Adding a plywood layer is optional, and skipping it will only slightly reduce overall sound isolation. But keep in mind that it’s an inexpensive way to create a backing layer that makes it easy to hang speakers, projectors—you name it—without having to hunt for studs.
7 Use a caulk gun to apply Green Glue damping compound to the drywall before installing it over the plywood; follow the manufacturer’s recommendations on how to apply the compound. Note: In cases in which you’re more interested in adding mass without thickening the walls too much, the mass-loaded vinyl barrier depicted in Figures 2, 3, and 4 is a good option, but you wouldn’t typically use both Green Glue and a vinyl barrier.

8 Install 5⁄8-inch drywall over the plywood after you apply Green Glue. Position the drywall vertically to avoid overlapping seams; doing so helps reduce sound transfer.
9 Soundproof the floor. It can be easy to overlook the floor, especially in a retrofit in which you have to deal with the hassle of mismatched floor heights, but the same principles that apply to walls and ceilings—mass, damping, and decoupling—are valid here, too. “Soundproofing the floor is a little more complicated,” Grimani says, noting that the exact course of action is determined by what’s beneath the floor—whether it’s a concrete slab, crawl space, or a finished room. One approach is to install an isolation mat and subflooring, which will raise the height of the floor between a half-inch and almost 2 inches, depending on the materials used. To get around that, you have to create an elevated threshold. Not ideal, but doable.
Grimani cites two products worth considering: Dura Undercushion’s Duracoustic 5⁄16-inch rubber mat, which is made out of recycled tires, and Kinetic Noise Control’s Roll-out Isolation Material (RIM), which provides much better isolation. “RIM flooring is a fiberglass mat with these little blocks glued into it,” Grimani explains. “You roll it out and put a subfloor on top of it—usually two layers of three-quarter-inch plywood. The soundproofed floor is almost 2 inches taller than the original floor, but you now have what is essentially a trampoline that blocks the sound transfer between spaces.”
10 Spackle, sand, and paint the new surfaces.
When all is said and done, you’ll have three key soundproofing principles working for you: You get mass from the plywood and drywall, damping from the Green Glue, and decoupling from the isolators. The steps outlined here point the way toward a good retrofit, according to Grimani. But keep in mind that it’s a generic solution with plenty of wiggle room—which is why it makes a lot of sense to consult an acoustics/soundproofing professional as a first step. As is the case with any type of construction, “if you’re trying to build a house that’s supposed to be classical revival, talk to an architect and a builder who are familiar with that style of construction.”
The Price of Quiet
When PMI is hired for a project, Grimani and his team analyze the situation, discuss goals with the owner, and prepare a detailed plan that a building crew can follow. “In new construction, I look at the entertainment and privacy areas as an architect, define where sound isolation is needed, and specify how it should be implemented,” he says. “We provide a complete set of soundproofing instructions, right down to the length of every screw. Depending on the project, it can cost a few thousand dollars to get to that level of data, but it’s worth it because you now have an engineered and documented solution.”
And what about the actual construction—what does a retrofit job cost if it’s done by a professional? It all depends on where you live and the exact steps you follow. But “you have to imagine a contractor is going to be in there for at least three or four days,” Grimani says, adding that ideally you want a contractor who specializes in home theater soundproofing. With that in mind, he says you can expect to spend around $30 per square foot of surface to go from regular drywall construction to a soundproofed structure with reasonable isolation.
One Final Tip
It’s no secret that the deep bass is extremely difficult to contain, which is why Grimani recommends putting subwoofers and floorstanding speakers on rubber blocks instead of placing them directly on the floor. Doing so reduces the transfer of acoustic energy into the floor, which, by the way, is exacerbated by the spikes found on some speakers. “All spikes do is ensure that low-frequency vibration from the woofers is really pushed down into the floor—not a good idea if you’re trying to keep things quiet,” Grimani says. Mason Industries sells Super W Pads for placement under compressors, HVAC units, and other machinery in industrial spaces. Intended to reduce noise and vibration, the pads come in a sheet made up of 2-by-2-inch rubber waffle pads, which are perfect for decoupling subwoofers and speakers. All you have to do is break off a few squares and put them under the corners of your subwoofers and speakers. Every little bit helps.
- Log in or register to post comments


Entry door...
Submitted by Rob Sabin on September 27, 2012 - 4:21pm
Good question. I'm not a soundproofing expert per se but I've seen how this gets handled in a lot of serious theater installs, and it's often done with a combination of a heavy soundproof door that's VERY tight to the frame and often sealed, and it will typically have a raised threshold on the bottom. Any air leak at all in the room will result in sound escaping. When I worked for another publication, we built two soundproof testing rooms into an office building suite in midtown Manhattan. Both had raised floors with fully decoupled walls and ceiling, and the doors were heavy metal insulated doors with metal frames. They would not swing fully closed naturally -- beyond a certain point you had to slam them shut to account for the resistance from the seals.
If anyone out there has anything to add, feel free to jump in.

Tight Seal
Submitted by IsoStore on February 10, 2014 - 3:23pm
We have lab tested each of our doors in single hung and communicating assemblies. The communicating assemblies are more common in home theaters or recording studios that require a real high level of isolation within a tighter space.
Our doors open and close with a 1/2 pound of force for our heaviest doors (on a smooth operating continuous hinge) and about 2 pounds of force for our standard door (on ball bearing hinges).
The difficult you had closing those doors was likely caused by the sealing system and not the fact they were sound doors. If they were communicating doors (doors installed back to back), then you must relieve air pressure between the two jambs for the doors to close normally.
Anyway, just saying that sound doors are not inherently difficult to operate. They should open and close like a standard door if they are sealed properly and prepared properly for the type of isolation required.
Check out our doors at http://www.soundisolationdoors.com if you want.

Very informative. I had no
Submitted by Mreilly06 on February 20, 2013 - 11:16am
Very informative. I had no idea sound proofing took so much effort. Thanks! Reilly
good topic
Submitted by sunnyday on March 6, 2013 - 12:20am
So the problem of bass being really loud in one seat and really quiet in another is eliminated, or substantially reduced, and you end up with a room that has tight, punchy bass just because the walls are not acting as strong reflectors. That’s a nice benefit. Thanks! kmec
Soundproofing for Commercial Spaces with high ceilings
Submitted by Nathan Smith on May 20, 2013 - 9:05am
What some ways you can sound proof a commercial space with really high ceilings? I have had a few clients that had retail spaces with high ceilings who have issues with it being echoey. Thanks for the post! Nathan Smith
Duct Work
Submitted by wesmannmsu on July 18, 2013 - 10:02am
My home theater is in the prestress under the garage. it has 14 inches of cement poured on all side (except the floor, which is 4, but there is just dirt there. So, not too worried about the sound traveling through out the house, except through the duct work, is there any sort of solution for that?
I guess windows and doors
Submitted by tonianderson on June 20, 2014 - 1:26am
I guess windows and doors also made of the same materials, or perhaps they are also built for sound proofing. I actually seen some sound proof door at caldwells.com/, they have office in Bay Area, San Francisco. It is a glass door type, but this one I know been using at many studio.
Insulation
Submitted by wladdr on September 3, 2014 - 8:29am
Since we need, and want, insulation in the walls what are the pros and cons of spray-foam insulation? It's quite common now, even DIY, and will fill every nook-and-cranny easily. Is thicker better or will the foam act like the studs and actually help transmit the audio to the rest of the house?

Sound
Submitted by RayMan on May 7, 2015 - 10:43am
I've would have to disagree on this article. Adding mass on the walls will cause echoes in the room. Doubling up on the walls is not feasible for remodeling job and doesn't do more than aid in sound transmission but not complete eliminate it. If you go this route as the article states then you would need to add some sort of wall sound absorbance to it like acoustical panels which you can make at home. Sealing off the home theater complete will create another problem. Air circulation. You would have to put in a return air for your HVAC but it must be running all the time you are in the theater.
Decoupling an upstairs bonus room
Submitted by Troyh4 on January 12, 2020 - 11:16am
I may be buying a new constructed house that has an upstairs bonus room that I want to convert to a dedicated HT room. If the builder has to sheet rock the room, is there anything I can do or have he builder do prior to sheet rock being installed to the studs?? I'm just trying to help decouple the room from the rest of the house with any kind of process to help silence the room once complete. Thanks for any help

Online Quran Academy
Submitted by tj300542 on May 11, 2023 - 10:30am
It's important to note that the effectiveness of an online Quran academy may vary depending on the specific institution and the dedication of the student. It is advisable to choose a reputable and well-established online academy with positive reviews and feedback from previous learners.
Cavity Between Teeth
Submitted by well healthius on May 14, 2023 - 5:25pm
A cavity between teeth refers to tooth decay that occurs in the space between two adjacent teeth. It is caused by the buildup of bacteria, plaque, and acids on the tooth surface, leading to the erosion of the protective enamel layer. This cavity can develop due to poor oral hygiene, excessive sugar consumption, or inadequate dental care.
cavity in between teeth xray
Pet Birds
Submitted by clark2ken on June 8, 2023 - 3:25am
If you are interested in owning a galah, cockatoo for sale make sure that you have plenty of free time to spend with your pet. It is a sensitive bird, requiring a lot of attention and interaction from its owners. As a flock-dwelling bird by nature, if its adopted human flockmate ignores it, the rose-breasted cockatoo can become depressed, angry, and destructive. cockatoos for sale
African Grey
Submitted by clark2ken on June 8, 2023 - 3:28am
Birds of varied species and different sizes have variable food needs African grey parrot for sale. The best way to gauge how much you should feed your bird is to watch how much it is eating and discarding. Cockatoos tend to like to play with and toss their food and chew on everything, African grey parrot for sale Melbourne
How Doxycycline Affected My Life: A Personal Journey
Submitted by nk2285609 on October 12, 2023 - 10:08am
Situations like as doxycycline ruined my life are uncommon but important threads in the vast fabric of medicinal interventions. They kindly remind us that
Wellliner General- Know more keep. Feel Better Them.
Submitted by cathrin duchess on December 20, 2023 - 10:09am
Millions of individuals may access a plethora of knowledge and information on Wellliner
Thanks for giving new update
Submitted by italianplaster on December 20, 2023 - 10:06pm
London's top Polished Plastering Company specialising in Venetian Plaster & Italian Plastering. Elevate your space with our experts.


| Displays Electronics Speakers | Sources Other Gear Software | Top Picks of the Year Top Picks | Custom Install How To Buy How To Use |
Tech 101
|
Latest News Features Blogs | Resources Subscriptions |
WHERE TECHNOLOGY BECOMES ENTERTAINMENT
 © 2024 Sound&Vision
AVTech Media Americas Inc., USA
All rights reserved

