Totally appreciate ALL of this information! Thanks for taking the time, great stuff!
- REVIEWS
Displays Electronics 
Speakers Sources Other Gear Software - HOW TO
How To Buy How To Use Tech 101
Prewiring and Lighting
 The elements of a solid foundation.
You're finally getting to install that home theater you've been wanting for so long. The most important thing is the wiring. It's the backbone of your entire home theater. If the proper wires aren't in place, you may not get the kind of performance you were hoping for, or you may be unable to do what you want. So, what wiring goes where?
Before you begin, it would be wise to consult a professional, preferably a member of CEDIA, the Custom Electronic Design & Installation Association. A CEDIA member can give you important insight gained through years of designing and installing home theater systems. Fees vary by firm and location, but the range for design work typically runs from $100 to $150 per hour.
Keep It Legal
You should be aware of local codes and statutes regarding electrical wiring. These roughly parallel the National Electric Code (NEC). You can pick up a copy of the NEC at your local bookseller or online at Amazon.com. Many localities have additional statutes that you'll need to abide by. For example, some locations require low-voltage wiring to be in metallic conduit, but most do not. If you are doing a prewire—that is, wiring a new construction project before you install the insulation and drywall—you may need to obtain a permit and have your work inspected. Local laws vary widely, so check in your location. Trust me: You don't want to have to pull out your wiring and redo it or have to remove any drywall or fixtures so the inspector can take a closer look.
Designing Elements
- The first step is to have a basic theater design. You need to know some basic information:
- The location of your seating and which is the primary seat, or where you will be sitting most often.
- How many people will be using your home theater. This will help you develop a seating plan.
- The type and location of your video display.
- The location of your audio/video equipment.
When you're putting together your design, it's best to plan for the future. If yours is a new-construction project, you are fortunate. It is much easier to prewire for things now than to retrofit the wiring later.
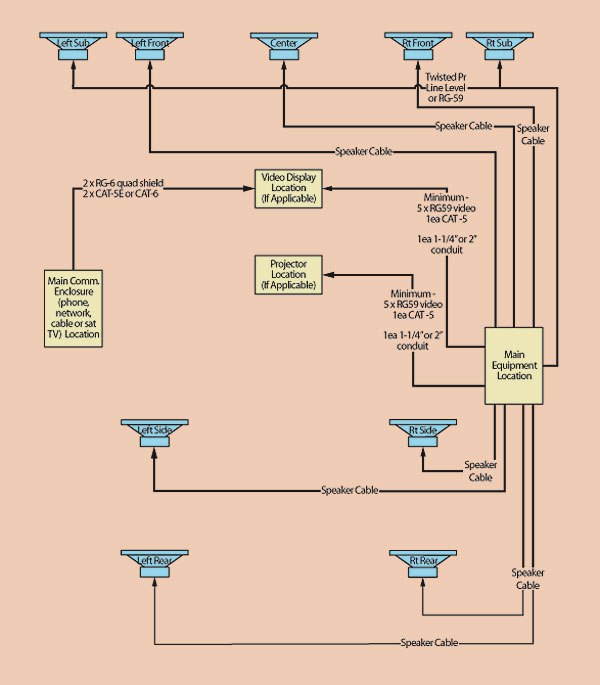
Once your theater plan is complete, you will be able to determine the proper wiring for each location. All wiring or cable inside of the walls or ceiling will need to be UL listed for this type of application. The correct rating is Class II or Class III, also known as CL2 or CL3. Your wiring provider will be able to guide you here.
The Nitty Gritty
You will run your low-voltage wiring after the electrician has completed the line-voltage wiring. You will need to run the low-voltage wires well away from the line-voltage wires when running in parallel. Maintain a separation of at least 12 inches. This will minimize interference in your theater wiring and keep you from running afoul of building codes. You may cross line-voltage wiring at a 90-degree angle with very little separation, however. Whatever you do, don't run your low-voltage wiring through the same holes as the line-voltage wiring. This is illegal and can cause electrical interference in your wiring.
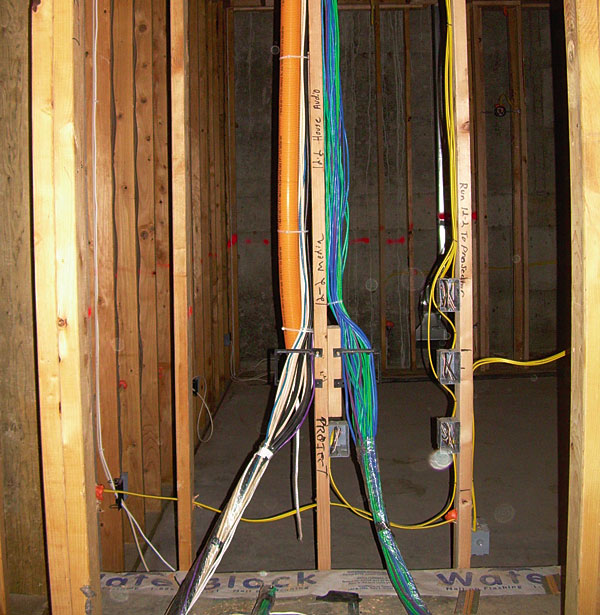
Use a good drill and drill 0.75-to-1-inch holes to pull your wire and cable through. (An auger bit works best for this.) This will allow you to pull a number of cables through the same hole if you need to. It's also much easier to pull the cables through a wide hole than a small one. Before you drill any holes in engineered lumber, such as Paralam or Glulam, get approval from your site superintendent or framing contractor. Engineered lumber has specific requirements pertaining to the location and size of holes permitted. If you do not follow the requirements, you may need to replace or shore up the lumber. Needless to say, this is very expensive.
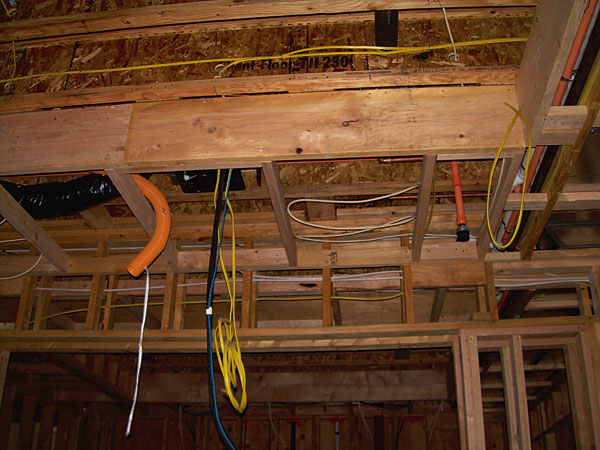
Run your cabling parallel to the building's construction. Even if it will save you a little wire, don't go shooting off across the ceiling at a diagonal—it's wrong, it looks funny, and your friends may laugh at you. You also need to secure your cabling at least every 4 feet. Use nylon wire ties to secure your cables. Don't use your electrician's Romex staples and a hammer. You'll end up crushing the cable and damaging it. This is especially important for video cables. The geometry in video cables is critical to proper performance. One hammer blow can cause video problems that will have you pulling your hair out for years.
Make sure your electrician provides electrical outlets in the proper locations. You'll need an outlet at each subwoofer location, the main A/V-equipment location, each video-display location, and (if applicable) your motorized-screen location. If you are using a motorized screen or providing for one in the future, the electrical outlet is usually located on the left side of the screen. Your main A/V equipment should have a dedicated circuit, and the subwoofers and video display should also have a separate, dedicated circuit. The two circuits should be on the same phase in the electrical panel to help prevent electrical noise.
You will run all of the cables from your A/V-equipment location unless otherwise noted. Make sure you label all of your wiring. Use white tape and a permanent marker—or, better yet, use a label maker.
Cost
The costs for different types of cable vary by quality, manufacturer, and location. Cat-5 usually costs between 5 and 15 cents per foot, and RG-6 quad shield typically costs 15 to 75 cents per foot. If you choose to use RG-6 coax, you should make sure you use cable with at least
60 percent braided shield and 100 percent foil shield. Use only quality compression ends, such as those from Digicon or Snap-n-Seal. Don't use cheap, screw-on connectors. You can get the special tool you'll need to make these terminations at your local home-improvement store or online.
Service Runs
The first type of wire you'll need to run delivers external services to your media system. These services include cable TV, satellite, telephone, and Internet. You may or may not use all of these. If you are installing a wholehouse wiring system at the same time as your theater, you will probably run these wires from the service entrance or the demarcation location to your communications panel. Typically, a service feed from the demark will consist of two Cat-5 or Cat-6 telephone cables and two RG-6 or RG-6 quad-shield coax runs. Be sure to run Cat-5 or Cat-6 network wiring from your service enclosure to at least your main equipment location, if not all of your video-display locations. In the future, much of your content will be delivered via the Internet.

If you are providing for a satellite system, you'll run at least four—but preferably six—coax cables from the service enclosure or media system to the dish-antenna location. This will provide for both satellite and terrestrial antenna service.
You will run the service feed to your theater from your service panel or demark to your equipment location. Usually, this will consist of two Cat-5 or Cat-6 cables and two RG-6 or RG-6 quad-shield cables. It is a good idea to provide a drop to your video-display location, as well.
Speaker Wire
Each speaker requires at least a two-conductor speaker wire. If you're using in-wall or in-ceiling speakers, it's a good idea to use the new-construction brackets that the speaker manufacturer provides. These brackets have a raised ridge for the drywall installer to cut around and make speaker installation much easier. Use at least 16-gauge speaker wire. It is better to use high-quality cable, even if you are installing budget speakers now. If you upgrade your speakers in the future, it will be cost-prohibitive to go back and change the wiring after the house is finished. Leave about 3 feet of extra wiring at the speaker end and 7 to 10 feet at the equipment end. This will facilitate connection of speakers and components and allow for relocation.
Subwoofer Wire
Wire for at least two subwoofer locations if possible. Current research indicates that you will have much better bass response throughout your home theater if you use two subwoofers. Locate your subwoofers at the front corners of the room. Use either RG-59 with both a braid and a foil shield or a twisted-pair communications cable with each pair shielded. You will need to know how to solder to terminate the twisted-pair cable and will use solder on RCA-type ends. Twisted-pair cable has a drain wire to let you ground the shield at the source to eliminate noise. Don't trim it too short, or you won't be able to hook it up if you need to.
Video Wire
You will need a service feed to your video display. In addition, you should have video and control cabling. The control cable should be Cat-5 or Cat-6, whichever you're using elsewhere. This will allow you to send remote-control signals to your video display. For video cabling, you should have at least three RG-59 or RG-6 video cables to provide component video. You should consider pulling up to five video cables and a digital cable such as HDMI or DVI. Keep in mind that digital video typically has distance limitations. Standard HDMI has a limitation of 5 meters, but you can usually get 10 meters or more with upgraded, high-quality cable. Digital video cables are preterminated. Make sure to leave enough extra cable on each end of each video and control cable to facilitate connection and possible equipment relocation.
It is a very good idea to run conduit to any current or possible future video locations to guard against changes in cabling standards. There may be cables required in the future that are unknown today, like HDMI was five years ago. If it is allowed in your area, electrical nonmetallic tubing (ENT)—also known as smurf tube for its blue color—works very well for this. It is flexible and fairly easy to run. Use a 1.25-inch or larger size for video applications.
Other Wiring
There are other wires that you may want to consider running for current or future applications. These applications may include screen control, motorized window treatments, an IR remote receiver, projector-lift control, and lighting control. For most control applications, Cat-5 works well, especially if you aren't sure exactly what you will need in the future.
Wire Termination
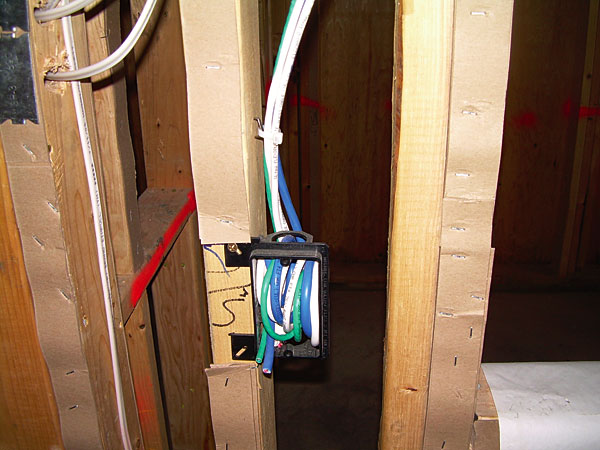
For speaker, subwoofer, telephone/network, and cable wiring, run to a single-gang mud ring. An electrical box will work. However, unless local code requires a box, use a mud ring—it's easier to work with. Use port-style plates, such as those available from Leviton, ChannelPlus, Russound, and others. This type of plate has one or more square holes and allows you to use an insert with the appropriate connector. This will let you have several different types of connections on one plate. You can have RCA jacks for audio or video, banana jacks for speakers, telephone jacks, and network jacks, and you can configure each plate for your specific need.
For the main equipment location, you can bring the wires through the wall in a bundle. Make sure you cover them with plastic wrap to shield them from paint and drywall mud. Otherwise, you'll be trying to scrape off the wires to read the labels. You can use a wire-access plate with a 1.5-to-2-inch hole to trim out the mud ring.
Be sure to get a copy of the NEC and read the sections that pertain to what you are doing. Also, be sure to check all local laws and building codes. If you have no construction wiring experience, get some on-site guidance from a qualified professional. A little bit of money spent in this area could prevent a major problem.
Mood Lighting
When you're designing and prewiring your home theater, don't neglect the lighting. The proper lighting and lighting control go a long way toward setting the right mood. Done correctly, your lighting will help create the sense of suspended disbelief that movie directors strive for. One key to achieving this is the use of dimmers. You'll want to be able to independently control the level of every lighting circuit, or zone, in your theater.
There are three general classifications for home theater lighting: task lighting, accent lighting, and area lighting. Task lighting is lighting dedicated to illuminating a specific task or activity. Accent lighting helps generate the proper look and feel of your theater. Area lights are the theater's primary lights that serve to illuminate the entire room. Your room's main can- or surface-mounted light fixtures fall into this category.
Lighting Layout
When you're laying out your lighting, you'll want to keep in mind how you'll be using the room. For example, if you're creating a media room with a bar area in the rear portion, you'll want to have appropriate lighting for multiple scenarios. There may be times when you're just hanging out, playing pool, or sitting at the bar and not using your home theater at all. Plan appropriately for these other situations.
A common lighting layout for a dedicated home theater calls for recessed can lights in the ceiling. You can use either traditional incandescent lighting in 4-, 5-, or 6-inch cans or choose recessed low-voltage lights. The low-voltage lights typically use 4-inch fixtures designed for 50-watt MR16 bulbs. Low-voltage lights can look very rich and will have smaller apertures, so they're less obtrusive. The light's pattern and color temperature can vary widely with low-voltage lamps, so you may want to try different bulbs to get the exact look you're trying to achieve. A good lighting designer can be invaluable to assist with your decision.
If you're using low-voltage lighting (depending upon the fixtures), you can legally do the wiring yourself in many locations, just like with your audio/video wiring. This task, however, is fraught with peril. If you choose wire that's too small, even though it's low voltage, you could burn down your fancy, new home theater. It's deceiving. Because the voltage is so low, the required current for a given voltage is much higher. All this current can really heat up the wire if it's too small. If you're not a licensed electrician—or working closely with one—it's best to leave this one alone. In any case, you'll have to use an electrician to run line voltage to the lighting transformers. Some of the transformers are integrated into the lighting fixtures, so you'll have to run line-voltage wire to each fixture.
The area lighting is usually arranged in two or three rows. If you are using this type of lighting design, separate the cans into at least two different circuits. This will allow you to have independent control over the lights in the front of the room, those closest to the screen, and those in the back of the room over the seating. In many situations, you'll want some light on over your seating, while the area closer to the screen remains darker. Your electrician can set up the fixtures so that the bulbs are recessed as far as possible. This will reduce the amount of light that falls on the screen and minimize distracting glare.
A Distinctive Accent
Many home theaters use wall sconces for accent lighting. You can mount them in whichever location gives you the desired effect. The variety of wall sconces available is only slightly less than the number of sand grains on Florida's beaches, so you should be able to find something that suits you. Another popular accent-lighting application is using rope, cold-cathode neon, or strip lighting around the inside of a coved ceiling, a crown molding, or a barrel vault. With this type of accent light, it's common practice to conceal the lighting fixtures behind molding or in a pocket so that only indirect light is visible. Rope light on the steps is also very common, both for safety and as an accent. If you do have stairs but elect not to use rope light, use recessed step lighting in the walls adjacent to the steps for safety.
Don't forget to light your equipment. It's frustrating to look for the right disc, button, or switch with a Maglite clamped in your teeth. Many surge protectors have a built-in light for this purpose, or you can narrowly focus a can light on your equipment so as not to disturb your guests.
Control Freak
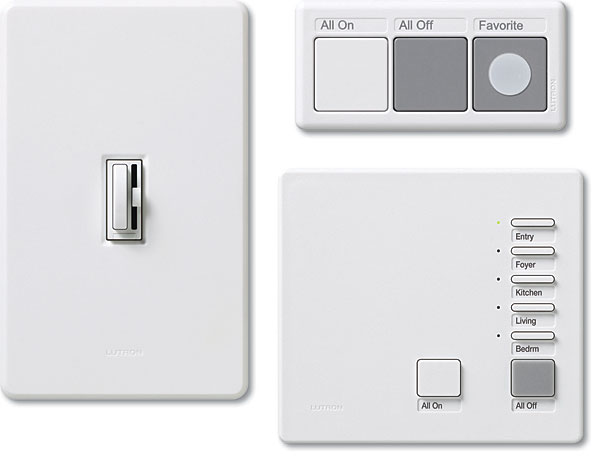
To control your lighting, you have several options. There are IR-controlled dimmers available, such as Lutron's Maestro IR dimmers. It's very convenient to be able to set your favorite lighting scenes as a preset that you can access from your remote control. For this, you need a preset scene dimmer. The Spacer System, also from Lutron, allows you to set multiple scenes. The dimmers' back enclosures are transparent, so, if several dimmers are mounted together in a single box, they can communicate with each other via IR.
For any IR-controlled dimmer, it's a great idea to run a control cable, such as a Cat-5, to the dimmer location. This will allow you to locate an IR emitter at the dimmer location if the dimmer's not situated in your direct line of sight. Simply run a Cat-5 from the dimmer(s) to your main theater equipment location.
Popular preset scene dimmers that are integrated into a single unit include the Lutron Grafik Eye and the LiteTouch Scenario. You can use either of these products independently or as part of a wholehouse lighting-control solution. For single-room use, you would typically control them via IR or use the units' integrated keypads. You would run a Cat-5 control cable as with the Spacer IR dimmers.
Other lighting-control plans include dedicated lighting-control systems, such as those from Lutron, LiteTouch, or Vantage. A certified professional systems integrator or electrical contractor should install these for you. It all makes for the start of a solid home theater.
- Log in or register to post comments

how to link bed switch with 2 way
Submitted by Devis9990 on May 3, 2023 - 1:56am
You have to attach black wire with down terminal of the switch and red wire on the upper terminal. You can check more about this on Capcut Template.

Great Post Thank You Farlight
Submitted by Shamul on June 22, 2023 - 8:26pm
Great Post Thank You Farlight 84 Apk If there have anyone who want result then meet here.

Not able to understand
Submitted by snaptube on July 16, 2023 - 3:29am
https://snaptube.org.ma/ est une application populaire utilisée pour télécharger des vidéos et des fichiers audio à partir de différentes plateformes en ligne. Cette application est principalement utilisée sur les appareils Android. Avec Snaptube, vous pouvez télécharger des vidéos à partir de sites de partage tels que YouTube, Facebook, Instagram, Twitter, SoundCloud et bien d'autres.
Wire Connections
Submitted by kevin9990 on September 15, 2023 - 2:50am
How to make connections between red and black wires?

Very interesting article
Submitted by Gvibe on February 21, 2024 - 9:20am
Very interesting article, thanks for the information. Even the Rabbit will understand it. Happy reading everyone!)


| Displays Electronics Speakers | Sources Other Gear Software | Top Picks of the Year Top Picks | Custom Install How To Buy How To Use |
Tech 101
|
Latest News Features Blogs | Resources Subscriptions |
WHERE TECHNOLOGY BECOMES ENTERTAINMENT
 © 2024 Sound&Vision
AVTech Media Americas Inc., USA
All rights reserved

