- REVIEWS
Displays Electronics 
Speakers Sources Other Gear Software - HOW TO
How To Buy How To Use Tech 101
HT Boot Camp: Sometimes, It's Good to Be Biased . . . Page 2
 To achieve this reference light, you need to install a light directly behind the monitor. The light then washes up the wall behind the monitor and spreads in a gradient up and to the left and right. There's no need to spill the light down, as the monitor and stand can't be seen and the monitor blocks the light fixture from being seen. The light should be the same color temperature as the display. If the CRT is D6500 Kelvin, then set the bias light to 6,500 degrees. This keeps the color temperature equal in your head. The luminance level of the reflected light should be 10 percent of the peak white of the monitor. That is to say, with a white field on the monitor reading 30 to 35 foot-lamberts, the light on the wall at the surround of the monitor case should be 3.5 ft-L. The light will fall off as it radiates up the wall. This reading should be taken with a reflective light meter. Your photographic instrument will do nicely.
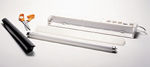
Now that we have the elements set to go, let's look at the materials. The light fixture: an 18-inch fluorescent-light fixture set on the same shelf the monitor is on is about the safest. The bulb: a Philips or Sylvania cool-white or daylight bulb is the closest to 6,500 degrees off the shelf. The temperature: D6500 is the target for most displays for television. You can correct nondaylight-colored bulbs by using several types of color gel filters. Lee and Rosco and also Tiffin make the gel in sheets you can buy to do your correction. These filters are available at most photo-supply stores. Lee filter number 218 is a 1/8 C.T. blue for correction. Using your color-temperature meter to get it correct, you may need to use a combination of gels to get it to the exact color temperature you want. Cut the sheets long enough to just wrap around the tube to form a "tear," and tape the tear end closed. The tube doesn't get hot, so it's safe using photo gel correction sheets.
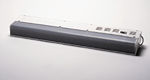 Luminance: To get the light level at 10 percent, you'll need to use a neutral-density filter to decrease the light level. Neutral-density filters are blocking filters that keep the color temperature constant but cut down the amount of light that a device passes. With Lee filters, for example, the #298 .15 ND cuts the light 25 percent, while the #299 1.2 ND cuts the light 93.75 percent. Any combination of ND filters can get you to the goal number. Another way to decrease the light is to use a dimmer—not just any dimmer, but a dimmer with dimmable ballast in the fluorescent-light fixture. These are a bit pricey for just a one-time adjustment, but they're very accurate. You can get the 3.5 ft-L set exactly and maintain it with this method. If you're setting different rooms, this is a great aid in the setup.
Environment: The room should be a neutral color or gray, about 18 percent. Lighting in the room should be indirect, as not to reflect on the display. The bias light should be the second brightest light in the room (the display being first). All other lights need to be lower than 2.0 ft-L.
This bias method is commonly used in the post-production and transfer rooms for major motion-picture and television transfers. It works and saves your eyeballs to give you a more-relaxed viewing experience, so you get to take advantage of the high-contrast cuts the director intended . . . without the headache.
|
| |||||||||
- Log in or register to post comments


| Displays Electronics Speakers | Sources Other Gear Software | Top Picks of the Year Top Picks | Custom Install How To Buy How To Use |
Tech 101
|
Latest News Features Blogs | Resources Subscriptions |
WHERE TECHNOLOGY BECOMES ENTERTAINMENT
 © 2024 Sound&Vision
AVTech Media Americas Inc., USA
All rights reserved

