- REVIEWS
Displays Electronics 
Speakers Sources Other Gear Software - HOW TO
How To Buy How To Use Tech 101
Get Your Game On

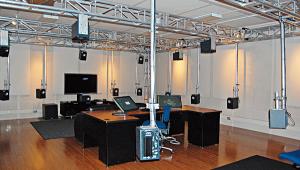
Photos by Tony Cordoza Now that you know what the hottest games are, why are you still playing them on a small screen using the TV's anemic speakers? Jacking your game console into your home theater is a no-brainer that will take your gaming to the next level. Using a big screen draws you into the action, and the surround sound totally envelopes you. Cringe as bullets whip by! Feel the tension as you hear other cars racing up behind you! Get into the battle as subwoofer-enhanced explosions detonate nearby!
Your game console can be connected in a variety of ways, so you should select the option that provides the best performance supported by your system. But before we get to the specifics of installation, a note of caution: burn-in, where a static image that stays on the TV screen for a long time leaves a permanent imprint, is a real problem. Anyone with a plasma display or a CRT-based front or rear projector should be careful. Games with unchanging backgrounds or score tallies pose the biggest risk. Be sure the TV's contrast isn't set too high, and don't play the same game for hours on end without periodically switching to a different source.
First Things Unlike typical A/V gear, game consoles don't use standard cables for most of their connections. Each platform has its own proprietary audio/video output for basic hookup, so you'll need to buy the appropriate accessories for your system. Fortunately, these cables can be found at most stores that sell the game systems.
After you have the right cables, get familiar with your game system's configuration menu, where you can change all of the audio and video settings. You can access this menu when the console is turned on but no game is present. If you have a widescreen TV, make sure the console is set for the proper shape. Multiplayer games, like racing games where each player has his own car, can be more enjoyable on a 16:9 screen since each player has a larger screen area to work with.
The most basic home theater hookup uses cables with proprietary connectors on the console end and standard RCA red-and-white analog audio and yellow composite-video connectors on the other end. These cables come with all systems so you can start gaming right out of the box. You can jack your console into the front-panel input on your TV or A/V receiver, if either has one. With the TV, make sure the set's audio output is connected to a receiver input (like TV). If you connect the console to your receiver, make sure the video-monitor output is connected to an available input on the TV.
If you plan to keep the console in your A/V rack, connect it to your receiver's rear-panel inputs. Don't worry if there aren't any inputs labeled Videogame. Use any input except Phono. Some new receivers even let you relabel inputs. Changing VCR2/Aux to Xbox or PS2 is a cool touch that helps you keep track of where you're connected.
Stepping UpA game console's digital video signals look better through an S-video connection, which separates the color (chrominance) from the black-and-white (luminance) signals, bypassing your TV's color-separating comb filter. The result is noticeably cleaner video images. For this you'll need to buy the appropriate S-video breakout cable. Xbox, for instance, requires the Advanced AV Pack ($20). If you're switching video through your receiver, make sure you have an S-video cable running from the receiver's monitor output to your TV. Otherwise, you'll probably get audio but no video. 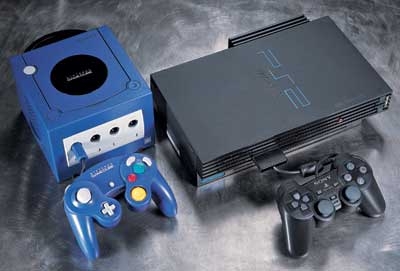
For the best possible picture, component video is the way to go. As with S-video, you'll need the right breakout cable for your system. For instance, Xbox owners will need the High Definition AV Pack ($20). Here are the most important things you'll need to know about making component-video connections with each system:
• PlayStation 2. Before you do anything else, hook up your system to the TV or receiver using a composite- or S-video cable and go to the System Configuration menu to make sure that the Component Video Out option is set to Y Cb/Pb Cr/Pr. Once you've made the component-video connection, you'll still need to select the progressive-scan (480p) output option within each game title.
• Game Cube.To activate progressive-scan (480p) output, turn the console off, hold down the controller's B button, and then turn the console back on. Answer "Yes" when the prompt asks, "Would you like to display in progressive-scan mode?" After you do this once, all games that support progressive-scan video will be shown that way.
• Xbox. Connect the High Definition AV Pack, then use the console to bring up the onscreen dashboard. Go to the video settings and choose 480p, 720p, or 1080i output. Select all of the output formats that your TV supports. Games with high-def output will then play at the highest possible resolution.
Sound and Fury Multichannel surround sound isn't just for movies anymore. With Xbox, you can get Dolby Digital 5.1 sound throughout the games. PS2 can offer Dolby Digital during transition scenes only, but using Dolby Pro Logic II during game play will greatly enhance stereo soundtracks. Some PS2 games with DTS soundtracks provide surround sound throughout the game. While it doesn't support Dolby Digital or DTS, GameCube titles are designed with DPL II in mind.
To get the best sound out of your PS2 or Xbox (GameCube has only analog audio outputs), hook the console up to your system using an optical digital audio cable. But to do this, your receiver will need to have an open optical digital input. (If your only available digital input is coaxial, companies like Calrad and Dayton Audio make optical-to-coaxial converters for less than $30.) PS2's optical digital output accepts any digital cable using a Toslink connector, while Xbox owners need either the Advanced or High Definition AV Pack, both of which provide an optical digital output. Be sure to activate the digital audio output in the game console's configuration menu and assign the digital audio input to the appropriate source on your receiver.
Finally, select the appropriate processing mode - Dolby Digital, Dolby Pro Logic II, or Dolby Pro Logic - on your receiver. All of your work will be for naught if you accidentally leave your receiver set for stereo!
Now that you've got your console hooked up to your home theater, invite some friends over, break out the munchies, get your trash-talk ready, and prepare for some ultra high-intensity gaming. After you've gamed on a big screen with surround sound, there's just no going back. For futher help in connecting your system, visit these support sites on the Web: • www.nintendo.com/consumer/systems/nintendogamecube/index.jsp • us.playstation.com/support • www.xboxcom/en-us/support/default.htm
More: Let the Games Beign We pick 10 videogames that go from deadly to killer when you play them on a home theater rig
- Log in or register to post comments


| Displays Electronics Speakers | Sources Other Gear Software | Top Picks of the Year Top Picks | Custom Install How To Buy How To Use |
Tech 101
|
Latest News Features Blogs | Resources Subscriptions |
WHERE TECHNOLOGY BECOMES ENTERTAINMENT
 © 2024 Sound&Vision
AVTech Media Americas Inc., USA
All rights reserved

