- REVIEWS
Displays Electronics 
Speakers Sources Other Gear Software - HOW TO
How To Buy How To Use Tech 101
DIY Reader Home Theater: A Theater in the Comfort of Our Home

The seeds for our home theater were planted in the mid-1980s, when the sun would shine through the curtains and put an incessant glare on the TV. I said on many occasions, "When I have a home built, I will have a TV room in the basement with no windows." In 1994, the idea of a home theater sprouted after I went to a home show in the Dayton, Ohio, area and saw a home theater with tiered seating, a 104-inch screen, a front projector, and a laserdisc player. As the idea grew, I was able to design the right-size room into the plans for our new home.
To prepare for the task of building our home theater, I read every issue of Home Theater magazine and Audio Video Interiors over the years to get some good ideas. While I had a pretty good idea of what I wanted, the whole project was quite daunting since I don't have much of an electronics background. It was imperative to work with a home theater consultant to fill in the important gaps. After meeting with several consultants in the Dayton area, I decided Automated Home Office Technology was the right company for my home theater. The owner, Mike Frye, did a great job of helping me focus my ideas based on his years of experience. Without the help and guidance of an experienced home theater installer, my home theater never would have turned out like it did.
Room Specifics
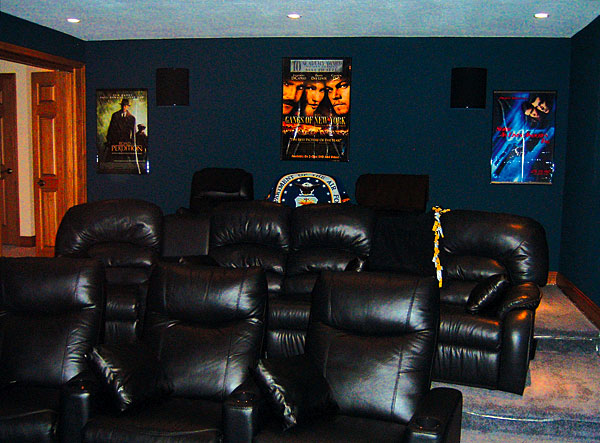
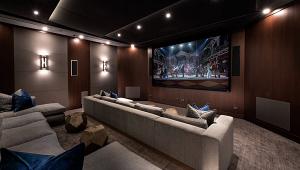
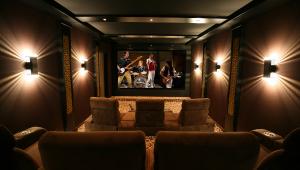
Because I wanted a windowless room—and to get the real feel of a theater—I decided to go with a dedicated theater rather than a multipurpose room. The room measures 16 by 25 feet with a 10-foot ceiling. To get 10-foot ceilings in the basement, we designed a sunken room into the plans. This allowed us to construct a riser for a tiered seating arrangement to give everyone a great view. We dropped the ceiling about 12 inches above the seats to have a place to hide the projector. This reduces the noise and heat that the projector generates and keeps it out of sight. In addition, the ceiling is dropped along both side walls to create a soffit, which draws the focus down the center of the room to the screen. With the soffit along the sides, I added some lighting effects to the center of the ceiling. Along the bottom of the soffit, I extended the ceiling out 6 inches to have a place to lay in rope lighting. Instead of a square corner where the soffit meets the ceiling, it is curved to help throw the light further into the center of the ceiling, providing some soft lighting during movies.

Sound Considerations
One of the main concerns with a dedicated theater room is sound. Not only was it imperative to have great sound within the room, but also to keep that great sound within the room as much as possible. To do the latter, we used acoustic insulation in the walls and ceilings, and we stuffed a lot of insulation around the HVAC vents to prevent the sound from traveling throughout the house. In addition, we double-drywalled the ceiling and two interior walls of the room to produce a better sound barrier. The room is located in the corner of the basement, so it has two concrete exterior walls. There wasn't a need to double-drywall these walls, and, instead of acoustic insulation, we used regular insulation. I thought about creating a room within a room, but this seemed like a lot of added work and expense. Plus, the home theater is located below the kitchen, so, when someone isn't in the theater, the chances of being disturbed are minimized. For the most part, the room contains sound well; however, there are some movies and Xbox games with high levels of bass that won't be contained no matter what.
As for the sound within the room, it's fantastic! With the exceptions of installing carpet on the floor and velour curtains up front, I didn't do any special sound treatments to the room. The drywall is covered with a textured coating, so the walls are not smooth, which cuts down on some of the sound reflection. The heart of the sound system is a set of Energy Veritas speakers powered by a Denon receiver. Our installer recommended this setup, and it is comparable to just about any of the pricier systems out there. We can turn the sound up if we want to, and it remains very clean, without any hint of distortion, at any volume level. Listening to a Led Zeppelin concert DVD at high levels makes me feel as if I am there.
Picture Perfect
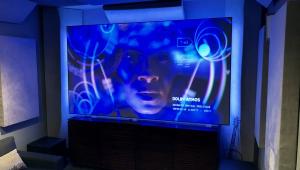
In order to get the feel of a theater, I wanted to bring in an awesome picture for a reasonable cost. My installer recommended InFocus' ScreenPlay 5700, a DLP projector with a fantastic picture. To go along with the projector, I needed a high-quality screen that would present even colors and lighting throughout the picture. I wanted the biggest screen possible without overwhelming any viewers in the audience and causing them to feel nauseous. A Da-Lite 110-inch gray screen fit both requirements perfectly and brings sporting events and movies to life.
To keep guests from getting too close to the screen and putting oily fingerprints on it—as well as to have a place to hide the speakers—we built an alcove at the front of the room. We placed the screen in the alcove, set back about 2 feet from the front edge of the stage. The speakers fit very nicely into the wall and are set behind speaker covers made from leftover door trim and speaker-cover material that I purchased at a local fabric store. In front of the screen are black velour curtains to help provide a theater feel. When the curtains open, they pull off to both sides and hide in the walls we built to house the speakers. To automatically open the curtains when I power up the theater and close them when I shut it down, I installed an automated curtain system called the Drape Boss. Unfortunately, the motor in the Boss wasn't strong enough to pull the heavy velour, and it burned out after about two years of use. I learned from that experience, and I'm planning to install a heavier-duty system soon.
Equipment
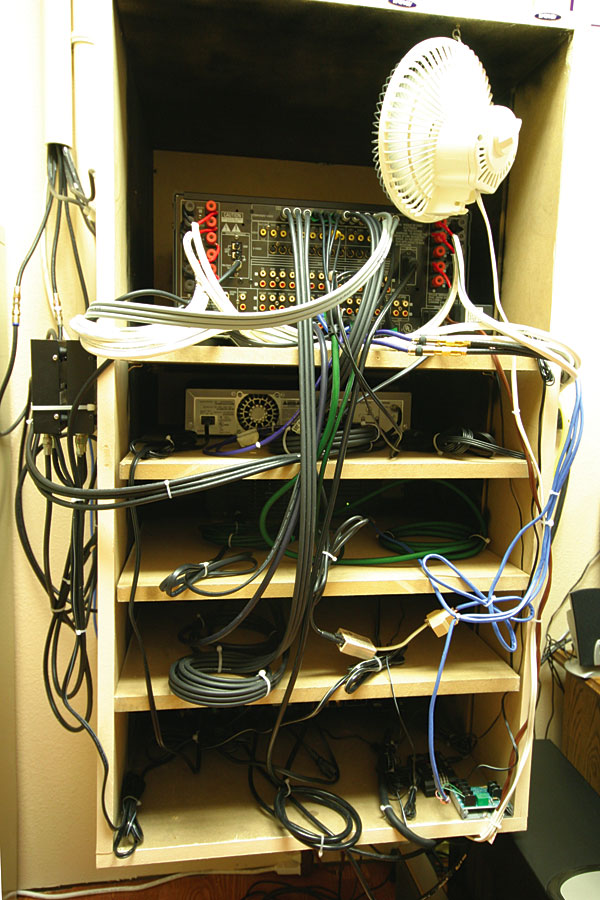
In order to have all of the home theater equipment at our fingertips, we needed some type of cabinet or rack to house everything. I decided the best scenario would be to build a rack into the wall and cover it with some type of door. There are many custom-built or commercial shelves available on the Internet, but they are all relatively expensive. To cut costs, I made a built-in rack using medium-density fiberboard with adjustable shelf tracks on both sides of the rack. The shelves are also made of MDF, so they're very solid, and they don't vibrate and cause unwanted noise within the room. The back side of the rack protrudes into an adjacent room that houses the circuit-breaker boxes, along with the security-alarm box, phone jacks, satellite-dish feed, and a computer that I use as a music server. It provides music throughout the home via a built-in computer network. In order to keep the noise from the equipment and cooling fan out of the theater, I built faceplates using MDF for each piece of equipment. Not only does this block the noise, but it also blocks the light from the adjacent room if someone is in this room. To minimize distraction from the lights on the receiver, DVD player, satellite DVR, Xbox, and power conditioner, I bought a piece of dark, smoke-colored glass and installed it with a couple of hinges. It covers the equipment and really dresses up the area.

Remote Controls Everywhere
With all of the equipment in the rack, it would take about four or five remote controls to run everything. To reduce the chaos, my installer recommended that I use the Marantz RC5400. We programmed all of my remote controls into one rechargeable remote. Very simple buttons make it easy for anyone to operate the system after just a few minutes of instruction.
Cutting Costs
To keep costs down as much as possible, my children and I did all the construction work, leaving the electrical work to the electrician and the home theater installers. I also searched eBay for some of the electronic components in the theater. I saved about $4,000 on the Energy Veritas speakers—most of which were new in the box. A factory-reconditioned Marantz DVD player for $129 was a great deal that will hold us over until the HD DVD and Blu-ray players come down to a reasonable price. To give the room a real theater look, I searched eBay for theater curtains. I found a lady in Las Vegas who was offering great deals on black velour curtains and a valance for the top. Adding to the theater ambience are posters for various movies. Michael's Arts & Crafts sells frames for about $10 each, and they look great. There was no need to spend big dollars on frames for posters.

Seating Comfort
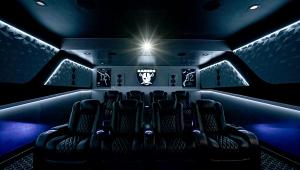
Last but not least is the seating. With risers for a tiered seating arrangement, I have three rows of theater seating, with three chairs in the bottom row, four in the middle row, and three in the top row. With four in the middle row, the chairs are offset from each other, and no chair sits directly behind another to block anyone's view. I ordered the top- and bottom-row seats from eBay, while the seats in the middle row are made by Palliser. I purchased these through DirectBuy at a discount. To light the way for anyone who may need to leave while the lights are low, we installed rope lighting along the edge of each tier.
Our home theater system has been up and running for two years now, and I can't imagine not having a setup like this. With pay-per-view movies available on satellite, I never go to the movies anymore—the movie experience is much better at home. Sporting events in high definition come to life like never before. When the camera pans over the crowd, I feel as if I'm in the next row. By using eBay and looking for bargains, you can keep costs down to a reasonable level. With a lot of planning and hard work, it's possible and fun to build such a setup.
- Log in or register to post comments


| Displays Electronics Speakers | Sources Other Gear Software | Top Picks of the Year Top Picks | Custom Install How To Buy How To Use |
Tech 101
|
Latest News Features Blogs | Resources Subscriptions |
WHERE TECHNOLOGY BECOMES ENTERTAINMENT
 © 2024 Sound&Vision
AVTech Media Americas Inc., USA
All rights reserved

