- REVIEWS
Displays Electronics 
Speakers Sources Other Gear Software - HOW TO
How To Buy How To Use Tech 101
Bringing the Theater Home
Photos by John Wilkes
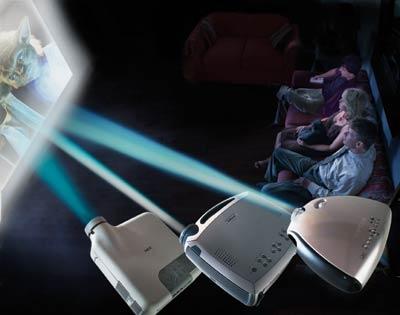
What do you think of when you hear the words "movie theater"? For me, it's stale, greasy popcorn, loud people talking back to the screen, and $10.50-a-pop tickets. But if you're one of the lucky ones who can look past that stuff, it's also cool surround sound and a huge, engrossing image. I love to watch movies, but I usually wait until they're on DVD so I can see them at home. Fortunately, video front projectors let me recreate the big-screen theater experience in my own living room, where the popcorn tastes good and the only one allowed to talk during the show is me.Front projectors used to be a pain to deal with - hard to set up and hard to maintain. But that was back when the only serious option was a bulky cathode-ray tube (CRT) model. New digital projectors that use Digital Light Processing (DLP) and LCD technology have changed things for the better. Not only do many new models deliver great images, but they're small and lightweight, easy to set up, require almost no maintenance, and come in a wide range of prices.
To survey the situation on the DLP side (we tested three LCD front projectors in the July/August issue - see LCD for Less), we called in three models: the Sharp XV-Z90U ($2,800), the NEC HT1000 ($4,995), and the InFocus ScreenPlay 7200 ($8,000). Outside of features and price, what sets these projectors apart is the native resolution of their Texas Instruments Digital Micromirror Device (DMD) display chips. Otherwise, they're pretty similar in that they all bring the movie theater experience home.
To get the most out of a front projector, you need to pair it with a screen designed for video use. Here, we went a step further and used a screen designed specifically for DLP projection: Stewart Filmscreen's contrast-enhancing GrayHawk ($1,300). The projectors were set up and evaluated at 14 to 17 feet from the screen, which measures 92 inches (diagonally) and has a wide 16:9 aspect ratio. While you can put a DLP projector on a coffee table, you'll get a brighter image by mounting it on the ceiling. For this test, we simulated that type of installation by placing the projector on a high shelf directly below the ceiling.
|
| |||||||||
- Log in or register to post comments


| Displays Electronics Speakers | Sources Other Gear Software | Top Picks of the Year Top Picks | Custom Install How To Buy How To Use |
Tech 101
|
Latest News Features Blogs | Resources Subscriptions |
WHERE TECHNOLOGY BECOMES ENTERTAINMENT
 © 2024 Sound&Vision
AVTech Media Americas Inc., USA
All rights reserved

