Yes, using the user menus to calibrate can improve your picture. However, if you want truly accurate, eye-popping color and performance, you need to calibrate the gamma and gray scale. This is a tedious process of adjustments and measurements using a color analyzer. On top of all that, a trained calibrator should make sure that all components are playing well with each other. By all means, please calibrate your systems the best you can with out the tools. Then, bring in a pro to really wow you so you can get the best out of your display.ThanksTom Angelopoulos, PresidentTHX Certified Home Theater Technician IIHAA Certified Home Acoustical CalibratorISF Certified CalibratorCEDIA Certified Install Technician I High Def Interiors LLC- Optimizing Sight & Sound -Serving all of San Diego and Southern Californiatom@HighDefInteriors.comPhone: 858-227-4588Fax: 858-292-7762www.HighDefInteriors.com
- REVIEWS
Displays Electronics 
Speakers Sources Other Gear Software - HOW TO
How To Buy How To Use Tech 101
Video Calibration
 Set up your video display to get a great picture.
Last month in this column, I offered some do-it-yourself tips for making your audio system shine. But that's only half the story. Now that you've got your audio gear calibrated, it's time to get your video system in great shape. And guess what: You don't have to shell out the big bucks to have a professional do it. With the right information and a little bit of patience, you can get your digital or direct-view display performing its best.
Video Calibration
Now that your audio is more or less ready to go, you'll have something to listen to while you slave away on your video gear. For this article, I'll cover digital displays only. If you're using a two-piece projection system, you have a few more steps to perform than you do if you've got a direct-view or rear-projection display. Hopefully, you squared up the projector when you mounted it, so that the image is centered laterally on the screen, is at the proper height (relative to the screen), and is pointed on an axis perpendicular to the screen's center. That's very important. Some of the higher-end digital projectors have an optical-shift feature that allows you to compensate for some projector displacement, but most consumer units don't offer it.
Once everything is in place, you should make sure the focus is accurate. You can use the projector's internal menu for a focus test pattern. Depending on the specific model, your projector has either a manual focus ring on the lens or a motorized focus that you can access on the remote or in the setup menu. For a direct-view set, you can ignore focus altogether. After you've got the optical focus as sharp as possible, you can slap a test disc in your DVD player and get to work. The disc will have various video test patterns. Each of these is designed for a specific purpose, and most of the DVDs include a fairly complete set of instructions.
You'll be looking to achieve a rich, luxurious image with accurate colors, smooth whites, and deep, detailed blacks. You can make some of these adjustments fairly easily, using the test patterns to adjust the consumer controls in the display's picture menu. These are brightness (black level), contrast (white level), color, and tint.

This PLUGE pattern shows a TV with a properly calibrated brightness setting. Below-black images are not visible, but above-black shadows are.
An accurate gray scale is one key to achieving these aims. Unfortunately, your display doesn't include a gray-scale adjustment. With video, much is predicated upon an accurate black-and-white image. The goal of an accurate gray scale is to ensure that the makeup of gray contains the correct proportions of red, green, and blue at every luminance level. If it doesn't, you'll see a shift toward one of the three primary colors. Often, this is different at different luminance levels. Many consumer displays tend to shift the gray more toward red at lower white levels and more toward blue at higher ones. Gray scale is measured in shades of gray from light to dark. These are noted in the test pattern, and they typically run from 20 to 100 IRE. IRE is a measure of luminance; 20 IRE is dark gray, and 100 IRE is peak white. Pure black, for video purposes, is 7.5 IRE. Due to accuracy problems with most color analyzers' optical sensors, information below 20 IRE is usually not considered.

This TV image is too bright. Note the black background, which looks gray, and the dark stripe on the left, which should not be visible.
Speaking of color analyzers, there are two basic ways to achieve an accurate gray scale. You can use the aforementioned color analyzer, or you can use an optical comparator. Optical comparators have been around since the 1920s and were developed to standardize screw sizes. For the purposes of home theater video calibration, it's a fairly low-tech device that basically consists of a box with a calibrated light source. You can visually compare the test pattern on your display to the reference and make the appropriate adjustments. Analyzers are more accurate. You should borrow one or make friends with someone who can (like an ISF technician). If you already have an analyzer, you probably know what comes next, so you can skip way ahead.
The correct measurement at each level is 6,500 K. If you're using a color analyzer, you'll be trying to achieve the coordinates X=0.313 and Y=0.329 on a colorimetry chart. That point is known as D6500. On some displays, you'll be able to access the proper adjustments in consumer-available menus; on others, you'll have to enter the factory service menu. If you can't do this yourself, contact an ISF-trained technician to perform the calibration for you. The adjustments you're looking for will be labeled "cutoff" and "drive" or something similar, and each should be present for red, green, and blue. The drive adjustments affect the high-luminance areas; cutoff affects the low-luminance areas.
After you've conquered the gray scale (if you elected to try it), you can proceed to the more mundane, consumer video adjustments. First, adjust the black level (brightness). This should only concern the dark areas of the picture. If it's too low, you'll have no detail in the dark areas. If it's too high, the image will look washed out. You'll be using the PLUGE (picture lineup generation equipment) test pattern to adjust the black level. The pattern is basically three (or sometimes two) parallel vertical lines, one below video black, one at video black, and one slightly above video black. With the brightness control correctly adjusted, you should only see two lines. The farthest-right line will be easy to see, and the center line will be barely visible. I mean barely. The farthest-left line should never be visible. In the case of two lines, one is just above black, the other just below.
In the old analog days, it was easy to adjust the contrast (white level). You used a needle-pulse pattern and adjusted the contrast or picture control until the display's power supply became nonlinear, causing the pattern's line to bend.
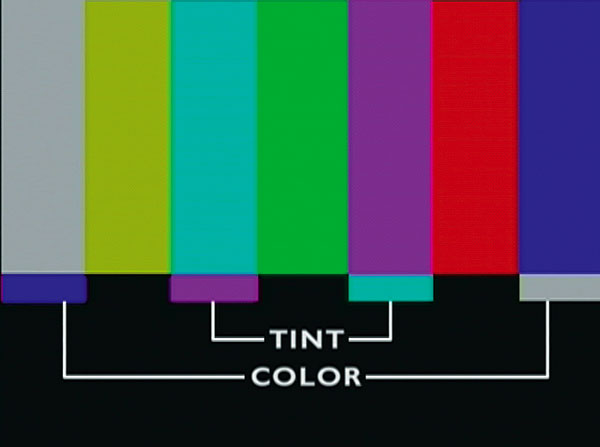
On the SMPTE color-bar pattern, the color level, when viewed through a blue filter, affects the outer bars, while the tint control makes changes to the cyan and magenta bars.
That method doesn't work with a digital display. You'll need to use a stepped gray pattern. Adjust the contrast down until all the whiter steps are visible, if you can. The fun part is that black-level and white-level controls interact with each other. Just when you think you've got one of them perfect, you'll adjust the other and mess up the original. Adjust both of the controls until you get everything right.

When color and tint are properly set, an accurate TV will show the bar second from the left as yellow (not orange) and the bar second from the right as red (but not exaggerated).
After you get the black, white, and gray squared away, you can make your color look like it should. You'll use an SMPTE color-bar pattern and look through a Wratten 47B blue filter. The filter usually comes with test DVDs. Your goal is to make the blue and white bars match in intensity. When the display's color control is properly adjusted, the bars should appear to be the same blue color when you look at them through the filter. You perform the tint adjustment in much the same way, using the cyan and magenta bars. When the tint is properly adjusted, the bars will look the same when viewed through the filter.
One last thing before you sit back and watch that DVD you've been saving: Most people want a really sharp picture, so it's tempting to turn the sharpness control way up. Don't do that, please. A TV's sharpness control is really a high-frequency booster. It will make the edges of any black line on a light background appear to have an outline around it. Many commercially produced DVDs already have too much edge enhancement. They'll have this problem to some degree, no matter what you do with the sharpness control, so don't exacerbate the problem.
Now you should have a picture that looks much more realistic and closer to the director's original intent. Take a rest for a while and enjoy it.
- Log in or register to post comments

I agree with the above comment. I'm not a calibrator but have seen what they can do. And, new/high end monitors have an ISF section which will dial in the monitor to adjust the gamma (which is the reaction of the light amplifiers) and if this is adjusted right you get accurate low/soft light. And, as well if it's adjusted accurately to 6500Kelvin it gives an accurate/realistic representation of the picture. Also, in the stores the monitors are in a torch mode; this means the stores turn up the blue and overamplify the picture to make it outblast the others in the store, it's eye catching but a poor representation of what's meant to be shown. I do agree, heck do the best you can yourself, but unfortunately the best your display can do will have to be done by a calibrator (who has to codes to get into the ISF part of the monitor) and has a colorimeter (light measuring equipment, ie. Klein K-th10)Alex.


| Displays Electronics Speakers | Sources Other Gear Software | Top Picks of the Year Top Picks | Custom Install How To Buy How To Use |
Tech 101
|
Latest News Features Blogs | Resources Subscriptions |
WHERE TECHNOLOGY BECOMES ENTERTAINMENT
 © 2024 Sound&Vision
AVTech Media Americas Inc., USA
All rights reserved

