- REVIEWS
Displays Electronics 
Speakers Sources Other Gear Software - HOW TO
How To Buy How To Use Tech 101
HT Measurements Explained: Ground Control - The Preamp/Processor
Launching the space shuttle requires the actions of thousands of control systems and hundreds of people all directed by, ultimately, one person. Technicians sit in front of dozens of monitors, checking systems, subsystems, weather patterns, and so on—all to make sure that, when the chief gives the order, the big hunk of steel sitting on the launch pad is able to take off without a glitch. You may not be igniting hundreds of thousands of pounds of rocket fuel when you press play on your DVD-player remote, but you are trying to launch your home theater system, and you usually want it to happen without too many hang-ups. The main component that controls this process is the pre/pro, or preamp/ processor. This is the subject of our latest Boot Camp in the series explaining the technical measurements that accompany our product reviews.
A pre/pro acts as command central for your home theater system. All source-component signals are routed here, where they're decoded, processed, and then sent to the amplifiers, speakers, and video display.
The preamp/processor is the center of your home theater system and is a combination of two products: the preamp and the surround decoder. A receiver is essentially a preamp, surround processor, AM/FM radio, and amplifier built into the same box. All of your sources connect to the preamp (or the preamp portion of a receiver), which routes multiple signals to the processor and then to the amplifier. The processor decodes Dolby and/or DTS signals, and it might use ambience synthesis to turn two-channel audio signals into 5.1 channels. Also, most systems require the pre/pro to perform the functions of an electronic crossover, routing the bass away from the satellites and to the subwoofer. These signals are then fed to the appropriate amplifiers and speakers. Since all signals are passing through the preamp and being processed by the surround decoder, we want to make sure the signal passes through without degradation and is decoded correctly.

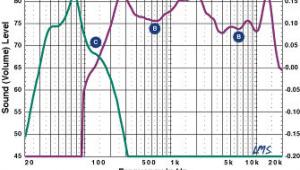
Our pre/pro measurement chart shows the frequency response of the Dolby Digital processor. A perfect response would be a flat horizontal line across the chart. Note: The subwoofer response will always fall off around 100 hertz.
As with nearly every component, our first test for a pre/pro is frequency response. In this case, we start by looking at the frequency response of the surround decoder's digital processor. This is the chart that's shown in the measurements box. We then measure the frequency response of the analog inputs. Although we often measure the response of a receiver's pre/pro section, we print a chart of the receiver's amplifier power output and describe the frequency response in the measurement text. Some receivers don't offer jumpers for the preamp output and main-amp input and are therefore only measured through the entire signal path.
 |
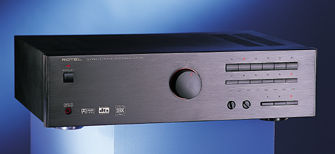
| A receiver is a component that combines a pre/pro with amplifiers and an AM/FM tuner. We measure them just as we do separate preamps and separate amplifiers. |
The only channel that won't appear as a straight horizontal line is the subwoofer, or LFE output. This channel is limited to only the low frequencies and rolls off above 100 hertz or so. The Dolby Digital specification reads that the LFE channel should be -3 dB somewhere between 80 and 120 Hz.

Measurement differences between pre/pros are usually subtle. Compared with the chart on the previous page, this unit has a flatter response that rolls off slightly at the top end, although the subwoofer output rolls off sooner.
Another test of pre/pros is total harmonic distortion plus noise, or THD+N. This measures the amount of noise—such as hiss or hum—and harmonics added to the signal between the input and the output, and it's most important in the analog domain. It's the same test we perform with amplifiers. As I mentioned last month, we input a 1-kilohertz sine wave and measure the output's harmonics (or multiples of that signal), which would be at 2 kHz, 3 kHz, 4 kHz, etc., as well as the amount of noise. Harmonics tend to change the tonal characteristics of the sound. In a musical instrument, this is good; in a pre/pro, it's not. In the latter case, the lower the measurement, the better. The Audio Precision System 2 test equipment we use performs this test at selected frequencies from 20 Hz to 20 kHz and simultaneously filters out the test signal itself at every given frequency, allowing a measurement of just the resulting distortion and noise.
Two important tests we'll be adding soon are crosstalk and signal-to-noise ratio. Crosstalk is a measure of how much of one channel's signal leaks into another. We don't want left-channel information, for example, to be heard from the right-channel output. With a sine wave at a known level fed to one channel, we measure how loud that signal is in the other channel. The lower the number, the happier we are. Signal-to-noise ratios indicate how much static, hiss, and hum you might hear added to the background of your movie or music soundtrack, assuming the noise wasn't recorded in the track to begin with. Again, we input a sine wave (our measurement engineer's favorite tune) and measure how much signal (in dB) there is at the output, compared with how much noise (information that wasn't in the original signal).
Since signals from all of your equipment most likely go through a preamp, receiver, or processor of some sort, you certainly want to make sure that those signals can make it through without unintended adulteration. Our measurements should help indicate which products accomplish this and which don't. As always, there are elements of sound quality that may not be definable in readily measurable terms, but at least you'll know the basics are right.
- Log in or register to post comments


| Displays Electronics Speakers | Sources Other Gear Software | Top Picks of the Year Top Picks | Custom Install How To Buy How To Use |
Tech 101
|
Latest News Features Blogs | Resources Subscriptions |
WHERE TECHNOLOGY BECOMES ENTERTAINMENT
 © 2024 Sound&Vision
AVTech Media Americas Inc., USA
All rights reserved

